Hello Steemit friends ❤️,
Welcome to my post and hope you are doing good today! 🌞
Today I will share a easy way for you to create your name or own watermarks on steemit or your photos.
I believes all of you can do it! It is the simplest tutorial ever.
歡迎來到我的帖子,大家好!🌞
今天會向大家介紹如何在照片上加Steemit 用戶名字或水印。
What is watermark? 什麼是水印?
When it is on paper: Watermark is a faint design made in some paper during manufacture that is visible when held against the light and typically identifies the maker.
When it is on digital: Watermark is a logo or signature that placed on the picture or photos to identifies the file's copyright information. You will need a png image to placed it above your photos. ( A watermark logo is placed on the left-top corner of my cover image above.)
當它在紙上:水印是在製造過程中在某些紙張中製成的不明顯設計,在與光線相對照時可見,並通常識別製造商。
當它在數碼上:水印是放置在圖片或照片上的標誌或簽名,用於標識文件的版權信息。 您將需要一個png圖像將其放在照片上。(我上面封面圖片的左上角放了水印標誌)
Here we come 2 simple methods to create your watermark on Steemit's photos:
這裡我們來介紹兩種簡單的方法來創建Steemit照片上的水印:
- Text-watermark 文字水印
- Logo-watermark 標誌水印
Method 1) Create your text-watermark
方法1)創建文字水印
Step 1: Open below link and start creating the PNG-text.
步驟1:打開下方的鏈接並開始創建PNG文本。
免費在線PNG文本創建

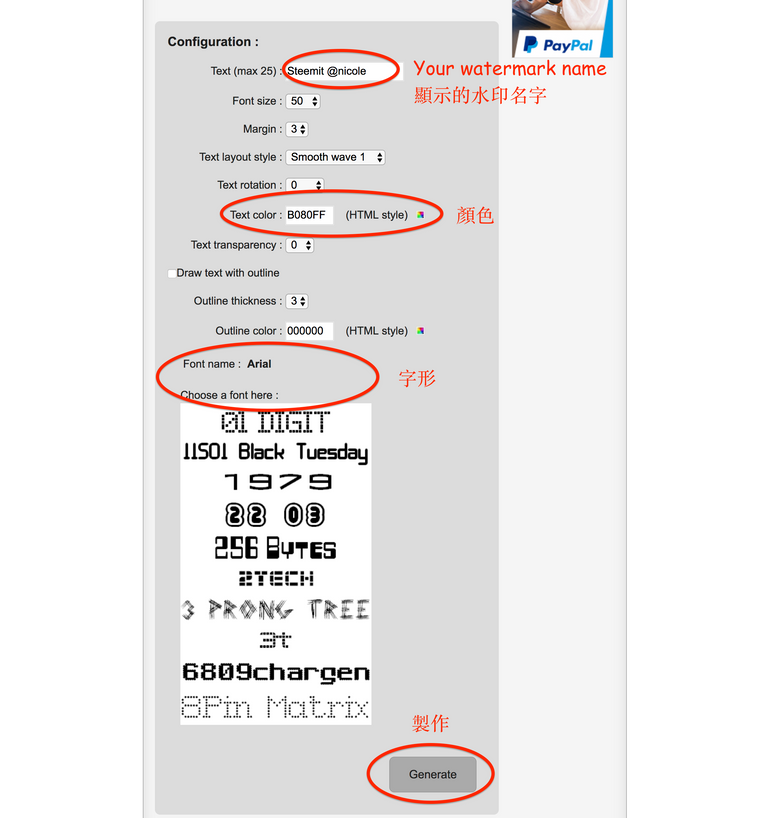
Step 2 : Scroll down the page and enter the information according to your favours.
Enter the text, color, fonts.
步驟2:向下滾動頁面,並根據您的喜好輸入信息。輸入您想 顯示的水印名字,字形,顏色。
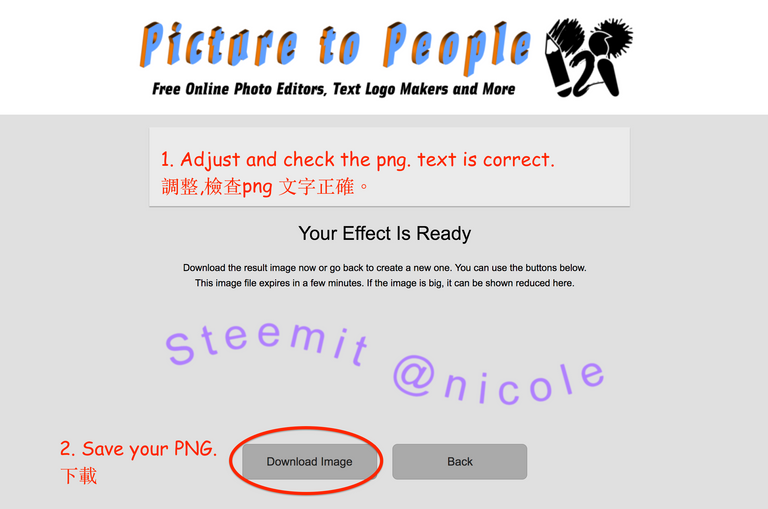
Step 3 : Check your text is correct, if not go back and adjust it. Download and save. DONE!
步驟3:檢查您的文字是否正確,否則回去調整。 下載並保存。完成!
2) Create your own logo to watermark
創建自己的標誌水印
Step 1: This is a tutorial for beginners or non-designers. Designer please close the tab right now! :P
步驟1:這是初學者或非設計師的教程。 設計師請立即關閉這帖子!:P
Step 2: Draw your own logo and take the picture clearly.步驟2:繪製自己的標誌,並清晰地拍照。
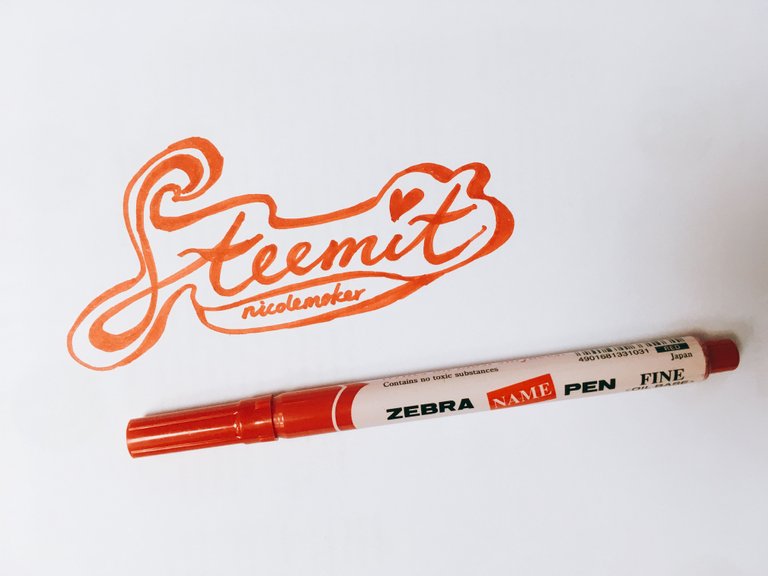
步驟2:繪製自己的標誌,並清晰地拍照。
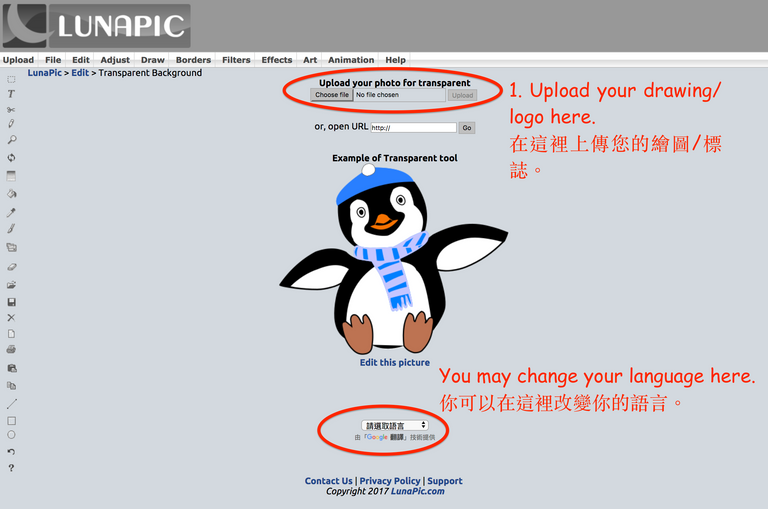
Step 3: Open below link and start creating the PNG-logo.
步驟3:打開下方的鏈接並開始創建PNG標誌。
免費在線PNG標誌創建
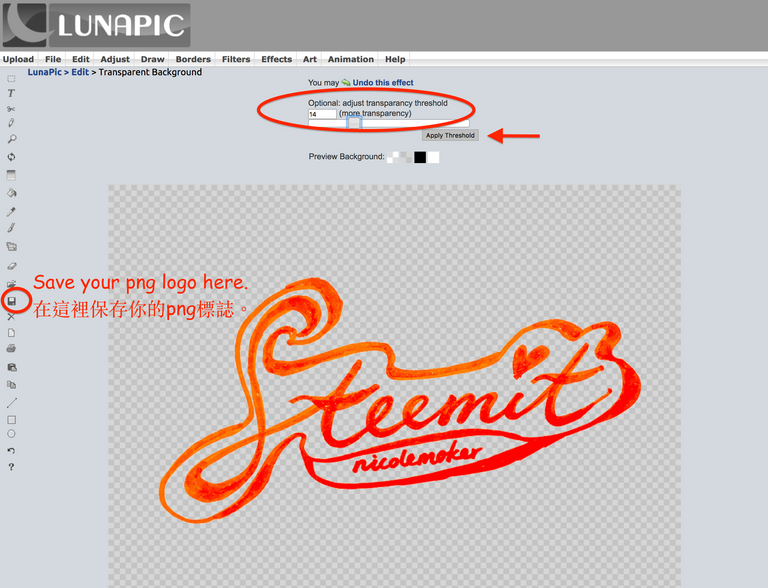
Step 4: Remove the background by clicking the color. Tips: If you need a white logo, draw it on black paper.
步驟4:點擊顏色刪除背景。 提示:如果您需要一個白色標誌,請將其畫在黑色紙上。
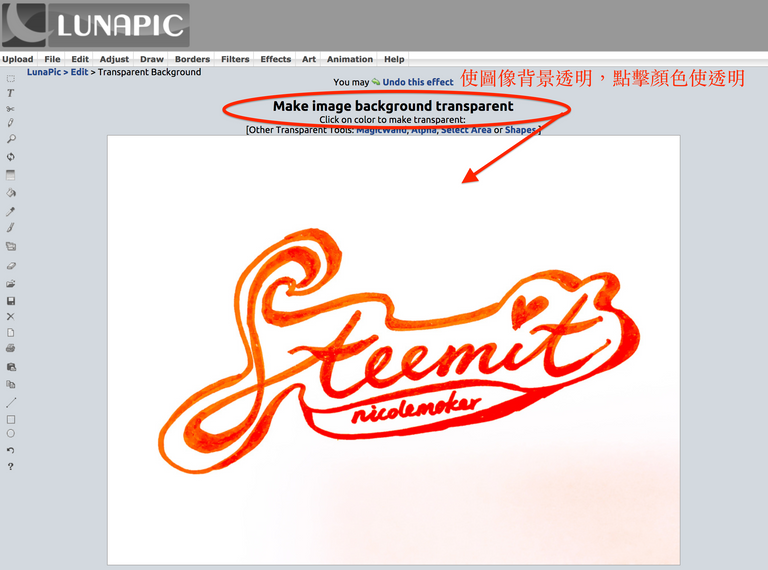
Step 5: Adjust the transparency threshold. Save it. DONE!
步驟5:調整透明度閾值。下載你的png標誌。完成!
If you have any questions about creating PNG or watermark, please feel free to ask me ❤️
Please tell us if there is any easier way you think it is good, don't hesitate to share in the comments box below!
如果您對創建PNG或水印有任何疑問,都可以留言問我呀 ❤️
你亦可以推介你認為好用的方式給大家~ 請你把好東西分享到下面的留言區~
👆🏻Upvote & Follow Nicole! 👆🏻




Dear friends,
This tutorial is created for steemian or blog beginners.
For professional users or designers, I believed that you can create better logo or watermarks on design software likes photoshops or illustrator:)
Please let us know if there is easier way for beginners too!
Thank you 💓💓
此教程為初學者或普通steemain 而設。
對於專業用戶或設計師,我相信你們有更好的技巧和方法,如果你們有更簡單的製作過程,請在下面分享給大家! 謝謝💓
Thanks for letting us know!
老師好~可以發一貼教有圖騰的Logo 嗎?
像下方有花邊那種~
搬椅子坐好了!(托腮)
有reference 看看? 😊
i usually use photoshop & illustrator to create my logo/watermark
Good idea. I'm using Ink Scape.
Ahhh ic, Actually u can do almost anything with photoshop and illustrator
I use Ai and Ps too :)... but it is not easy for steemain to create their logo/ watermark on professional software
It is a very good post
WOW thanks dear... u shared such a wonderful and useful information.. will try to follow the instructions and create one!
Nice:p have a try!
sure :) :)
手殘的我就是可憐...
This is a new and good tutorial we can learn from, especially for new starters of Steemit. Creating our own logo adds variety to our post.
Thank you Nicolemoker for introducing us another way of making and designing the logo. I will give you a BIG thumbs up for this! I shared it to the universe! Keep up!
Wonderful, I gotta make my own flashy handle. Thanks :)
Wow, great idea logo is extremely beautiful👍! We are thrilled to have you on our team and this is exactly why we need you followed you wish you the same:).
Nicole 先生,等上 advance 課!🙋🏻♂️🙋🏻♂️🙋🏻♂️
You made the world better !!!
nice
interesting...let me try~
i can make gif image or logo. thats free for you
i can other models GIFmaybe you want i make special watermark for you @nicolemoker
you can sample in this post link
https://steemit.com/art/@arie.steem/ramengirl-my-appreciation-design-gif-image
新技能get了,果断转走
謝謝你,希望對大家有用:)
好详细的教程!😊
Great Tutorial. I just knew some other tools so far but this one actually seems to be really easy to use.
Yes! I had did lots of research for doing beginners tutorial :p ( I'm using illustrator indeed... haha
学习了!加上水印显得高大上了很多!
简洁明了,很有用的教程👏
It is a very good post. I will refer to it soon.
谢谢你这一系列教程,非常实用
Fantastic! i am happy to see something like this. great work!
Very nice tutorial @nicolemoker.. follow me @toffer to get more tutorial..
Wow so cool, me too i need some! Ty
可以幫我設計一個屬於我的水印嗎?
thanks for ur information really helpfull post
This is one of the best post tutorials I've seen in steemit ... Explained super good, super simple, and too useful for all !! ... Soon I will do my png logo.
Greetings from Venezuela! Thanks for sharing your knowledge with us @nicolemoker
Thank you :p please let me know how's your logo looks like!
Nice post
Upvote & Follow! :)Thank you @nicolemoker! This is a very usefull tutorial! Great!
It's really simple and I'll try it too. I thought in the beginning that you would explain working in Photoshop :D
天才美女啊!渴望得到您的支持是最大荣幸!
Thanks, very helpful!
Congratulations @nicolemoker! You have completed some achievement on Steemit and have been rewarded with new badge(s) :
<p dir="auto"><a href="http://steemitboard.com/@nicolemoker" target="_blank" rel="noreferrer noopener" title="This link will take you away from hive.blog" class="external_link"><img src="https://images.hive.blog/768x0/https://steemitimages.com/70x80/http://steemitboard.com/notifications/votes.png" srcset="https://images.hive.blog/768x0/https://steemitimages.com/70x80/http://steemitboard.com/notifications/votes.png 1x, https://images.hive.blog/1536x0/https://steemitimages.com/70x80/http://steemitboard.com/notifications/votes.png 2x" /> Award for the number of upvotes <p dir="auto">Click on any badge to view your own Board of Honor on SteemitBoard.<br /> For more information about SteemitBoard, click <a href="https://steemit.com/@steemitboard" target="_blank" rel="noreferrer noopener" title="This link will take you away from hive.blog" class="external_link">here <p dir="auto">If you no longer want to receive notifications, reply to this comment with the word <code>STOP <blockquote> <p dir="auto">By upvoting this notification, you can help all Steemit users. Learn how <a href="https://steemit.com/steemitboard/@steemitboard/http-i-cubeupload-com-7ciqeo-png" target="_blank" rel="noreferrer noopener" title="This link will take you away from hive.blog" class="external_link">here!Great to see tutorials for alternative methods. I know many especially that do not work in photo/design industries may not have access to standard tools like Photoshop or Illustrator that does these with breeze.
Thanks lot!
This tutorial about watermark is very interesting.
Upvote and follow you next post !
Thanks
Good job
Your post was mentioned in the hit parade in the following category:Congratulations @nicolemoker!
thank you so much for this:) I'm a total beginner but this is extremely helpful !!
But your tutorial was so great too, thank you!! :Dwooow so great!!! I personally use PicMonkey @nicolemoker for my logo!!!!
wish you an amazing weekend!
不错的教程,感谢分享~~~
Great idea. Easy to follow, good for everyone.
Hey, nice tutorial. I was usually making my watermarks in photoshop, but as I have already driven away from graphics and I don't have it installed anymore this is a nice way as well. Thanks for sharing this, I'm sure it will come in handy :)
改天來試用看看 :D
受用