Happy monday everyone!
I had intended to publish the second part of my Highland Coo head tutorial last week, but I ended up spending a week in the beautiful Western Isles for work, which didnt leave a lot of time for internet! I did finish the Coo though, and he is on his way to his new home now.
At the end of the Part 1 tutorial, we had crocheted the main head part, and the back panels, stuffed the head and made the circle for hanging to the wall. In this part, I will go over making the facial features, sewing together and attaching the hair, so lets get started!
There are several bits to the face that are crocheted separately then sewn on. The muzzle is the next logical section - the three sections below make up the nose and lips. the left piece is the lower lip - this is standard dc increases to form a circle, with a few rows of straight dc around. This is sewn to the end of the head so that the top edge sits at ~row 6 on the head.
.jpg)
A small amount of stuffing is required to give the mouth some extra shape.
.jpg)
The middle piece is the upper lip - again this is a simple dc increase circle (slightly bigger than the lower lip). the piece is then flattened and joined with slip stitches, and this is sewn on so that the bottom edge sits approximately half way down the lower lip. The pattern suggests using the joined edge along the bottom, but I actually find this edge much easier to sew straight along the top edge of the lower lip, so I turn mine upside down.
.jpg)
The third piece (right) is the nose, and really gives the face character. This piece is worked in the round again, but is a flat shape. A small amount of stuffing is added, and it is sewn onto the top edge of the upper lip. The lower edge is sewn to the bottom of the upper lip. This creates the iconic nose and muzzle of the Heeland Coo :)
.jpg)
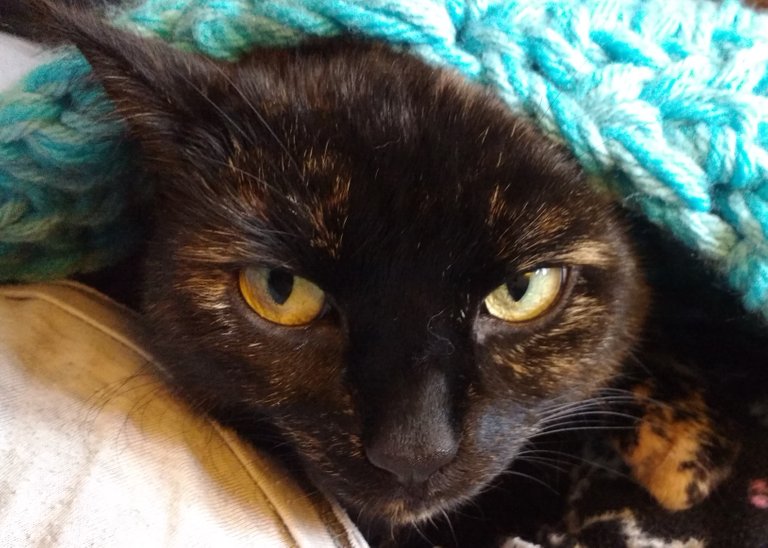
The ears and eyes are crocheted as separate pieces, then sewn onto the face.
.jpg)
Once the muzzle is complete, its a good point to hang the Coo up and pin on the rest of the facial pieces. I position the ears and eyes, make sure that they are aligned and straight, before sewing them in position.
.jpg)
Other details such as eyelashes can be added at this point:
.jpg)
Now that most of the pieces are sewn on its time to add the fringe hair! Any colour way could be used here - Ive used a combination of teal, pink and gold. I have a piece of card that I use as a template to wrap my yarn around, so that I get relatively even lengths of each colour. You will need a lot of each colour (~1.5-2 balls). Take ~28cm lengths of each shade, then fold in half. Insert the hook through a stitch and draw the yarn loop through, then weave the loose ends through the loop and pull to tighten. I start at the front centre of the edge of the head, next to where the base is attached and work a 'fringe' stitch every 3 stitches. You can pack the stitches closer together to give a more dense hair in places if you choose.
.jpg)
The fringe should be continued up the side of the head to approx the level of the ears. I normally complete the front fringing, then will attach the horns, before finishing off the head. This ensures that you have everything placed before going to the effort of adding the fringing! The front of the head fringe is longer, so I increase the lengths of yarn to ~35cm - this gives the floppy haired look when its finished!
So the final pieces to crochet are the horns. The horns of Highland Cows are very long, so I have been experimenting with wiring to give them some support.
.jpg)
.jpg)
The horns are stuffed as you go along - make sure and stuff firmly, as will impact the way they sit once all attached to the head. Sew around above the ears, pushing more stuffing into the base.
Attach fringing around the horns and ears, using the longer lengths from the peak of the head to the back base, so that hair falls around the face.
The finished fringing can be left to look naturally ragged, or it could be trimmed to be more even - I prefer the natural look.
.jpg)
That completes the How to make a Heeland Coo - hopefully it inspires someone to have a shot :)
Goodbye from me and my crochet buddy :)
That's incredibly detailed and such a fun creation! I'm going to have to go back to post one now.
Thank you for expanding on the process @kimbolo86! I think it’s so neat seeing how every added piece gives it more character. That nose and muzzle looks so awesome! It’s also neat how adding stuffing makes a huge difference. This is such a massive project to take on and you do it well. 😊
You just planted 0.05 tree(s)!
We have planted already 4505.90 trees
out of 1,000,000
Let's save and restore Abongphen Highland Forest
in Cameroonian village Kedjom-Keku!
My Steem Power = 20558.38
Thanks a lot!
This is so cool!! I wish I was decent at crochet, I might try it. Purrs to your crochet buddy! <3
haha! I like your crochet buddy! Looks like alot of help there..lol. Hey this post is so cool, I don't know how to crochet but it is so interesting to see the individual pieces done and not knowing what the total image will be when they are all put together and then wow! It really is a Highland Coo!
Very good instructions and details for all the phases so great job!
Do you specialize in crocheting animal figures or do you do anything you feel like?
Aw thanks :) my wee puss certainly keeps me company even if shes more a hindrance - she likes to chew my yarn :) i like to do whatever patterns appeal to me really - i dont usually like doing lots of the same thing, because i get bored, but the animal heads are great as they come out a little different each time. Ive done some clothing but i love the animals and figures much more!
well you're very talented so thank you!
Wow! This looks amazing, so you made thins with crochet, some yarn, and stuffing? It's incredible! I think I do love the more natural one too (well, I dunno how it will look when trimmed but I like it this way).
Somehow, the "background color" looks different in the final photo (is it orange or red?). I do think your work is amazing, not sure I will ever be able to pull this off (well, maybe not as good as yours) but it was definitely a pleasure reading through this...
Ah yes the base is a copper colour - it looks different in varying light! You should give it a go - the pattern is very easy to follow :)
At first I looked on the topmost photo and thought "hmmmm, why is she crocheting boobs!!?" Then I had a laugh and understood, that these were the starting point for the big eyes of your adorable cow :-D
Wonderful project <3
this post.Hello 😊 I wondered if you would like to take part in the #needleworkmonday voting circle? You can find out more about it in
It looks really sculptural, @kimbolo86 - thanks for sharing the process photos !
Hi kimbolo86,
Visit curiesteem.com or join the Curie Discord community to learn more.
Hi kimbolo86,
Visit curiesteem.com or join the Curie Discord community to learn more.
That is a very cute head <3. I really like the horns and its colourful hair, and I also enjoy that you put a lot of tips and advice along with many photos in this post.
Congratulations on your first curie vote. I hope you will keep showing us these wonderful and lovely artworks of yours ^_^.
Aaawwww.. so cute @kimbolo86. The snout looks so realistic!! Love it! Will you be making the body and legs too? Love the funky hair :)
You made me think of my mom. She always made these kind of handmade decorations and toys for us. She is very good with that. I'm completely useless.
You are so creative. The color combination of the hair is very cheerful and I like how you split different colors so that all fits perfectly.
Thank you for sharing! Your instructions are so detailed!
Very creative done, I love crochet myself and have done such a small toys such as chicks for Easter and blankets for baby of my friend. I think such a large toy with complex features needs good skills and also a good preparation so that you do not crochet them but due to too large or small sizes have to re-do, I do it on and off. I love your creation, beautifully done and great deco!
It's funny that I thought of coo as murmuring or something so I was wondering what will come out of that as crocheted product. 😂
But kidding aside, I gasped wow when I got to the end and saw the end product. That is a very good and colorful wall décor! Few months ago I brought home a carabao's horn which I planned to use as wall décor. With this art, I got an idea for the carabao's crocheted head to match the horns. Thank you for sharing this! 😊
This is something different, I admire your passion for this occupation so admirable that it does not cease to be art. It's fantastic has some children's imagination that makes it even more beautiful. I'm glad you shared it.
LF
My arthritic hands hurt just to look at this! I went back to your earlier post as well, and this is lovely work. Excellent color scheme too :)
Congratulations @kimbolo86! You have completed the following achievement on the Steem blockchain and have been rewarded with new badge(s) :
<p dir="auto"><a href="http://steemitboard.com/@kimbolo86" target="_blank" rel="noreferrer noopener" title="This link will take you away from hive.blog" class="external_link"><img src="https://images.hive.blog/768x0/https://steemitimages.com/70x80/http://steemitboard.com/notifications/payout.png" srcset="https://images.hive.blog/768x0/https://steemitimages.com/70x80/http://steemitboard.com/notifications/payout.png 1x, https://images.hive.blog/1536x0/https://steemitimages.com/70x80/http://steemitboard.com/notifications/payout.png 2x" /> Award for the total payout received <p dir="auto"><sub><em>Click on the badge to view your Board of Honor.<br /> <sub><em>If you no longer want to receive notifications, reply to this comment with the word <code>STOP <p dir="auto"><strong><span>Do not miss the last post from <a href="/@steemitboard">@steemitboard: <table><tr><td><a href="https://steemit.com/steemitboard/@steemitboard/steemitboard-ranking-update-steem-power-followers-and-following-added" target="_blank" rel="noreferrer noopener" title="This link will take you away from hive.blog" class="external_link"><img src="https://images.hive.blog/768x0/https://steemitimages.com/64x128/https://cdn.steemitimages.com/DQmfRVpHQhLDhnjDtqck8GPv9NPvNKPfMsDaAFDE1D9Er2Z/header_ranking.png" srcset="https://images.hive.blog/768x0/https://steemitimages.com/64x128/https://cdn.steemitimages.com/DQmfRVpHQhLDhnjDtqck8GPv9NPvNKPfMsDaAFDE1D9Er2Z/header_ranking.png 1x, https://images.hive.blog/1536x0/https://steemitimages.com/64x128/https://cdn.steemitimages.com/DQmfRVpHQhLDhnjDtqck8GPv9NPvNKPfMsDaAFDE1D9Er2Z/header_ranking.png 2x" /><td><a href="https://steemit.com/steemitboard/@steemitboard/steemitboard-ranking-update-steem-power-followers-and-following-added" target="_blank" rel="noreferrer noopener" title="This link will take you away from hive.blog" class="external_link">SteemitBoard Ranking update - Steem Power, Followers and Following added <blockquote> <p dir="auto">Support <a href="https://steemit.com/@steemitboard" target="_blank" rel="noreferrer noopener" title="This link will take you away from hive.blog" class="external_link">SteemitBoard's project! <strong><a href="https://v2.steemconnect.com/sign/account-witness-vote?witness=steemitboard&approve=1" target="_blank" rel="noreferrer noopener" title="This link will take you away from hive.blog" class="external_link">Vote for its witness and <strong>get one more award!Congratulations @kimbolo86! You received a personal award!
You can view your badges on your Steem Board and compare to others on the Steem Ranking
Vote for @Steemitboard as a witness to get one more award and increased upvotes!