안녕하세요. @jwsohn입니다. 오늘 포스팅에서는 리눅스에서 프로그램을 개발하는 방법을 간단한 예제를 통해서 알아보겠습니다. 오늘 강좌를 통해서 리눅스 상에서 프로그램 개발이 왜 편리한지 직접 경험해 보실 수 있는 계기가 되었으면 좋겠습니다.
프로그램 만들기
어떤 컴퓨터 언어를 배우더라도 제일 처음에는 소위 "Hello, World!" 프로그램을 작성합니다. 단순히 "Hello, World!" 메세지를 화면에 출력하는 프로그램인데요. 이를 통해 해당 컴퓨터 언어의 특성을 간단히 한 눈에 볼 수 있기 때문입니다.
일단 리눅스에서 바로 사용 가능한 다양한 언어로 "Hello, World!" 프로그램을 만들어 보겠습니다. 우선 여러분들이 학교 전산소 같은 곳에서 리눅스 서버 계정을 하나 준비했다고 전제하겠습니다.
Python
hello.py
#!/usr/bin/env python

print "Hello, World!"
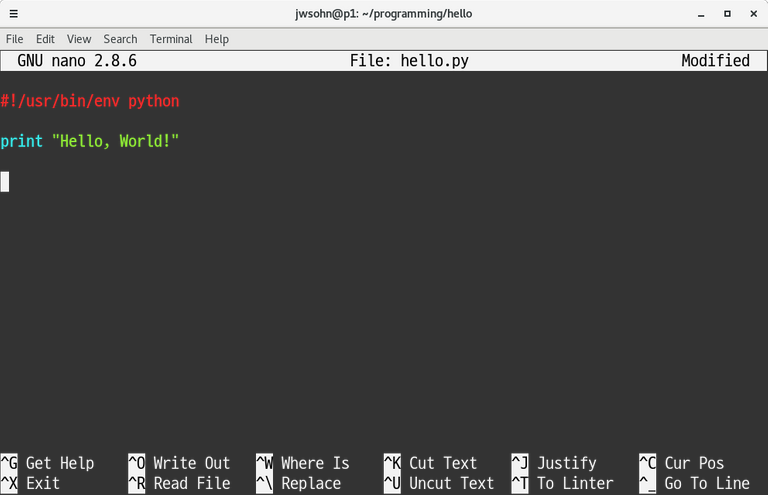
제일 먼저 파이썬(Python) 언어로 Hello, World!를 출력해 보겠습니다. 가장 처음 해야 할 것은 리눅스 서버에 MobaXTerm과 같은 터미널 에뮬레이터에서 접속을 한 다음 에디터를 이용해서 hello.py 파일을 작성해야 하겠습니다. 아직까지 vi나 emacs 에디터를 배우지 않은 관계로 간단한 nano 에디터를 이용해 편집을 해 보겠습니다. 리눅스 명령어 프롬프트(command prompt)에서 다음 명령을 입력하고 엔터키를 누르면 되겠습니다.
nano hello.py
그리고 다음 화면과 같이 hello.py 프로그램을 입력해 봅시다. 입력이 끝난 뒤 Ctrl-X 키로 파일을 저장하고 nano 에디터를 종료하면 다시 리눅스 명령어 프롬프트(shell이라고 합니다)로 돌아옵니다.

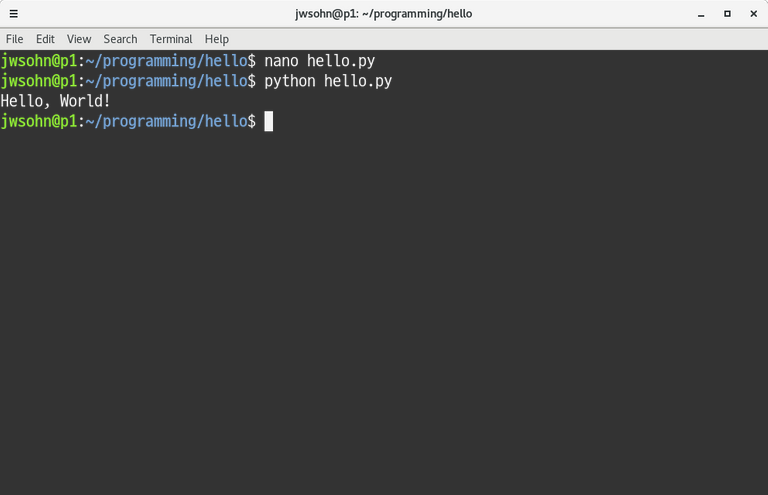
hello.py 파이썬 프로그램은 다음과 같이 실행시키면 됩니다. 간단하죠?
python hello.py
그러면 다음 화면과 같은 출력을 얻을 수 있겠습니다.

C
hello.c
#include <stdio.h>

void main()
{
    printf("Hello, World!\n");
}
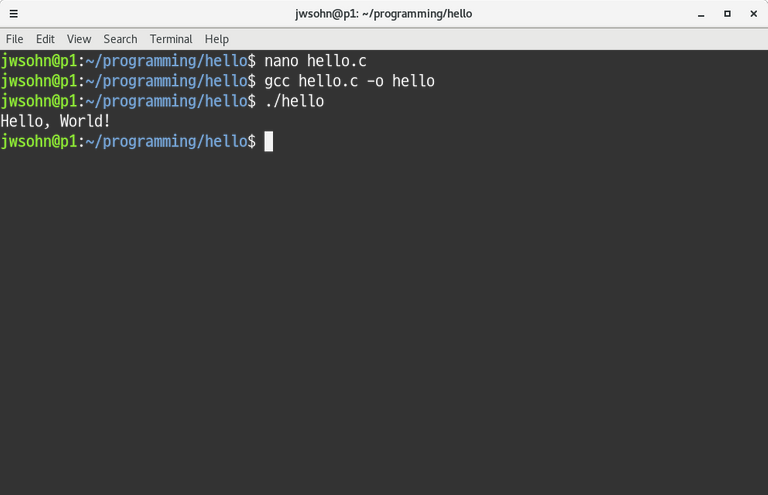
C 언어로 만든 Hello, World! 프로그램은 실행 파일을 만들기 위해서 컴파일(compile) 과정이 필요합니다. 여기서 컴파일이란 hello.c 소스 코드 (source code)를 CPU가 직접 실행할 수 있는 기계어 (machine language)로 번역을 하는 과정입니다. 리눅스에서는 gcc가 대표적인 C 언어 컴파일러(compiler)가 되겠습니다. 아까와 마찬가지로 nano 에디터로 hello.c 프로그램을 편집하고 다음 명령을 실행합니다. -o 옵션(option) 뒤의 hello는 실행파일의 이름을 hello로 하겠다는 의미입니다.
gcc hello.c -o hello
실행은 아래와 같이 합니다. hello 앞의 ./는 현재 디렉토리라는 의미입니다.
./hello
화면 캡춰도 한번 보시지요.

Java
HelloWorld.java
public class HelloWorld
{
    public static void main(String[] args)
    {
        System.out.println("Hello, World!");
    }
}
자바(Java) 언어도 C의 gcc와 마찬가지로 javac 컴파일러로 프로그램 컴파일 과정을 거칩니다. 다만, C와는 달리 자바는 java라는 명령어를 이용해서 컴파일된 프로그램 실행을 시킵니다. 그런데, 이것은 어떻게 보면 제일 처음 본 python hello.py와 비슷하지요? 자세한 이유는 프로그래밍 언어 수업 시간에 배우시기 바랍니다. :)
자바의 경우는 소스 코드의 파일 이름이 독특합니다. hello.java로 할 수 있으면 좋을 텐데 자바에서는 class 이름과 소스 코드의 이름이 똑같아야 하는 제한이 있습니다. class 이름을 HelloWorld로 줬기 때문에 소스 코드 파일 이름 역시 HelloWorld.java로 해야 하겠습니다.
컴파일:
javac HelloWorld.java
실행:
java HelloWorld
Perl
hello.pl
#!/usr/bin/env perl

print "Hello, World!\n";
파이썬과 더불어 스크립트(Script) 언어로 각광받던 펄(Perl) 언어입니다. 요즘은 Python이 많이 쓰이는 관계로 주춤하고 있지만 여전히 사용자층이 탄탄한 언어입니다.
파이썬이나 펄과 같은 스크립트 언어는 소스코드를 기계어로 번역하는 컴파일 과정이 필요하지 않습니다. 대신 인터프리터(interpreter)라는 프로그램을 통해서 한줄씩 명령을 읽고 수행합니다. 위의 파이썬의 예에서는 python이 인터프리터가 되겠구요. 여기서는 perl이 인터프리터가 되겠습니다.
실행:
perl hello.pl
LaTeX
hello.tex
\documentclass[a4paper]{article}

\begin{document}
Hello, World!
\end{document}
LaTeX은 pdf 문서 조판 시스템입니다. 그러니까 LaTeX은 문서 작성용 언어인 것이지요. LaTeX은 컴파일 과정이 있는데 결과물이 특이하게 실행 파일이 아닌 pdf 파일이 생성됩니다. 컴파일 명령부터 볼까요?
컴파일:
pdflatex hello.tex
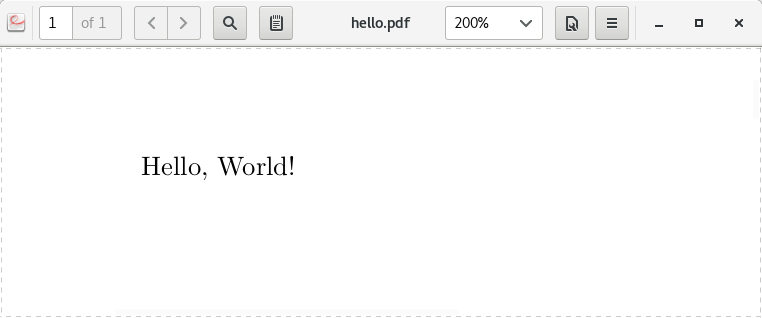
컴파일 이후 만들어진 hello.pdf 파일은 WinScp와 같은 secure FTP 프로그램으로 내 컴퓨터에 가져 와서 보면 되겠습니다. pdf 파일 캡춰도 한번 보시지요.

마무리하면서
이렇게 여기까지 간단하게 Hello, World! 프로그램을 5개 언어로 리눅스 터미널 상에서 구현해 보았습니다. 명령어 타이핑을 해야 해서 그렇지 의외로 프로그램 개발 환경이 잘 되어 있음을 보실 수 있을 겁니다. 그리고 리눅스 shell에서 명령어 문법도 일관성이 있어 어렵지 않습니다.
개발환경도 기본으로 깔려 있는 것이 많습니다. 위의 언어 중에서 리눅스 배포본만 설치하면 기본으로 깔리는 것이 Python과 Perl 입니다. 나머지 환경들도 웹페이지 같은 곳에서 다운 받아 설치할 필요가 없이 리눅스 배포본 전용 앱스토어에서 받으시면 되겠습니다. 참고로 앱 설치는 우분투 계열 리눅스 배포본은 apt install [package] 명령을, 레드햇 계열 배포본은 yum install [package] 명령을 사용하겠습니다.
다음 강좌에서는 오늘에서 조금 더 나아가 리눅스에서 LaTeX으로 문서를 만들어 보겠습니다. 굳이 LaTeX을 선택한 이유는 이미 여러분들이 SteemIt에 포스팅을 하면서 Markdown으로 문서를 작성하는데 익숙하기 때문입니다. 간단하게 하나만 LaTeX의 문법을 Markdown과 비교해 볼까요? 가장 큰 글제목인 Heading 1을 표현하는 방법입니다.
Markdown
# Heading 1
LaTeX
\section{Heading 1}
문서의 내용에 명령어로 markup을 한다는 점에서 비슷합니다. 더 자세한 내용은 다음 포스팅에서 적어 보도록 하구요. 오늘도 제 글을 읽어 주셔서 감사합니다.
저한테 필요한 강의네요. 이걸 눈여겨 볼 사람은 많지 않을 것 같습니다만... 감사합니다.
필요하시다니 감사합니다. :)
스팀아 4월을 멋지게 가보즈아!!!
4월은 스팀의 달 가즈아!
잘봤습니다 프로그램(파이썬 자바)공부중인데... jwsohn님 블로그 자주 와야겠습니다 ㅋㅋ
네. 감사합니다. 자주 놀러 와 주세요. :)
잘봤습니다. 저는 일할때 nano가 손에 잘 안익어서 vim을 쓰네요 ㅎㅎ
당연히 vim을 쓰셔야죠. 저도 vim 유저입니다.