Greetings to the community of diy hub, lovers of the creative, art, DIY and crafts, I hope you are very well, here I will be sharing with you a little wood carving sculpture in small format and its varnishing, a bust corresponding to the classical style, in this case I carve the god Janus or also known as the Janus bifronte.
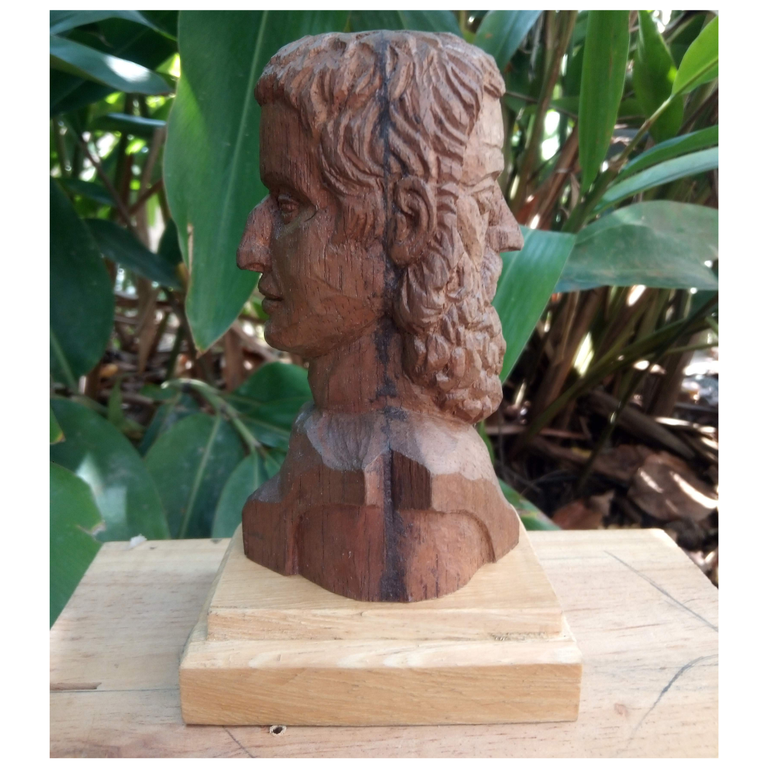
The Janus is a symbolic representation of a god with two faces, one young and one old, one looks to the future and the other to the past. He is also called the god of the door, the one who opens the door to the new year, hence etymologically the name January derives from Janus, attributed by Janus, it is understood that he is called god not by substitution to God with animated qualities (god with a lower case d refers to a representation that carries a positive message for the internal development of each individual) if you are interested in more information and to know more about Janus here I leave you a video of a monograph with very good details, so let's start with the wood carving.click
As we can see it is not easy to teach through written communication the wood carving sculpture, what we can achieve is to share our experience and show the results we achieve, besides it can be a source of inspiration for those who have the desire to start an idea, so I will show the steps I managed to take in photography because as you know when the blade touches the wood there is no stopping us, although I insist I will always strive to bring a content that is useful to all of you.

- Low density wood (soft wood)
- Knife and small gouges
- Carpenter's glue
- Sandpaper
- Sealer and varnish
- Potassium bichromate

Step 1
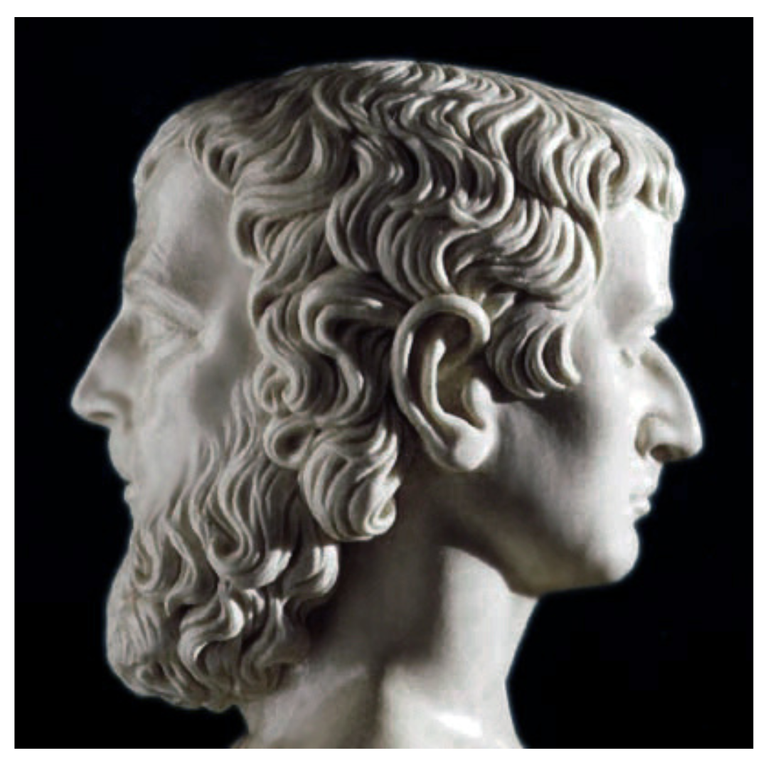
One of the things to take into account is a reference either two-dimensional or three-dimensional as in this case it is not an own sculpture but a model of an already existing one I must take into account its details.
Step 2
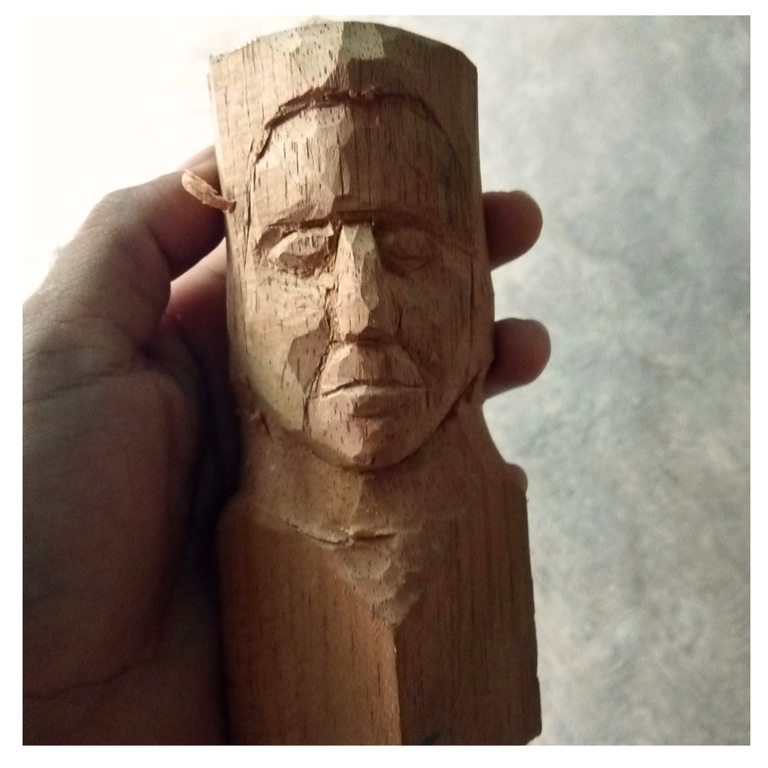
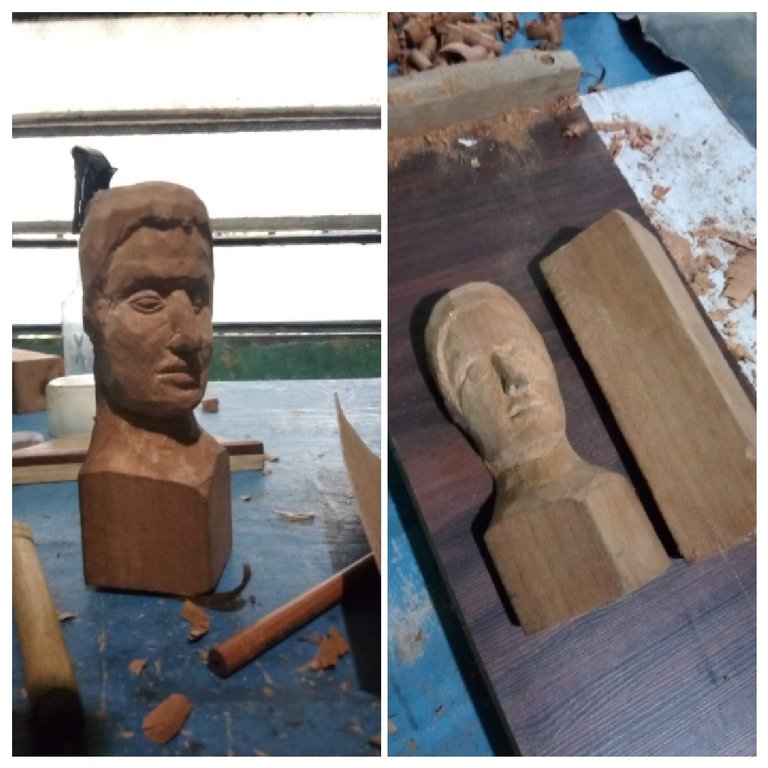
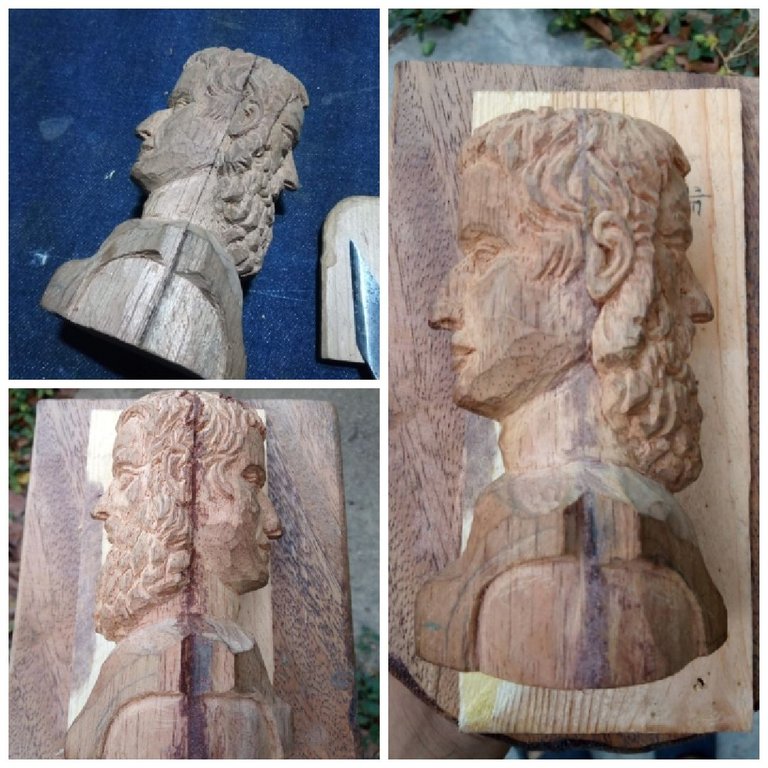
By chance I had two rectangular pieces of ceiba a very noble and soft wood, so I started to carve from one of the corners, which should be done is to go out the larger volume which will be the nose and in turn the eyes and the volume of the lips, as I always comment, the wood is talking and communicating in addition to the view of the creator is observing its shape is technique, skill and intuition.
Step 3
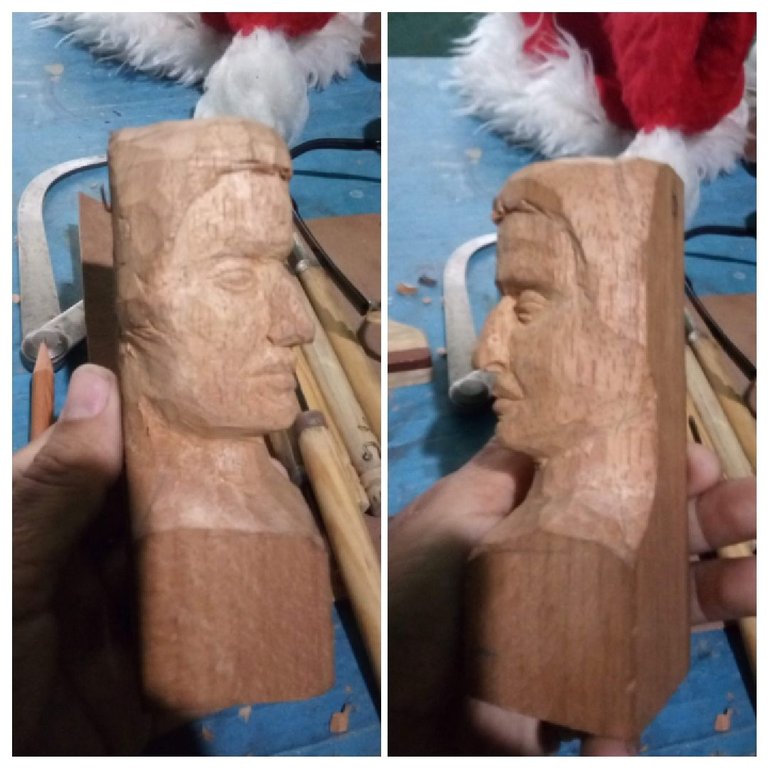
After generating the volumes, we move on to give a little detail with the intention of generating more identity to the sculpture, it is convenient that in the previous step we leave enough volume, remember that the blades must also have good edge, so that we do not make missteps when trying to remove matter and after generating force we remove much more than it was.
Step 4
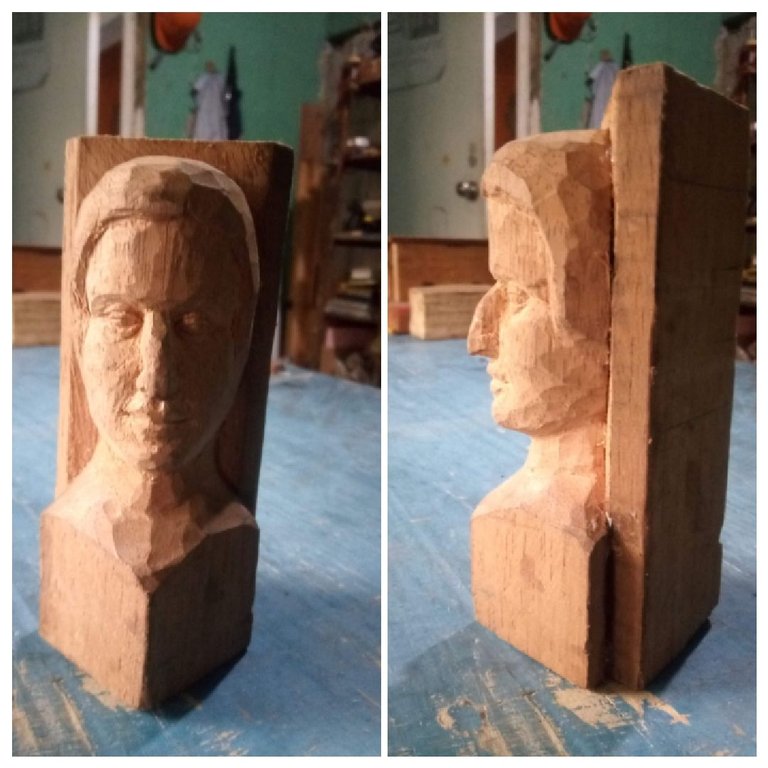
Once we have given it a certain identity almost achieved, we glue the other piece of wood, cut a little with the handsaw one of the corners and with the carpenter's plane we rectify it so that it is flat, we put glue and we press the wood.

Step 5
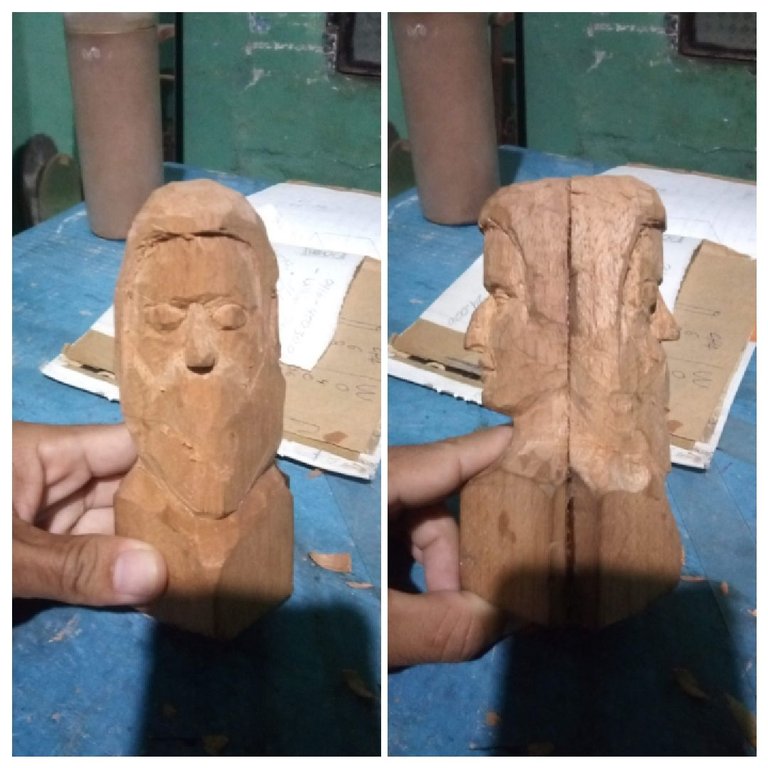
In the same way as step 2 and 3 we carve the janus of the past leaving volume for the beard, this part of the sculpture is much simpler because we would not be working the proportion of the chin and among other anatomical parts of the lower face, here my intention will be focused on the hair and the undulations of the beard as the reference with which I am this
and guiding me.
Step 6
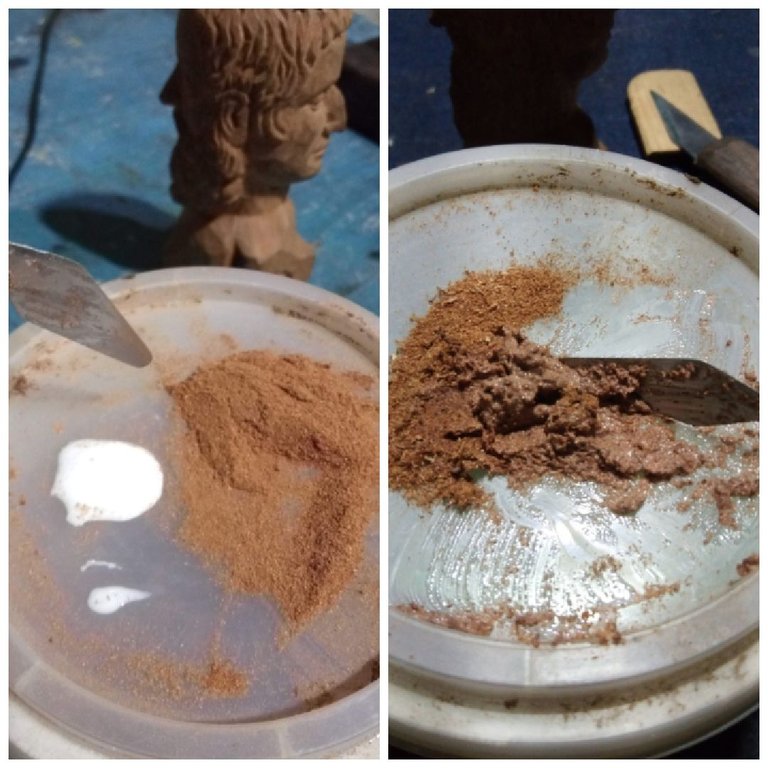
Once the sculptural details have been completed, which is a long and concentrated process, I prepare a little mastic because I have a brief opening when I join the two faces and so I leave everything level, I prepare it with carpenter's glue and sawdust of the same wood and if possible and if it has some lemon gothic, this way it is not very noticeable, the ideal is that the joints are completely flat.

Step 7
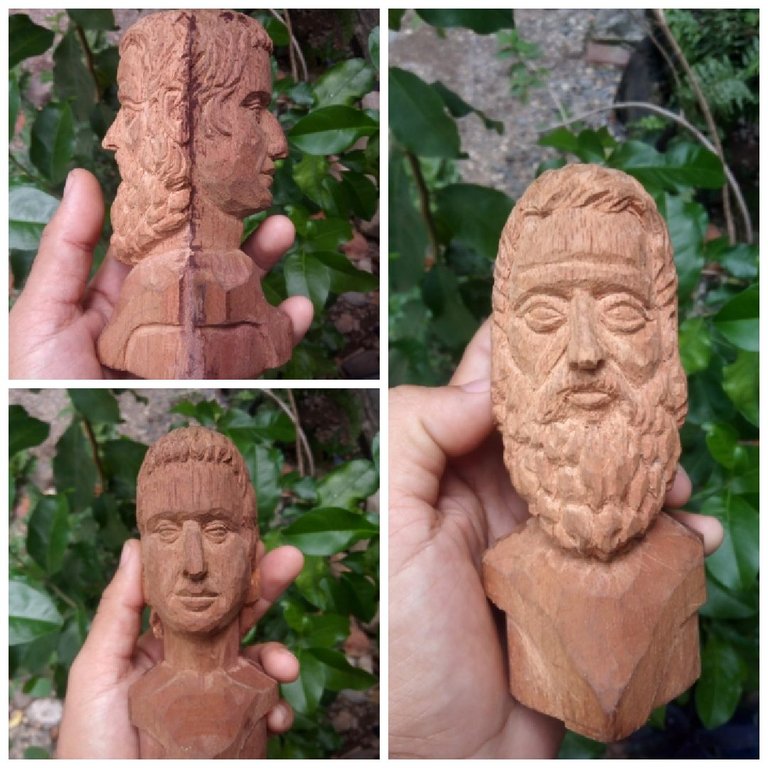
In view that I would not put colour to the piece, but leave it in a natural way, I gave a little aged with potassium bichromate a little diluted, because if we apply it pure it would be very dark, I gave two coats and I lowered a little its tone o its tone.
Step 8
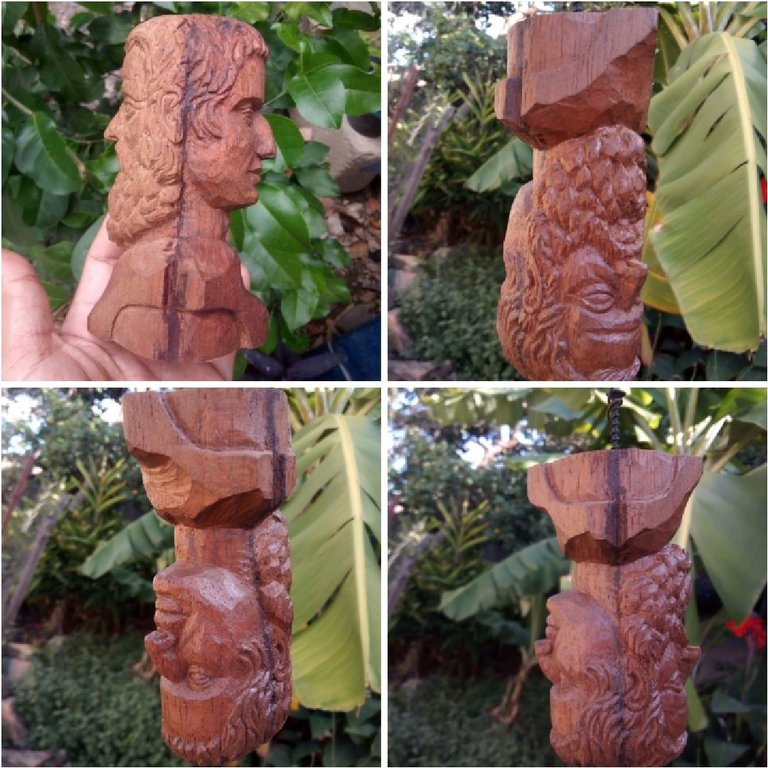
As you may have noticed I did not sand the sculpture, as my intention was to leave it with the carving marks, a bit rustic, so we applied sealer, three coats per time that is, we applied one, let it dry and so on, then the varnish and then we finished the sculpting and polychrome process.
Step 9
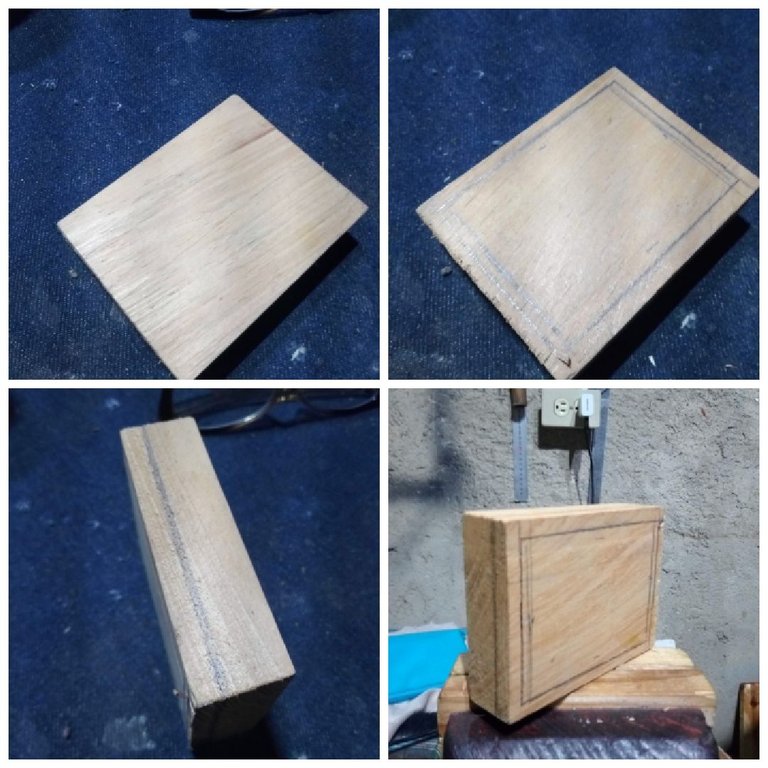
Every sculpture must have a pedestal to support it, so I placed a pine wood with some measures that would generate me stability to the piece, I made a mark on the edges to make a simple molding later.
Step 10
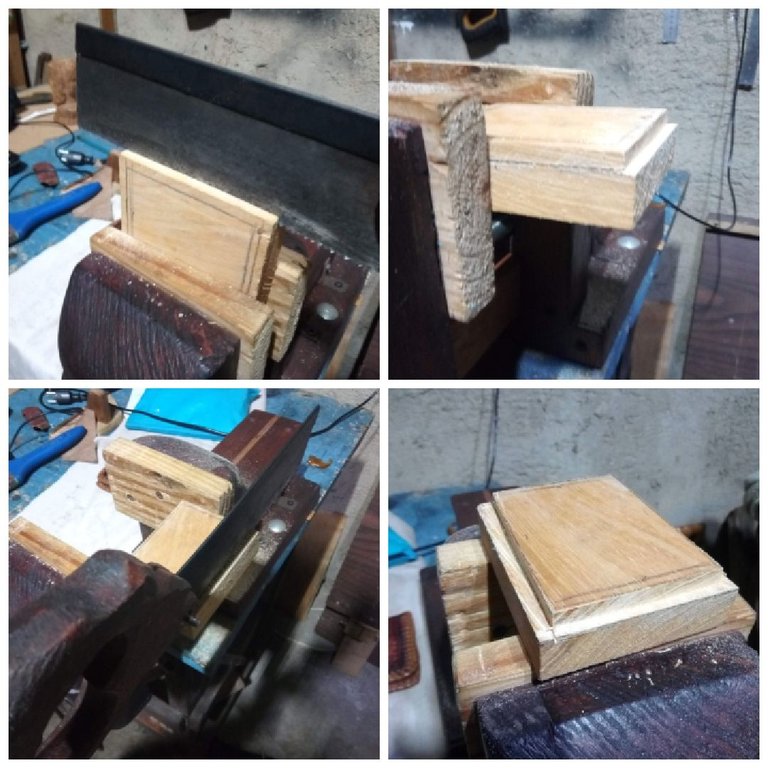
This step can be done with a router or spinning top, with a milling cutter depending on the drawing we want, but I will do it in the basic way, using a mini saw and a half-inch chisel.
and a half inch chisel.
Step 11
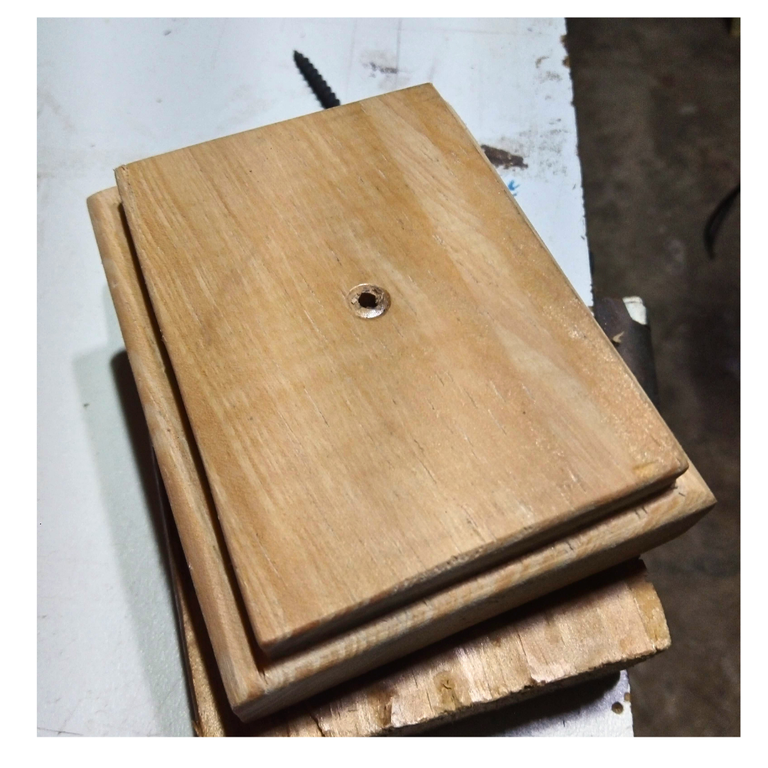
Sand the edges and mark the centre with a 3 mm drill bit, drill the centre and the pedestal is ready, apply sealant and varnish, then assemble the Janus sculpture.
Step 12

We assemble the sculpture and thus culminated the creative process, I placed the base of a light colour so that in turn generate a contrast between the tones, so we can appreciate the transformation of a material through the hands of the creator.
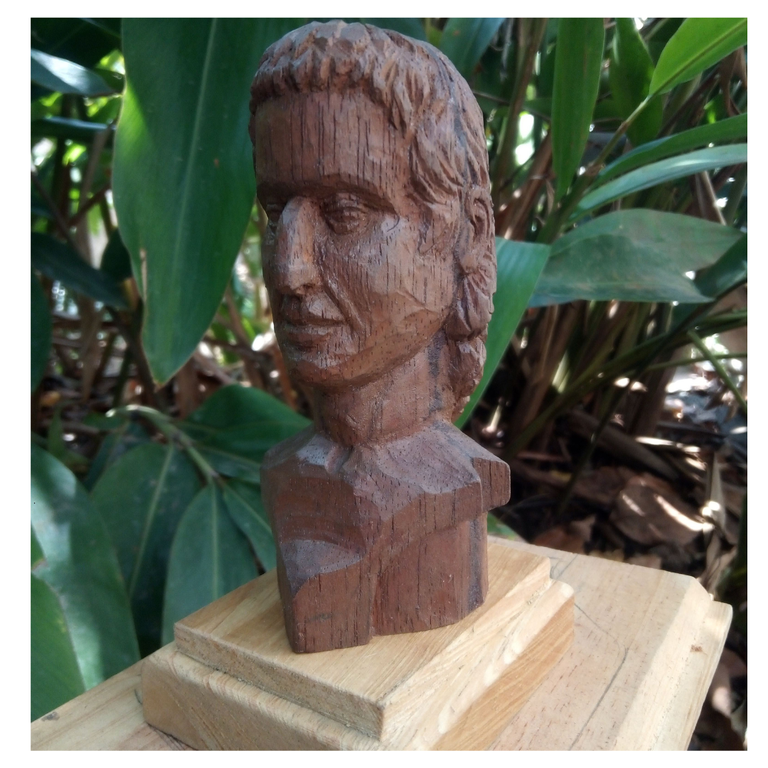
The wood carving has its degree of complexity only by the fact that we can subtract, but not add to acceptances of assemblies in sculpture of larger format, but studying a little proportion practice in clay do drawing, observe and imagine we already have half achieved, but this is not an obligation is just an idea that about to those who want to do wood carving, I remind you that art is freedom, it is expression of the being, besides this, to know the tools to place it in its best conditions will help us a lot in this adventure, that is to say nothing is impossible the important thing is to have the will to begin and this begins from finding the tools and the suitable wood.
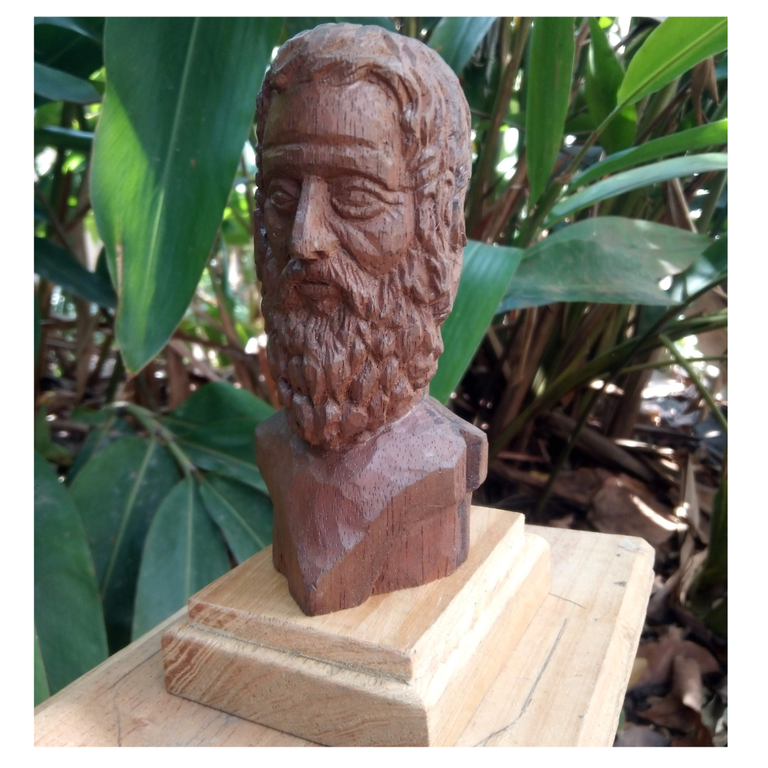

I say goodbye and I hope this content is of benefit, thank you very much for reading, if you have any suggestions or questions I am attentive to the comments and if you wish to place an order or purchase any of the work I do can contact me, until a future publication.

- Photographs taken from my mobile phone
- Text translated in deelp
- Image editing in canva

version español
Un saludo a la comunidad de diy hub, amantes de lo creativo, el arte, el bricolaje y los oficios manuales, espero que estén muy bien, por aquí les estaré compartiendo un poco de escultura en talla en madera a pequeño formato y su barnizado, un busto correspondiente al estilo clásico, en este caso talle al dios Jano o también conocido el Jano bifronte.

El Jano es una representación simbólica de un dios de dos rostros uno joven y otro mayor, uno mira el futuro y el otro el pasado también se le llama el dios de la puerta, el que abre la puerta del nuevo año por ello etimológicamente el nombre enero deriva de janero, atribuido por Jano, entiéndase que se le llama dios no por sustitución a Dios con cualidades animadas (dios con d minúscula se refiere a una representación que porta consigo un mensaje positivo para el desarrollo interno de cada individuo) si les interesa informarse más y conocer sobre jano aquí les dejo un video de una monografía con muy buenos detalles click para ir al video así que comencemos con la talla en madera
Como bien podemos observar no es fácil enseñar por medio de la comunicación escrita la escultura en talla en madera, lo que si podemos lograr es compartir nuestra experiencia y mostrar los resultados que logramos, además de que puede ser motivos de inspiración para quien tiene las ganas de iniciar una idea, así que mostrare los pasos que logre tomar en fotografía porque como saben cuándo la cuchilla toca la madera no hay quien nos pare, aunque insisto siempre me esforzare en traer un contenido que les sea útil a todos.

- Madera de baja densidad (madera blanda)
- Cuchilla y gubias pequeñas
- Cola de carpintero
- Lijas
- Sellador y barniz
- Bicromato de potasio

Paso 1

Una de las cosas a tener en cuenta es una referencia ya sea bidimensional o tridimensional como en este caso no es una escultura propia sino un modelo de una ya exístete debo de tener en cuenta sus detalles.
Paso 2

Casualmente tenía dos pedazos rectangulares de ceiba una madera muy noble y blanda, así que comencé a tallar desde una de las esquinas, lo que se debe hacer es ir sacando el volumen mayor el cual será la nariz y a su vez los ojos y el volumen de los labios, como siempre comento, la madera te va hablando y comunicando además de que la vista del creador va observando su forma es técnica, habilidad e intuición.
Paso 3

Tras generar los volúmenes, pasamos a dar un poco de detalles con la intención de generar más identidad a la escultura, es conveniente que en el paso anterior dejemos bastante volumen, recordemos que también las cuchillas deben de tener buen filo, para que no demos pasos en falso al intentar quitar materia y tras generar fuerza quitemos mucho más de lo que era.
Paso 4

Una vez le hayamos dado una cierta identidad casi lograda, encolamos el otro pedazo de madera, cortamos un poco con el serrucho una de las esquinas y con el cepillo carpintero rectificamos para que quede plano, colocamos cola y prensamos la madera.


Paso 5

De igual forma que el paso 2 y 3 tallamos al jano del pasado dejando volumen para la barba, esta parte de la escultura es mucho más sencilla porque no estaríamos trabajando la proporción del mentón y entre otras partes anatómica del rostro inferior, aquí mi intención estará centrada en el cabello y las ondulaciones de la barba como la referencia con la que me estoy guiando.
Paso 6

Una vez culminado los detalles escultóricos el cual es un proceso largo y de concentración, preparo un poco de mastique esto porque me quedo una breve abertura al juntar los dos rostros y así dejo todo a nivel, esto lo preparo con cola de carpintero y aserrín de la misma madera y si se puede y tiene unas góticas de limón, de esta manera no se nota mucho, lo ideal es que las juntas queden totalmente planas.


Paso 7

En vista de que no le colocaría color a la pieza, sino dejarla de manera natural, le di un poco de envejecido con bicromato de potasio un poco diluido, ya que si lo aplicamos puro quedaría muy oscuro, le di dos manos y bajo un poco su tono.
Paso 8

Como habrán notado no lije la escultura, ya que mi intención era dejarla con las marcas de la talla, un poco rústica, así que aplicamos sellador, tres manos por tiempo es decir, aplicamos una, dejamos secar y así sucesivamente, luego el barniz y culminamos entonces el proceso de escultura y policromía.
Paso 9

Toda escultura debe llevar en su medida un pedestal como soporte de la misma, así que ubique una madera de pino con unas medidas que me generara estabilidad a la pieza, le hice una marca por los bordes para hacer posteriormente una moldura sencilla.
Paso 10

Este paso se puede hacer con un router o trompo, con una fresa que depende del dibujo que queramos, pero lo haré de la forma básica, usando un mini serrucho y formón de media pulgada.
Paso 11

Lijamos los bordes y marcamos el centro con una mecha de 3 mm, perforamos el centro y ya tendríamos el pedestal listo, aplicamos sellador y barniz, luego ensamblamos la escultura de Jano.
Paso 12

Ensamblamos la escultura y de esta manera culminamos el proceso creativo, le coloqué la base de un color claro para que a su vez generara un contraste entre los tonos, de esta manera podemos apreciar la transformación de una materia a través de las manos del creador.

La talla en madera tiene su grado de complejidad solo por el hecho de que podemos sustraer, pero no adicionar a acepciones de ensamblajes en escultura de mayor formato, pero estudiando un poco de proporción practicar en arcilla hacer dibujo, observar e imaginar ya tenemos la mitad lograda, pero esto no es una obligación es solo una idea que a punto para los que quieren hacer talla en madera, les recuerdo que el arte es libertad, es expresión del ser, además de esto, conocer las herramientas colocarla en sus mejores condiciones nos ayudaran mucho en esta aventura, es decir nada es imposible lo importante es tener la voluntad de comenzar y esto comienza desde encontrar las herramientas y la madera adecuada.


Me despido y espero que sea de provecho este contenido, muchas gracias por leer, si tienen alguna sugerencia o duda estoy atento a los comentarios y si desean hacer algún pedido o adquirir algún trabajo de los que hago pueden contactarme, hasta una próxima publicación.

- Fotografías tomadas desde mi celular
- texto traducido en deelp
- Edición de imágenes en canva
Posted Using InLeo Alpha
Trabajar la madera es muy satisfactorio, recuerdo mi tercer año de liceo vi clases de madera, me gustó mucho y quizás algún día me ponga en ello, cierto, tiene su grado de complejidad, igual que la orfebrería u otro arte /oficio que te guste, todo se transforma ...
También recuerdo años atrás haber visto una pieza algo parecida pero era como tridimensional no se si decirle así, en vez de dos rostros habían tres: Jesús, Simón Bolivar y Don Quijote los tres grandes majaderos de la historia.
Saludos que chévere, que bueno haber tenido esa experiencia, recordando el liceo yo lo hacía por fuera a pesar de que tenía una malla curricular de humanidades veíamos cosas mas bidimensional y manualidades sencillas...
Los tres majaderos de la historia, muy bueno...
Al Jano también se representa con tres rostro uno en el centro siendo este el presente.
Saludos, gracias por pasar a darle una vistazo al contenido.
This is what I love most about Hive, meeting talented people with a lot of creativity, artists who do amazing work, nice to visit and appreciate. Bravo, I am really surprised, this is a skill that I have never in my dreams put into practice... Besides your work I also admire the quality and presentation of this post.
@jesuslnrs saludos, gracias por visitar el contenido, bueno también admiro la genialidad del músico, sabes que mi propósito en hive es mostrar y compartir el conocimiento práctico que he adquirido en esta aventura, el arte de la escultura y lutheria, con la reparación de cordófonos y creación de instrumentos que se terminan de desarrollar con ustedes los músicos, gracias por tus buenas palabras, seguiremos por aquí y estamos a disposición para cualquiera cosa relacionada con la lutheria, paz!
This is absolutely awesome and very creative of you. You are a perfectionist when it comes to wood work and your craft is an evidence of what am saying. It's truly amazing and well carved, kudos and keep it up
Saludos compañero, muchas gracias por tu comentario, más que perfección es hacer el trabajo con amor, con paciencia y concentración, es centrarse en la idea y cada uno tendremos un resultado distinto de expresión, lo bello y feo es subjetivo así que hay representaciones mejores que otra en cuanto a técnica y esteticismo, pero en mi caso la importancia yace en la intención del individuo como comunicador ya lo demás se va desarrollando a través de la praxis, la disciplina y talento que cada uno tenemos...
Congratulations @torre-alba! You have completed the following achievement on the Hive blockchain And have been rewarded with New badge(s)
<table><tr><td><img src="https://images.hive.blog/60x70/https://hivebuzz.me/@torre-alba/posts.png?202410041933" /><td>You published more than 30 posts.<br />Your next target is to reach 40 posts. <p dir="auto"><sub><em>You can view your badges on <a href="https://hivebuzz.me/@torre-alba" target="_blank" rel="noreferrer noopener" title="This link will take you away from hive.blog" class="external_link">your board and compare yourself to others in the <a href="https://hivebuzz.me/ranking" target="_blank" rel="noreferrer noopener" title="This link will take you away from hive.blog" class="external_link">Ranking<br /> <sub><em>If you no longer want to receive notifications, reply to this comment with the word <code>STOP <p dir="auto"><strong>Check out our last posts: <table><tr><td><a href="/hive-122221/@hivebuzz/pum-202409-delegations"><img src="https://images.hive.blog/64x128/https://i.imgur.com/fg8QnBc.png" /><td><a href="/hive-122221/@hivebuzz/pum-202409-delegations">Our Hive Power Delegations to the September PUM Winners<tr><td><a href="/hive-122221/@hivebuzz/pud-202410-feedback"><img src="https://images.hive.blog/64x128/https://i.imgur.com/zHjYI1k.jpg" /><td><a href="/hive-122221/@hivebuzz/pud-202410-feedback">Feedback from the October Hive Power Up Day<tr><td><a href="/hive-122221/@hivebuzz/pum-202409-result"><img src="https://images.hive.blog/64x128/https://i.imgur.com/mzwqdSL.png" /><td><a href="/hive-122221/@hivebuzz/pum-202409-result">Hive Power Up Month Challenge - September 2024 Winners ListMaravilloso!! Seguimos avanzando
Un trabajo con mucha dedicación, quedó hermoso
A job with a lot of dedication, it was beautiful
Mucha dedicación en la obra, muchas veces son varias sesiones a veces se tardan meses, dependiendo lo que estemos haciendo, claro cuando es por gusto no se tiene tiempo definido cuando es por trabajo ya si se tiene un límite.
Gracias por tu comentario.
This is impressive. Great quality work that graces our community. Thank you very much for sharing it and for being so detailed in your publication, it is an example for everyone.
Gracias a la comunidad por estar presente y a todos los hivers por pasar por el contenido, estare compartiendo por aquí siempre con la mejor disposición, saludos y paz!
Wood craft most times is always one of the hardest part of craft.
But look at how you just made it inspiring and adorable.
This looks really good.
Lo tridimensional es difícil de calcar aunque existe una herramienta usada por los grandes escultores llamado pantógrafo igual se debe tener habilidad y conocimiento, pero la talla en especial suele tener su complejidad pero otras labores del bricolaje si son un poco más de conocer las herramientas, dándole el uso adecuado se domina la madera...
Que gran escultura del dios Jano, quedó impresionante. Espero que estés bien, aún no he conseguido madera de la.que me recomendaste, me gustaría visitar tu taller, saludos!
Saludos @fixie gracias por comentar y pasar por el post,bueno ahorita no estoy en la ciudad, luego no contactamos, escribeme al IG s