Español
Saludos amigos creadores.
¡Feliz 2025!🙋🎉🌟
La vida nos demuestra que apesar de las tensiones y obstáculos que afrontamos en nuestro diario , hay momentos que llenan el alma como lo son estos días en espera del nuevo año, donde disfrutamos de la compañía de familiares y amigos.
Mi hogar, ha sido cumbre de múltiples actividades festivas que a parte de la buena vibra de los integrantes, las manualidades creadas para decorarlo, han logrado un ambiente acogedor.
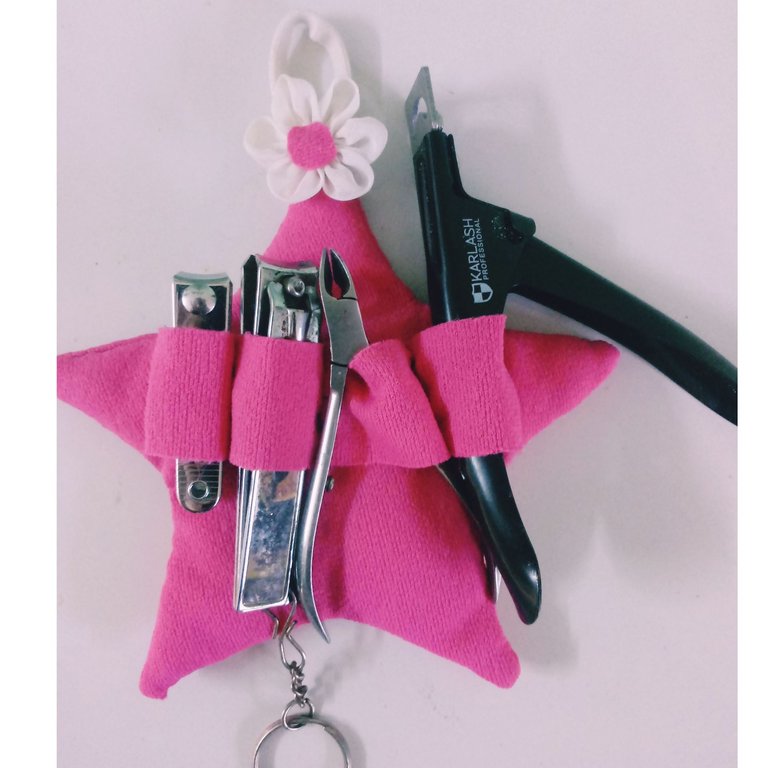
Hoy, les traigo el tutorial de mis colgantes de estrellas, los que se encuentran dispersos en todo mi hogar, realizando funciones útiles y decorando.¡Comencémos!
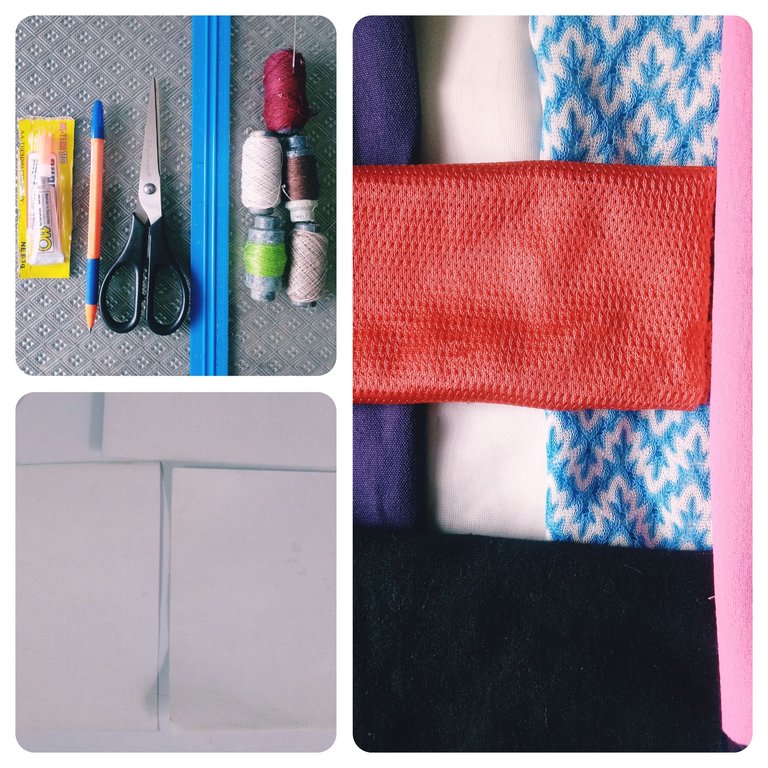
Materiales
.Retazos de tela
.Tijera
.Hilo
.Aguja
.Regla
.Cartulina
.Pegamento
.Plumón
Modo de confección
1-Primeramente dibujamos y recortamos en nuestra cartulina una estrella, que nos servirá para trabajar en nuestra tela.
2-Colocamos nuestra estrella de cartulina sobre el retazo tela seleccionado para nuestra creación, y utilizando un plumón marcamos por todo su borde, logrando obtener una replica semejante en la tela.
3-Cortamos siguiendo la guía trazada y obtenemos la estrella bien conformada.
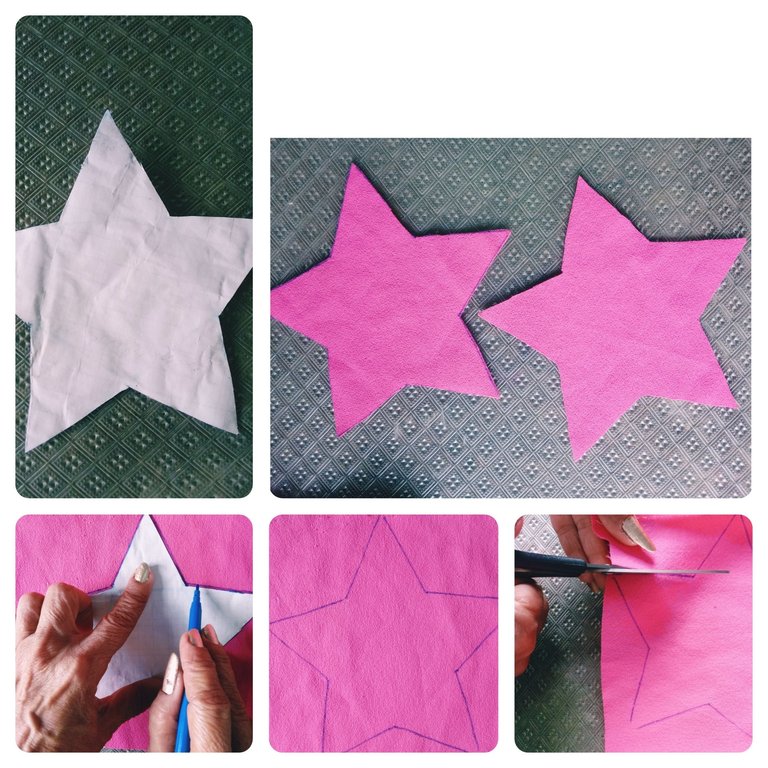
Este proceder, lo realizamos dos veces para obtener dos estrellas con iguales diámetro.
El paso que les mostraré acontinuación , es opcional, pero útil, pues ayudará a que las estrellas sirvan para soporte.
4-Marcamos y cortamos un listón de tela, y luego, cosemos con ayuda de aguja e hilo a una de las estrellas, conformando continúas divisiones.
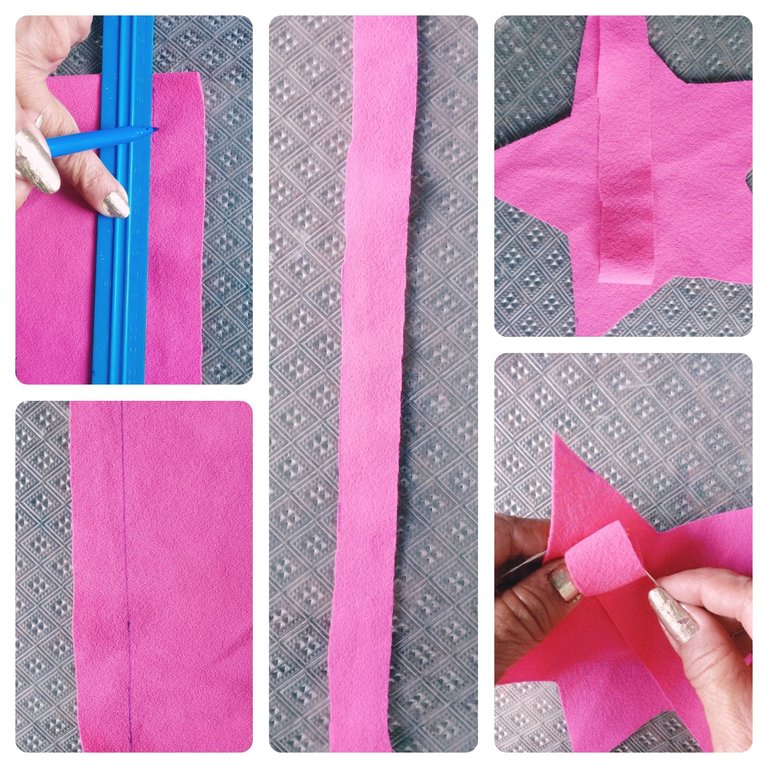
5-Cosemos nuestras dos estrellas utilizando aguja e hilo, dejando hacia dentro la cara de las divisiones.
6-Cuando la tengamos completamente cosida, tomamos la tijera y le realizamos un pequeño corte en el centro , por el que viramos totalmente a la estrella.
7-Utilizando: lana, tiritas de tela, algodón , rellenamos la estrella y cerramos el corte con la aguja e hilo.
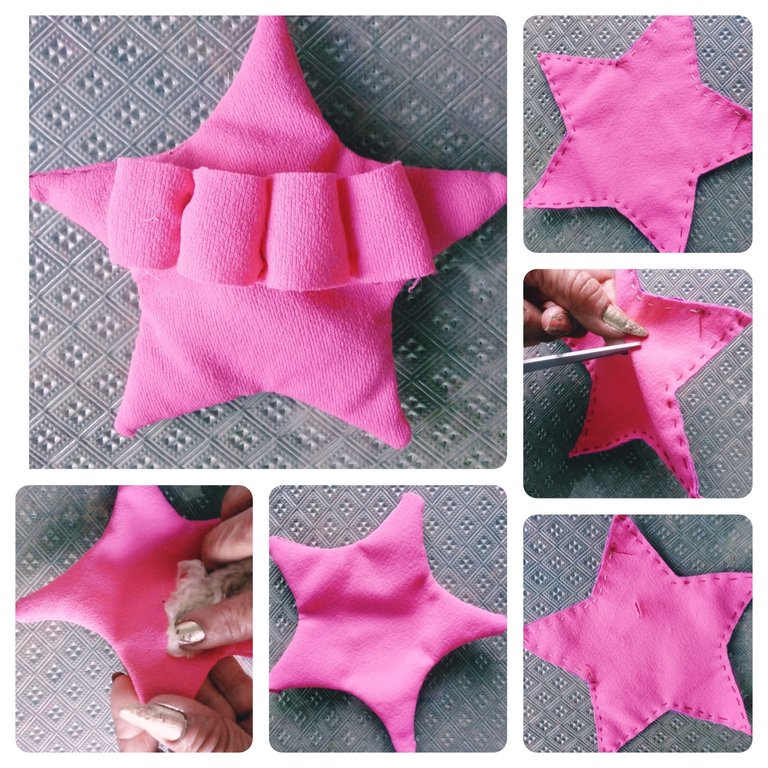
Teniendo lista nuestra estrella, pasamos a decorarla a nuestro gusto, podemos utilizar botones , lentejuelas, todo lo que gustemos. Yo las decoré con pequeñas flores creadas de la siguiente forma.
Pasos
1-Con un pequeño círculo de cartón previamente confeccionado, marcamos con el plumón cinco círculos, en un retazo de tela.
2-Cortamos utilizando la tijera los círculos y los doblamos por su mitad.
3-Con una hebra de hilo, vamos insertando los círculos por su borde y luego amarramos.
4-Utilizando pegamento, adherimos un pequeño círculo en su centro, obteniendo pequeñas flores hermosas.
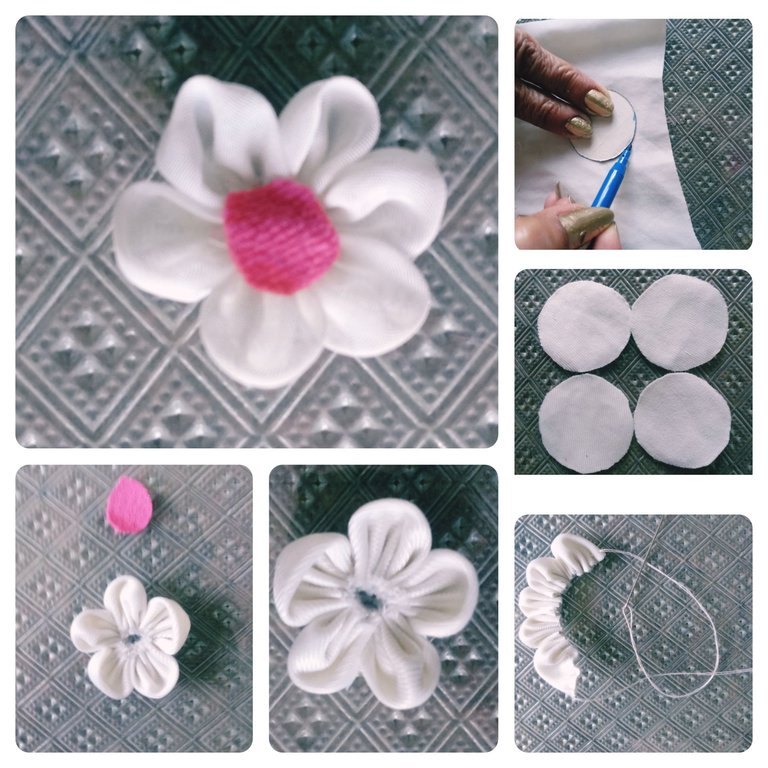
Ya teniendo nuestra flores decorativas listas , las cosemos a nuestra estrella , además de un pequeño listón de tela, que nos permitirá su colgado.
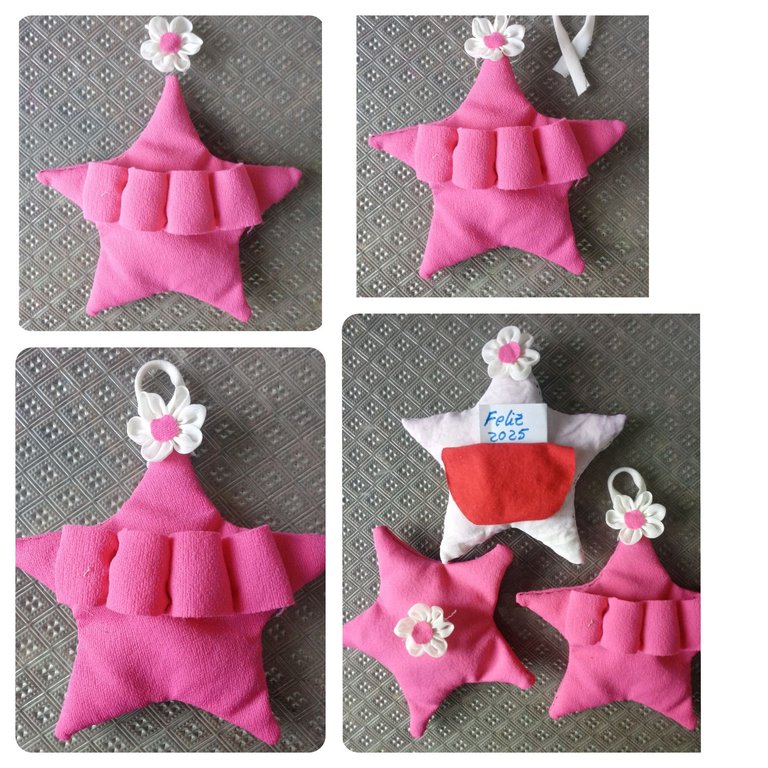
Mis estrellas las utilicé para colgar mis heramientas para uñas, pero se pueden utilizar para el colgado de cepillos dentales, prendas, notas, según el modelo que le realicemos.
Como pueden observar es un método sencillo que nos permite mediante el reciclado, el decorado de nuestros hogares. Los exhortó amigos a que disfruten creándolas.
Bendiciones a todos , que el nuevo año sea inspirador, creativo.
Confecciones y fotografías propias.
🎉¡ FELIZ Y BENDECIDO 2025!🎉
English
Greetings fellow creators.
Happy 2025!🙋🎉🌟
Life shows us that despite the tensions and obstacles we face in our daily lives, there are moments that fill the soul, such as these days waiting for the new year, where we enjoy the company of family and friends.
My home has been the summit of multiple festive activities that, apart from the good vibes of the members, the crafts created to decorate it, have achieved a cozy atmosphere.
Today, I bring you the tutorial of my star pendants, the ones that are scattered all over my home, performing useful functions and decorating.Let's get started!

Materials
.Scraps of fabric
.Scissor
.Thread
.Needle
.Rule
.Cardboard
.Glue
.Down

Mode of preparation
1-First we draw and cut out a star on our cardstock, which will serve us to work on our fabric.
2-We place our cardboard star on the fabric patchwork selected for our creation, and using a down we mark all over its edge, managing to get a similar replica on the fabric.
3-We cut following the traced guide and get the well-shaped star.
We performed this procedure twice to obtain two stars with the same diameter.

The step that I will show you next, is optional, but useful, because it will help the stars to serve as support.
4-We mark and cut a ribbon of fabric, and then, we sew with the help of needle and thread to one of the stars, forming continuous divisions.

5-We sew our two stars using needle and thread, leaving the face of the divisions inwards.
6-When we have it completely sewn, we take the scissors and make a small cut in the center, by which we turn completely to the star.
7-Using: wool, cloth band-aids, cotton, fill the star and close the cut with the needle and thread.

Having our star ready, we go on to decorate it to our liking, we can use buttons, sequins, everything we like. I decorated them with small flowers created as follows.
Steps
1-With a small circle of cardboard previously made, we marked with the down five circles, on a piece of fabric.
2-Cut the circles using the scissors and fold them in half.
3-With a strand of thread, we are inserting the circles by its edge and then tie.
4-Using glue, we adhere a small circle in its center, obtaining beautiful small flowers.

Already having our decorative flowers ready, we sew them to our star, in addition to a small ribbon of fabric, which will allow us to hang them.

I used my stars to hang my nail tools, but they can be used to hang toothbrushes, clothes, notes, depending on the model we make for you.
As you can see, it is a simple method that allows us to recycle the decoration of our homes. They were encouraged by friends to enjoy creating them.
Blessings to all, may the new year be inspiring, creative.
Own clothing and photographs
🎉HAPPY AND BLESSED 2025!🎉
Necesito uno de estos, no uno, necesito muchos, muchos de estos en mi muro. Es un buenisimo utensilio para minimizar mi desastre 😍. Gracias por compartir
Congratulations @marydeluz! You have completed the following achievement on the Hive blockchain And have been rewarded with New badge(s)
<table><tr><td><img src="https://images.hive.blog/60x70/https://hivebuzz.me/@marydeluz/upvoted.png?202501011744" /><td>You received more than 15000 upvotes.<br />Your next target is to reach 20000 upvotes. <p dir="auto"><sub><em>You can view your badges on <a href="https://hivebuzz.me/@marydeluz" target="_blank" rel="noreferrer noopener" title="This link will take you away from hive.blog" class="external_link">your board and compare yourself to others in the <a href="https://hivebuzz.me/ranking" target="_blank" rel="noreferrer noopener" title="This link will take you away from hive.blog" class="external_link">Ranking<br /> <sub><em>If you no longer want to receive notifications, reply to this comment with the word <code>STOP <p dir="auto"><strong>Check out our last posts: <table><tr><td><a href="/hive-122221/@hivebuzz/pum-202412-result"><img src="https://images.hive.blog/64x128/https://i.imgur.com/mzwqdSL.png" /><td><a href="/hive-122221/@hivebuzz/pum-202412-result">Hive Power Up Month Challenge - December 2024 Winners List<tr><td><a href="/hive-122221/@hivebuzz/pum-202501"><img src="https://images.hive.blog/64x128/https://i.imgur.com/M9RD8KS.png" /><td><a href="/hive-122221/@hivebuzz/pum-202501">Be ready for the January edition of the Hive Power Up Month!<tr><td><a href="/hive-122221/@hivebuzz/pud-202501"><img src="https://images.hive.blog/64x128/https://i.imgur.com/805FIIt.jpg" /><td><a href="/hive-122221/@hivebuzz/pud-202501">Hive Power Up Day - January 1st 2025"Useful" is a great way to describe. The fabric scrap would help hold and organize little and handy tools. Nice work
Thank you very much. Blessed 2025 community.🙋🎉
your idea is cool, the results are very beautiful and of course very useful for storing things.
Thank you very much. Greetings and excellent days🙋☀.
You're welcome, I hope you have a nice day too, friend.
Thank you very much friend.Greetings and great days☀
Un lindo proyecto para mantener loas herramientas organizadas y aprovechar los retazos.
Feliz año 2025! 🌟🥂
Muy cierto amigo , nos permite reciclar. Muchas gracias y bendecido inicio de año 🙋🎉.
muy útil y creativo!
very useful and creative!
Saludos. Muchas gracias y feliz 2025🙋🎉.
Greetings. Thank you very much and happy 2025🙋🎉.