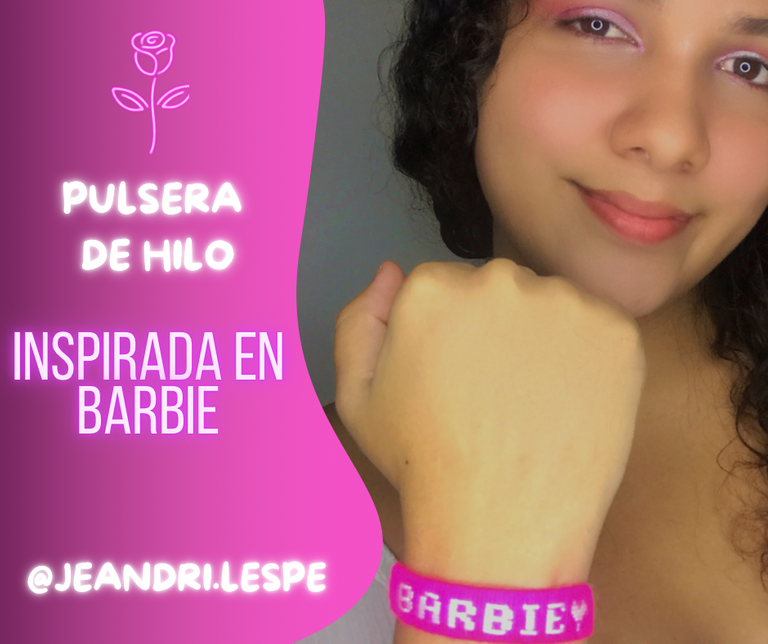
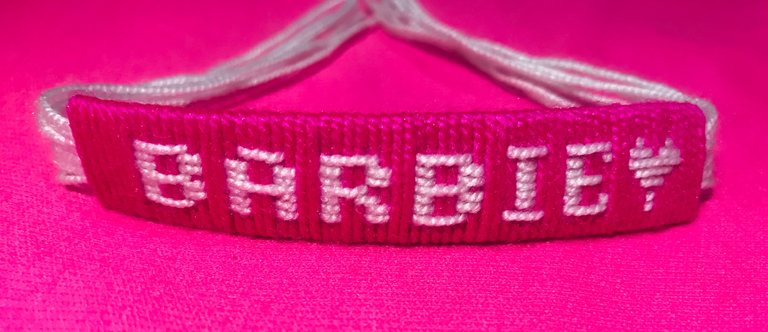
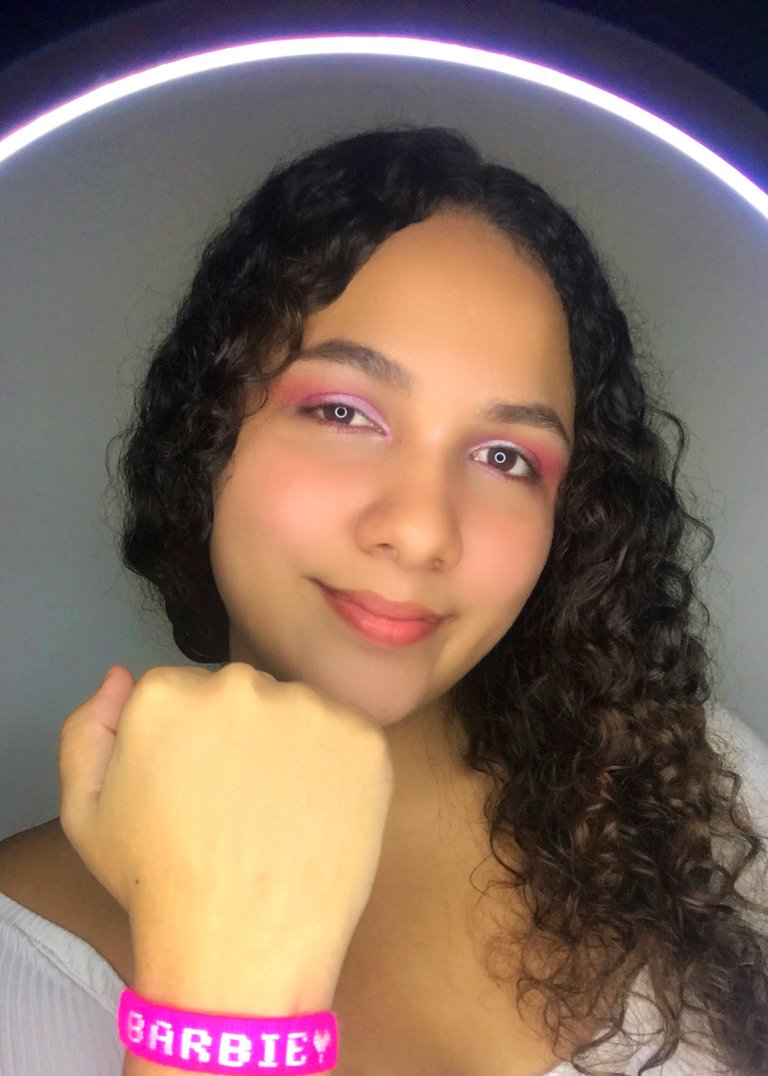
Hello beautiful community, I hope you are having a wonderful start to the week, today I wanted to share with you this thread bracelet that I made today, inspired by Barbie, also taking advantage of the fact that July 20 is the premiere of the movie and I'm going to see it with some friends, so the 3 of us will wear this beautiful bracelet, it's my first time in the community and I hope with all my heart that you like what I've done. Now yes, let's start!
Hola linda comunidad, espero estén teniendo un comienzo de semana maravilloso, el día de hoy quise compartir con ustedes esta pulsera pulsera de hilo que realice el día de hoy, inspirada en Barbie, aprovechando además, que el 20 de julio es el estreno de la película e iré a verla con unas amigas, por lo que, las 3 llevaremos esta hermosa pulsera, es mi primera vez en la comunidad y espero de todo corazón, que les guste lo que he realizado. ¡Ahora sí, comencemos!

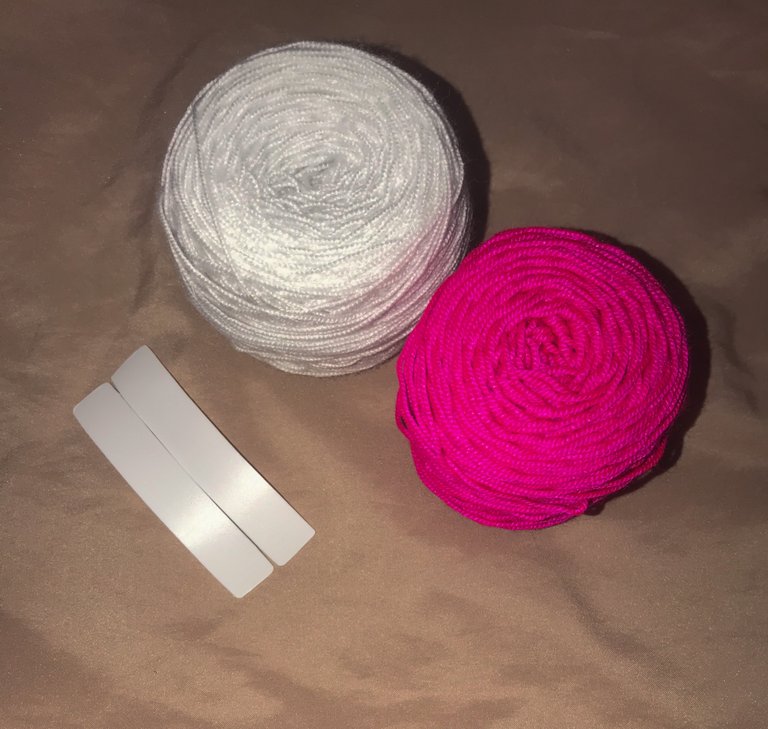
Materials / Materiales 💗
Coral thread (white color, 7 threads of 25 centimeters each) / Hilo coral (color blanco, 7 hilos de 25 centímetros cada uno) 💗
Macramé thread (fuchsia color) / Hilo macramé (color fucsia) 💗
Plastic mold (9 centimeters long, 2 centimeters wide) / *Molde de plástico (9 centímetros de largo, 2 centímetros de ancho) * 💗

Elaboration / Elaboración 💗
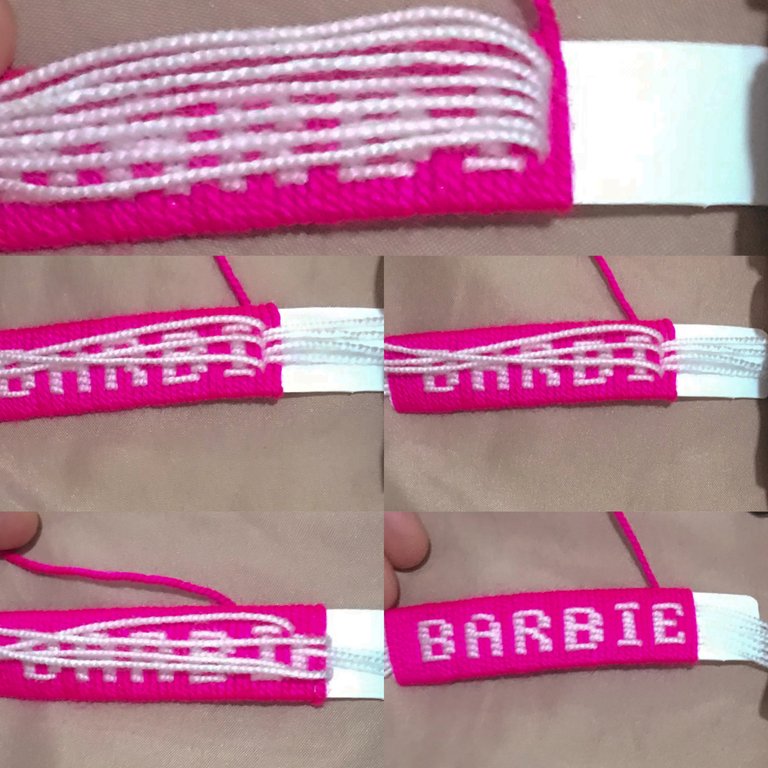
The first thing we will do is place the thread in our plastic base, to make this base you can even use the plastic from your shampoo container or another plastic that is manageable and not so hard, after having our base 9 centimeters long and 2 centimeters wide, we are going with a lighter to polish the edges a little, so that they do not cut when putting on your bracelet.
Then, we place the white thread seeing that each thread is next to the other, and with the fuchsia thread, we are going to begin to make 6 turns, I recommend that you take a slightly long thread at the end and make the turns above it , in order to hide the thread and it does not remain outside the bracelet, just as seen in the photograph.
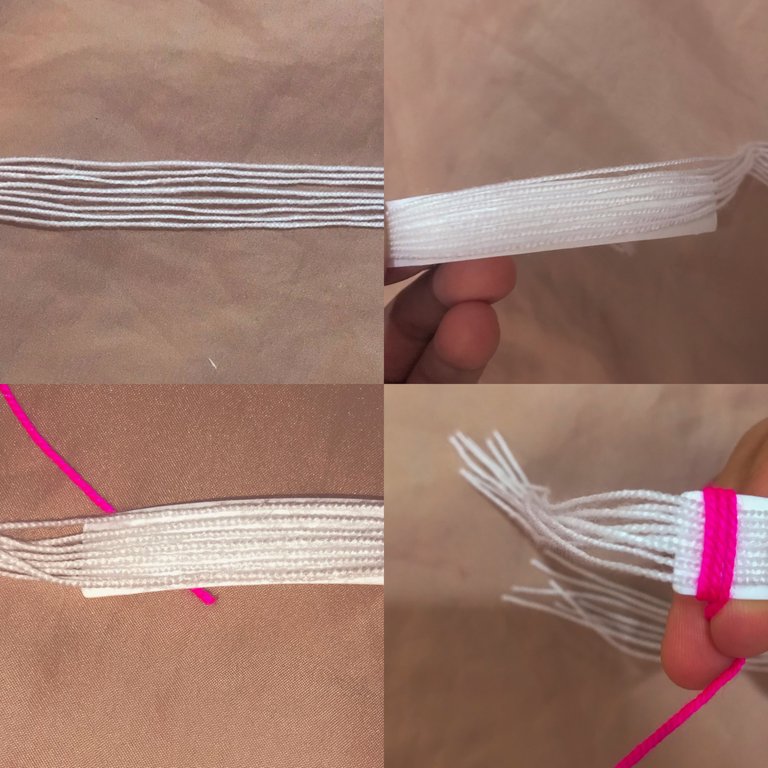
Lo primero que haremos, será ubicar el hilo en nuestra base plástica, para hacer esta base incluso puedes utilizar el plástico de tu envase de shampoo u otro plástico que sea manejable y no tan duro, luego de tener nuestra base con 9 centímetros de largo y 2 centímetros de ancho, vamos con un encendedor a pulir un poco las orillas, para que así no se corten a la hora de colocarse su pulsera.
Luego, ubicamos el hilo blanco viendo que queden cada hilo al lado del otro, y con el hilo fucsia, vamos a comenzar a realizar 6 vueltas, les recomiendo, sacar una hebra un poco larga en la punta y realizar las vueltas por encima de ella, para así esconder la hebra y no le quede por fuera de la pulsera, Justo como se ve en la fotografía.

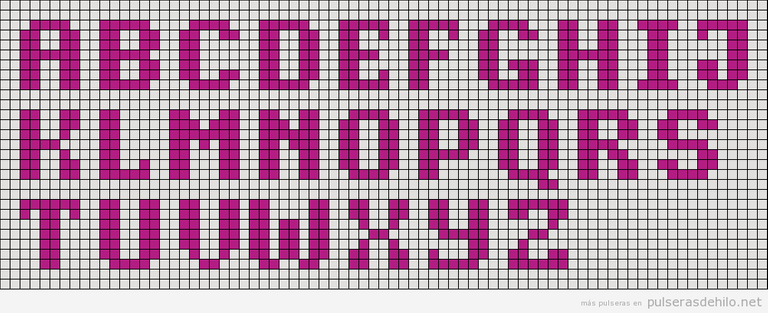
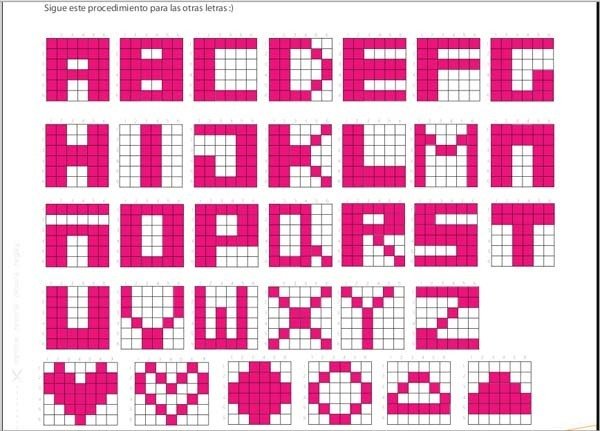
Having done our 6 laps we go with the first letter, which is "B", below, I will leave you the guides to make the letters correctly, however, in the same way, I will give you the step by step of each one. To make the letter "B" we are going to raise the 7 white threads and we will make 2 turns with the fuchsia thread, then, we will lower the threads 2, 3, 5 and 6, as can be seen in the photo, we will give 2 turns again with the fuchsia thread and now, we go up the threads 2, 3, 5, 6 and we lower the threads 1, 4 and 7, we give another turn with the fuchsia thread, we lower all the threads, we give another turn and that's it, our first letter remains, the distance between each letter will be 2 turns with the fuchsia thread.
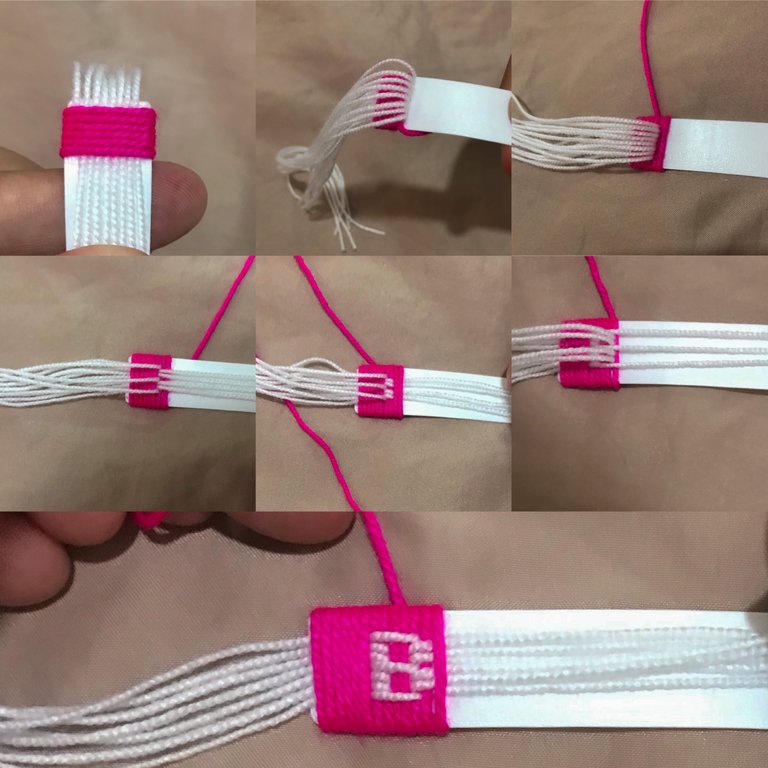
Habiendo realizado nuestras 6 vueltas vamos con la primera letra, que es la “B”, abajo, les dejare las guías para realizar las letras correctamente, sin embargo, de igual manera, yo les realice el paso a paso de cada una. Para hacer la letra “B” vamos a subir los 7 hilos blancos y daremos 2 vueltas con el hilo fucsia, luego, bajaremos los hilos 2, 3, 5 y 6, así como se aprecia en la foto, volvemos a dar 2 vueltas con el hilo fucsia y ahora, subimos los hilos 2, 3, 5, 6 y bajamos los hilos 1, 4 y 7, damos otra vuelta con el hilo fucsia, bajamos todos los hilos, damos otra vuelta y listo, queda nuestra primera letra, la distancia entre cada letra, serán 2 vueltas con el hilo fucsia.

For the letter "A" we will start raising all the threads, except the first one, we make a turn with the fuchsia thread and now yes, we raise all the threads, we make another turn and now, we lower all the threads, except thread 1 and 4 , we will do 2 turns with the fuchsia thread and we go up all the threads again, we turn 1 turn and do the same from the beginning, we raise all the threads, except the first one, we turn, now we lower all the threads, we do one last turn and We already have our second letter, ready.
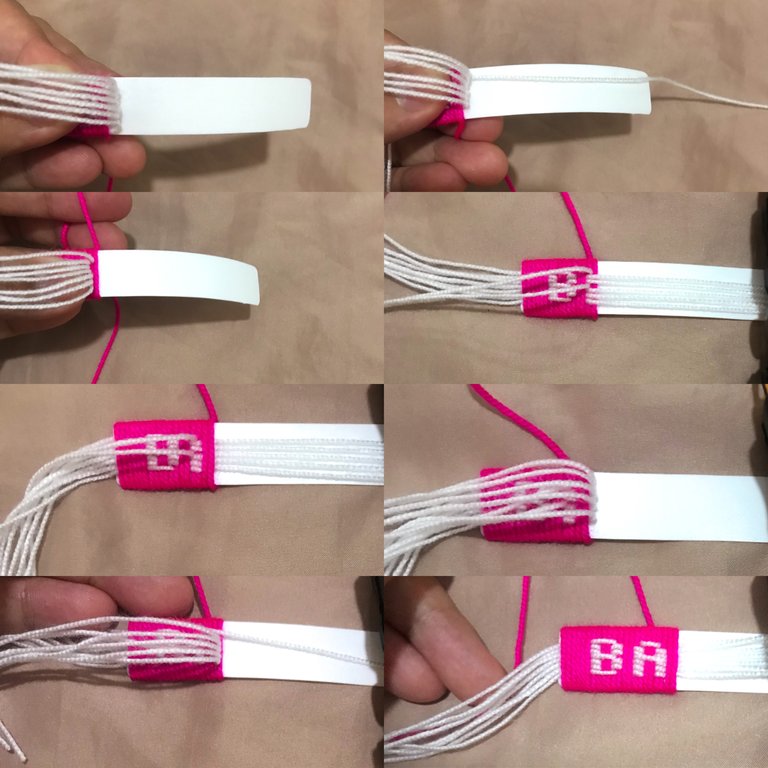
Para la letra “A” comenzaremos subiendo todos los hilos, excepto el primero, hacemos una vuelta con el hilo fucsia y ahora si, subimos todos los hilos, damos otra vuelta y ahora, bajamos todos los hilos, excepto el hilo 1 y el 4, daremos 2 vueltas con el hilo fucsia y volvemos a subir todos los hilos, damos 1 vuelta y hacemos lo mismo del comienzo, subimos todos los hilos, excepto el primero, damos una vuelta, ahora bajamos todos los hilos, damos una última vuelta y ya nos queda nuestra segunda letra, lista.

Now, we continue with the letter "R" the first thing we will do, is to raise all the threads, and do 2 turns with the fuchsia thread, then we will lower all the threads, except thread 1 and 4, we make another turn, we will leave the same threads up and we raise thread 5 together with them, we turn again and this time, we will raise all the threads, except number 4, we turn again and now we will lower threads 1, 4 and 5 and the rest, we will leave them up, then we lower all the threads again and make the last turn, and thus, we finish our third letter.
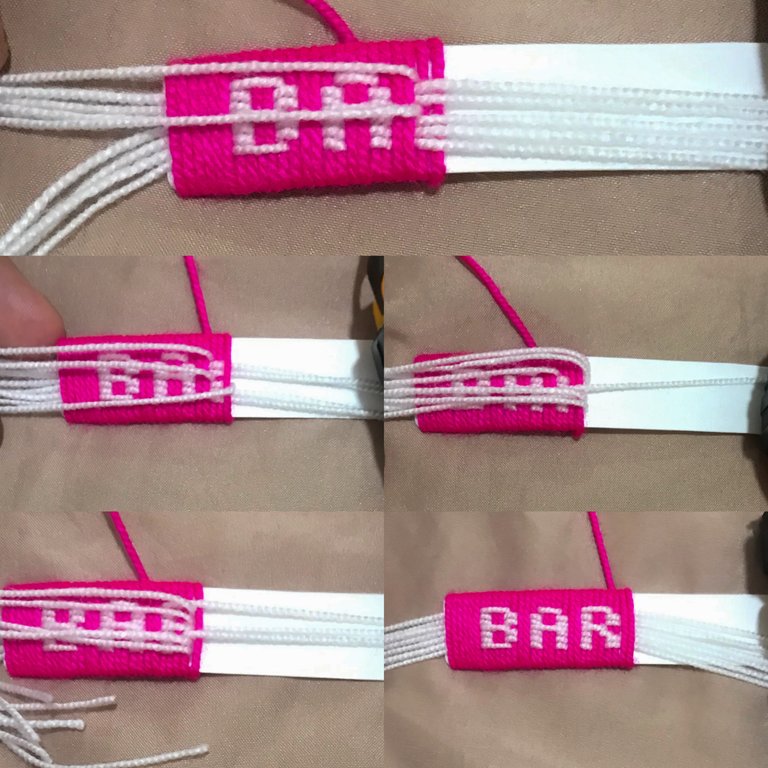
Ahora, proseguimos con la letra “R” lo primero que haremos, será subir todos los hilos, y hacer 2 vueltas con el hilo fucsia, luego bajaremos todos los hilos, excepto el hilo 1 y 4, damos otra vuelta, dejaremos los mismos hilos arriba y subimos junto con ellos el hilo 5, volvemos a dar una vuelta y esta vez, subiremos todos los hilos, excepto el número 4, damos otra vuelta y ahora bajaremos los hilos 1, 4 y 5 y el resto, los dejaremos arriba, luego bajamos nuevamente todos los hilos y hacemos la última vuelta, y así, terminamos nuestra tercera letra.

The fourth letter, would be again the "B" so I will not give you the explanation in this paragraph, so as not to make the post longer, so, just follow the first step and that's it, you have your fourth letter.
We continue with the letter "I" which for me was the easiest to do, we just have to raise threads 1 and 7, we turn 2 times with the fuchsia thread and close by lowering all the threads and doing one last turn, it is like this, as our fifth letter is already.
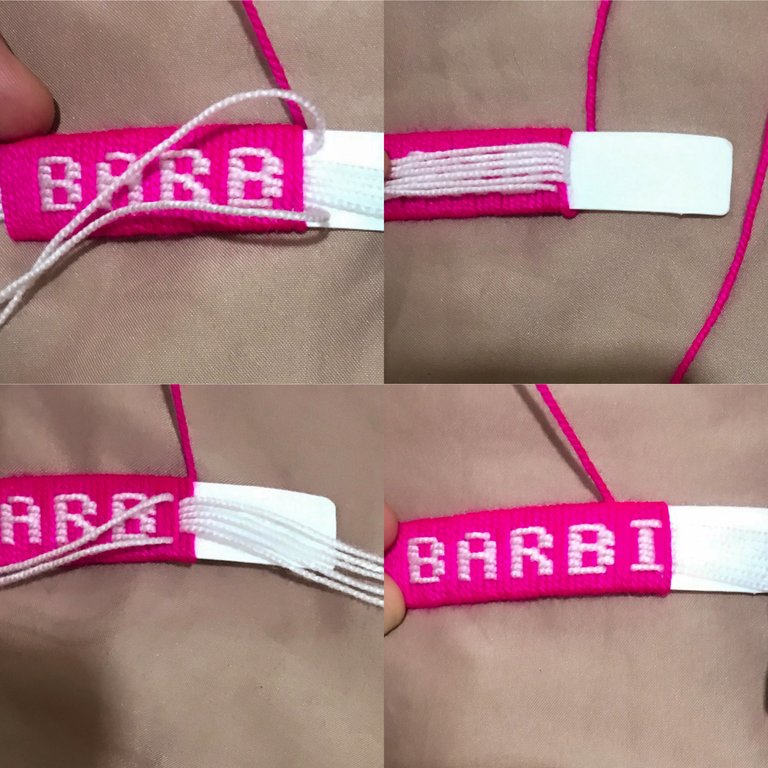
La cuarta letra, vendría siendo nuevamente la “B” por lo que no les daré la explicación en este párrafo, para no hacerles más largo el post, así que, solo se guían del primer paso y listo, tienen su cuarta letra.
Seguimos con la letra “I” la cual para mi, fue la más fácil de realizar, solo debemos de, subir los hilos 1 y 7, damos 2 vueltas con el hilo fucsia y cerramos bajando todos los hilos y haciendo una última vuelta, es así, como ya queda nuestra quinta letra.

Let's go with the last letter, which is, the letter "E" the first thing we will do, will be to raise all the white threads and do 2 turns with the fuchsia thread, then, we will lower all the threads, except threads 1, 4 and 7 , we do 2 turns again and now, we raise the threads 1, 2, 6 and 7, we make the turn, then we lower them all, we make another turn and the sixth and last letter is ready.
Vamos con la última letra, la cual es, la letra “E” lo primero que haremos, será subir todos los hilos blancos y dar 2 vueltas con el hilo fucsia, luego, bajaremos todos los hilos, excepto los hilos 1, 4 y 7, damos nuevamente 2 vueltas y ahora, subimos los hilos 1, 2, 6 y 7, realizamos la vuelta, luego los bajamos todos, hacemos otra vuelta y ya queda lista la sexta y última letra.

Although at the beginning I wanted to make the silhouette of Barbie, it turned out that the amount of threads was not adequate, so I decided to make a heart that I show you below.
To make the heart, we are going to lower all the threads, except thread 2 and 3, we make a round and to the threads that we have above, we add thread 1 and 4, then, we are going to raise all the threads, except thread 1 , 6 and 7, we turn around and here we have half of our heart, to do the other half, it is the same procedure, only in reverse and that is how our heart remains.
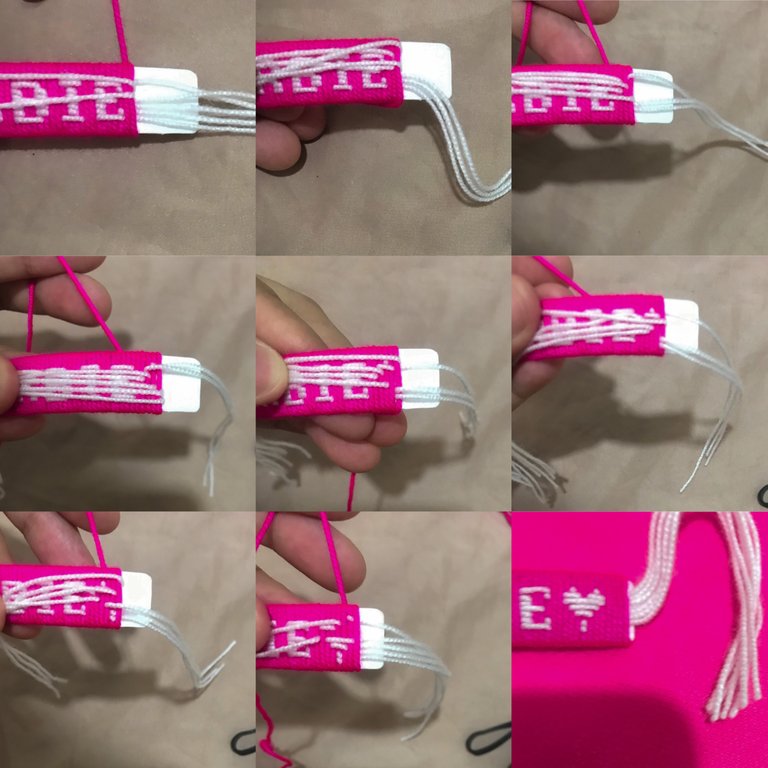
Aunque al comienzo quería hacer la silueta de Barbie, resultó que la cantidad de hilos no era la adecuada, así que, decidí realizar un corazón que les muestro a continuación.
Para hacer el corazón, vamos a bajar todos los hilos, excepto el hilo 2 y 3, hacemos una vuelta y a los hilos que tenemos arriba, le sumamos el hilo 1 y 4, luego, vamos a subir todos los hilos, excepto el hilo 1, 6 y 7, damos una vuelta y ya acá tenemos la mitad de nuestro corazón, para hacer la otra mitad, es el mismo procedimiento solo que al contrario y es así, como nos queda nuestro corazón.

Here we can finish our bracelet, however, in my case we must close with 4 turns and now yes, we are going to cut the fuchsia thread, but, we will cut it quite long, why? Because as I show you in the photo, they are going to hide that strand of thread, which I recommend hiding quite well, because if you leave it loose or too close to the edge, it can come out and damage the entire bracelet, and finally, I measure the threads whites that will be the ones that I will tie my bracelet with and I cut off the excess, until they are the same size and that's it, now yes, we finished our Barbie bracelet and we are ready to go see our movie! 💗 I hope you liked it and any comments, I will receive them with great respect and affection ✨
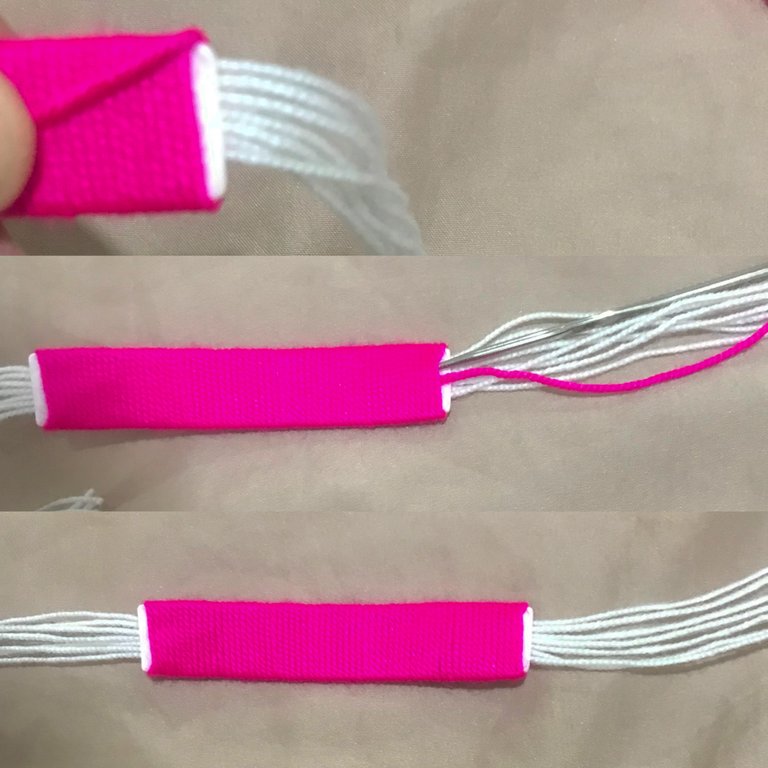
Acá ya podemos dar por terminada nuestra pulsera, sin embargo, debemos de cerrar en mi caso con 4 vueltas y ahora si, vamos a cortar el hilo fucsia, pero, lo cortaremos de un tamaño bastante largo ¿por que? Porque como les muestro en la foto, van a ocultar esa hebra de hilo, la cual les recomiendo ocultar bastante bien, porque si la dejan floja o muy a la orilla, puede salirse y dañar toda la pulsera, ya por último, mido los hilos blancos que será con los que amarrare mi pulsera y les corto el excedente, hasta que queden del mismo tamaño y listo, ahora si, ¡terminamos nuestra pulsera de Barbie y estamos listas para ir a ver nuestra película! 💗 espero les haya gustado y cualquier observación, la recibiré con mucho respeto y cariño ✨


Plantillas
Separador de texto Picsart
Banner realizado en Canva
GIF GIPHY
Que hermosa 😍 quiero una!
!discovery 45
Te la envío ami 🤭💗
This post was shared and voted inside the discord by the curators team of discovery-it
Join our Community and follow our Curation Trail
Discovery-it is also a Witness, vote for us here
Delegate to us for passive income. Check our 80% fee-back Program
such a thoughtful thing to do; to make matching bracelets for you and your friends. would make the experience of watching the movie very special . Beautiful bracelet too
Thank you very much for your nice comment and support always 💗✨
Hermosa pulsera, me recordaste mi niñez ya que de este tipo de pulseras de nombres tejí bastante para vender cuando era niña, gran trabajo amiga @jeandri.lespe 😉
Que bonito haberte recordado a tu niñez amiga, me alegra muchísimo que te haya gustado 🥹💗
Wow amiga, que hermoso bracelet, te quedo hermoso, eres muy creativa, tienes talento bella, saludos.
Mi bella, tu siempre con comentarios tan bonitos, muchísimas Gracias por tanto apoyo y me alegra demasiado que te haya gustado 💗✨
Hola. Las tres irán al cine usando una de estas pulseras? Deberías hacer unas cuantas más porque seguro otras chicas se van antojar.
Me encanta este tipo de tejidos, no lo he practicado mucho. La última pulsera que tejí fue con la palabra HIVE.
Bien trabajo.
Siii, iremos las 3 con las pulseras 🤭 Muchísimas Gracias por tu apoyo 💗✨
Hola, wow está increíble e inspirada en una temática que está de moda en la actualidad, buen trabajo. Saludos.
!PIZZA
Muchísimas Gracias amigo, Sii, realmente disfrute muchísimo el proceso y además que, hacer cosas para mis amigos, me hace feliz 💗✨
$PIZZA slices delivered:
(4/5) @darwinjj tipped @jeandri.lespe
que hermoso el resultado final😍
Muchísimas Gracias hermosa ✨😍
Que bella, gracias por compartir!
Necesito una💗😋
Me alegra muchísimo que te haya gustado amiga, si estuvieras cerca, también te hiciera una 💗✨
I have tried to learn this method but I'm mostly scared 😨 not to lose it at the process.
He intentado aprender este método pero me da sobre todo miedo 😨 no perderlo en el proceso.
I'm sure you'll be beautiful friend, it's all about trying and you'll see that you'll make it 💗
Quedo preciosa 😍😍, excelente explicación un trabajo hermoso y estructurado, me encantó.
Muchísimas Gracias amiga, me alegra muchísimo que te haya gustado y muchas Gracias por pasarte, ¡te mando un fuerte abrazo! 💗
me encanta, muy ingenieosa esta idea
Muchísimas Gracias bella 💗✨
Contáctenos para saber más del proyecto a nuestro servidor de Discord.
Si deseas delegar HP al proyecto: Delegue 5 HP - Delegue 10 HP - Delegue 20 HP - Delegue 30 HP - Delegue 50 HP - Delegue 100 HP.
Muchísimas Gracias por el apoyo 💗✨
Esta hermosa esa pulsera, aprovechando la premier de Barbie. Te ha quedado genial!
Muchísimas Gracias amiga ✨💗
Que excelente que brindes los patrones, justo en los primeros pasos me preguntaba como hizo las letras, quedó hermosa esa pulsera y muy acertada al tema viral de hoy día.