English

Hi there, friends of the Sketchbook community; I haven't been here in a while. How are you today? I hope you're doing great!
I always say I should share drawings more regularly, but I always end up doing one decent drawing a week at most, and the rest are what I consider sketches.
However, I think I'll be doing small drawings and taking tutorials to bring here. I'd like my account to have a little more of my art, as I like to draw a lot and I don't upload as regularly as I'd like.
So in this post, I'll show you a quick drawing of an interesting face. Here we go!

I started by sketching the facial features, starting with the eyes. You know I don't use curves for this, but only straight lines, the same with the eyebrows. The base of the nose I drew from a circle; likewise, for the lips I used circular shapes, trying to give this sensation of volume.
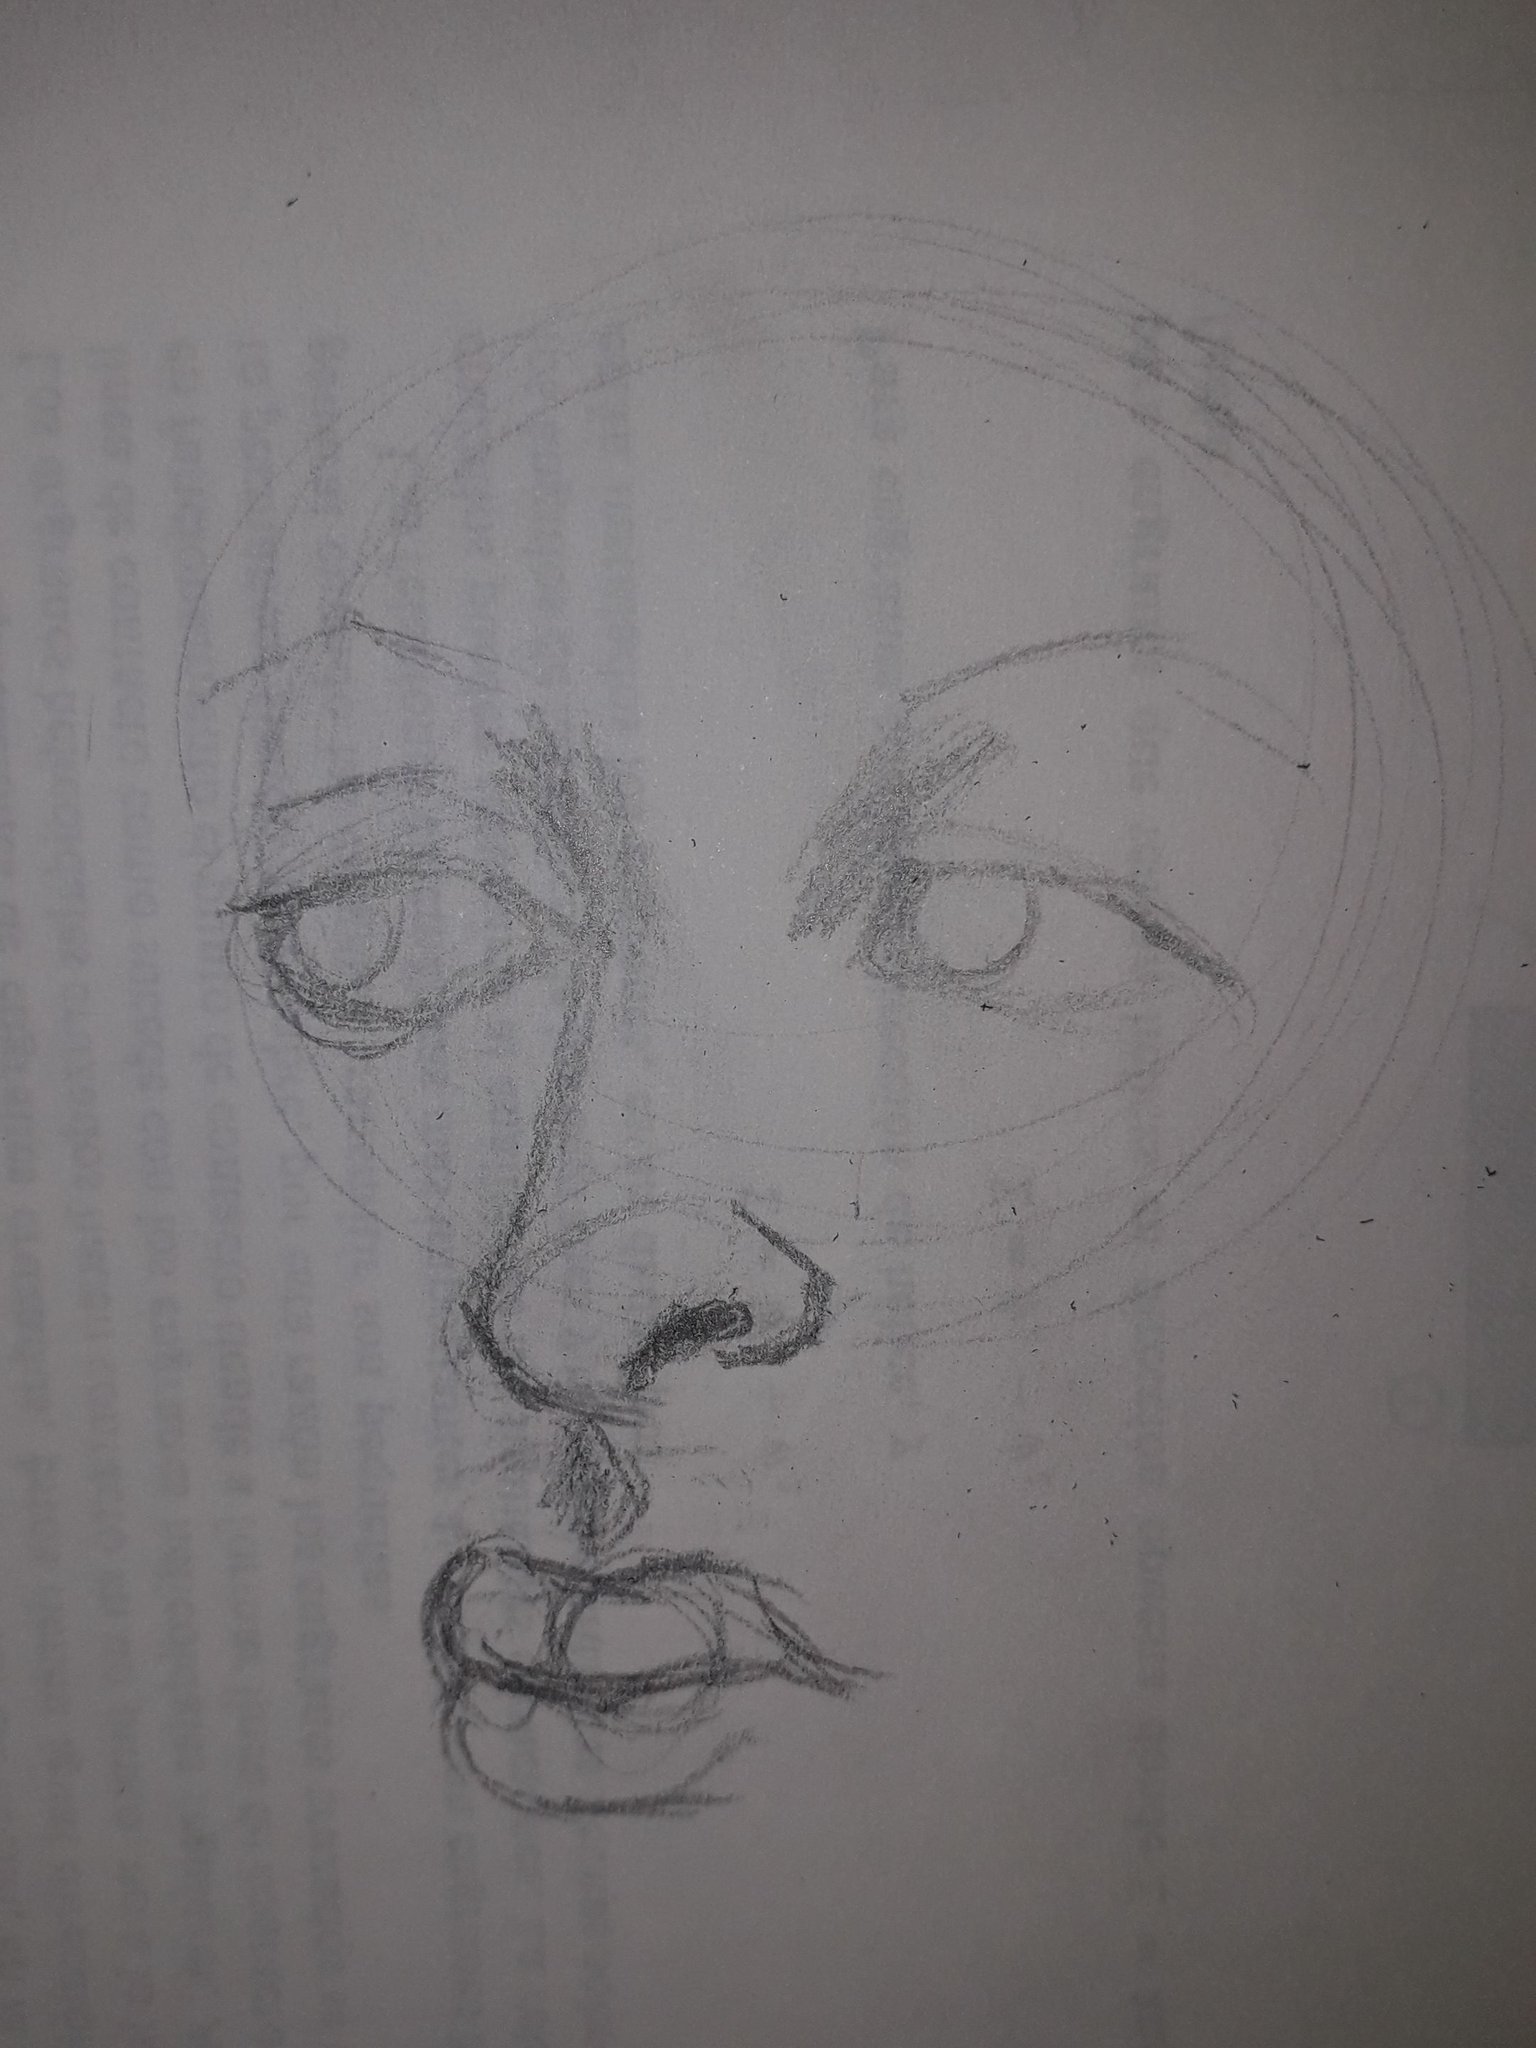
Here I added the irises, along with some shadow, in the creases of the upper eyelid.
I also added shadows in the nostril and in the hollow between the lips and the nose, which is called the nasolabial fold (yes, I just googled it).
Then, guided by the circles I made earlier, I traced the lip contour, making the necessary curvatures to give more that idea of volume.
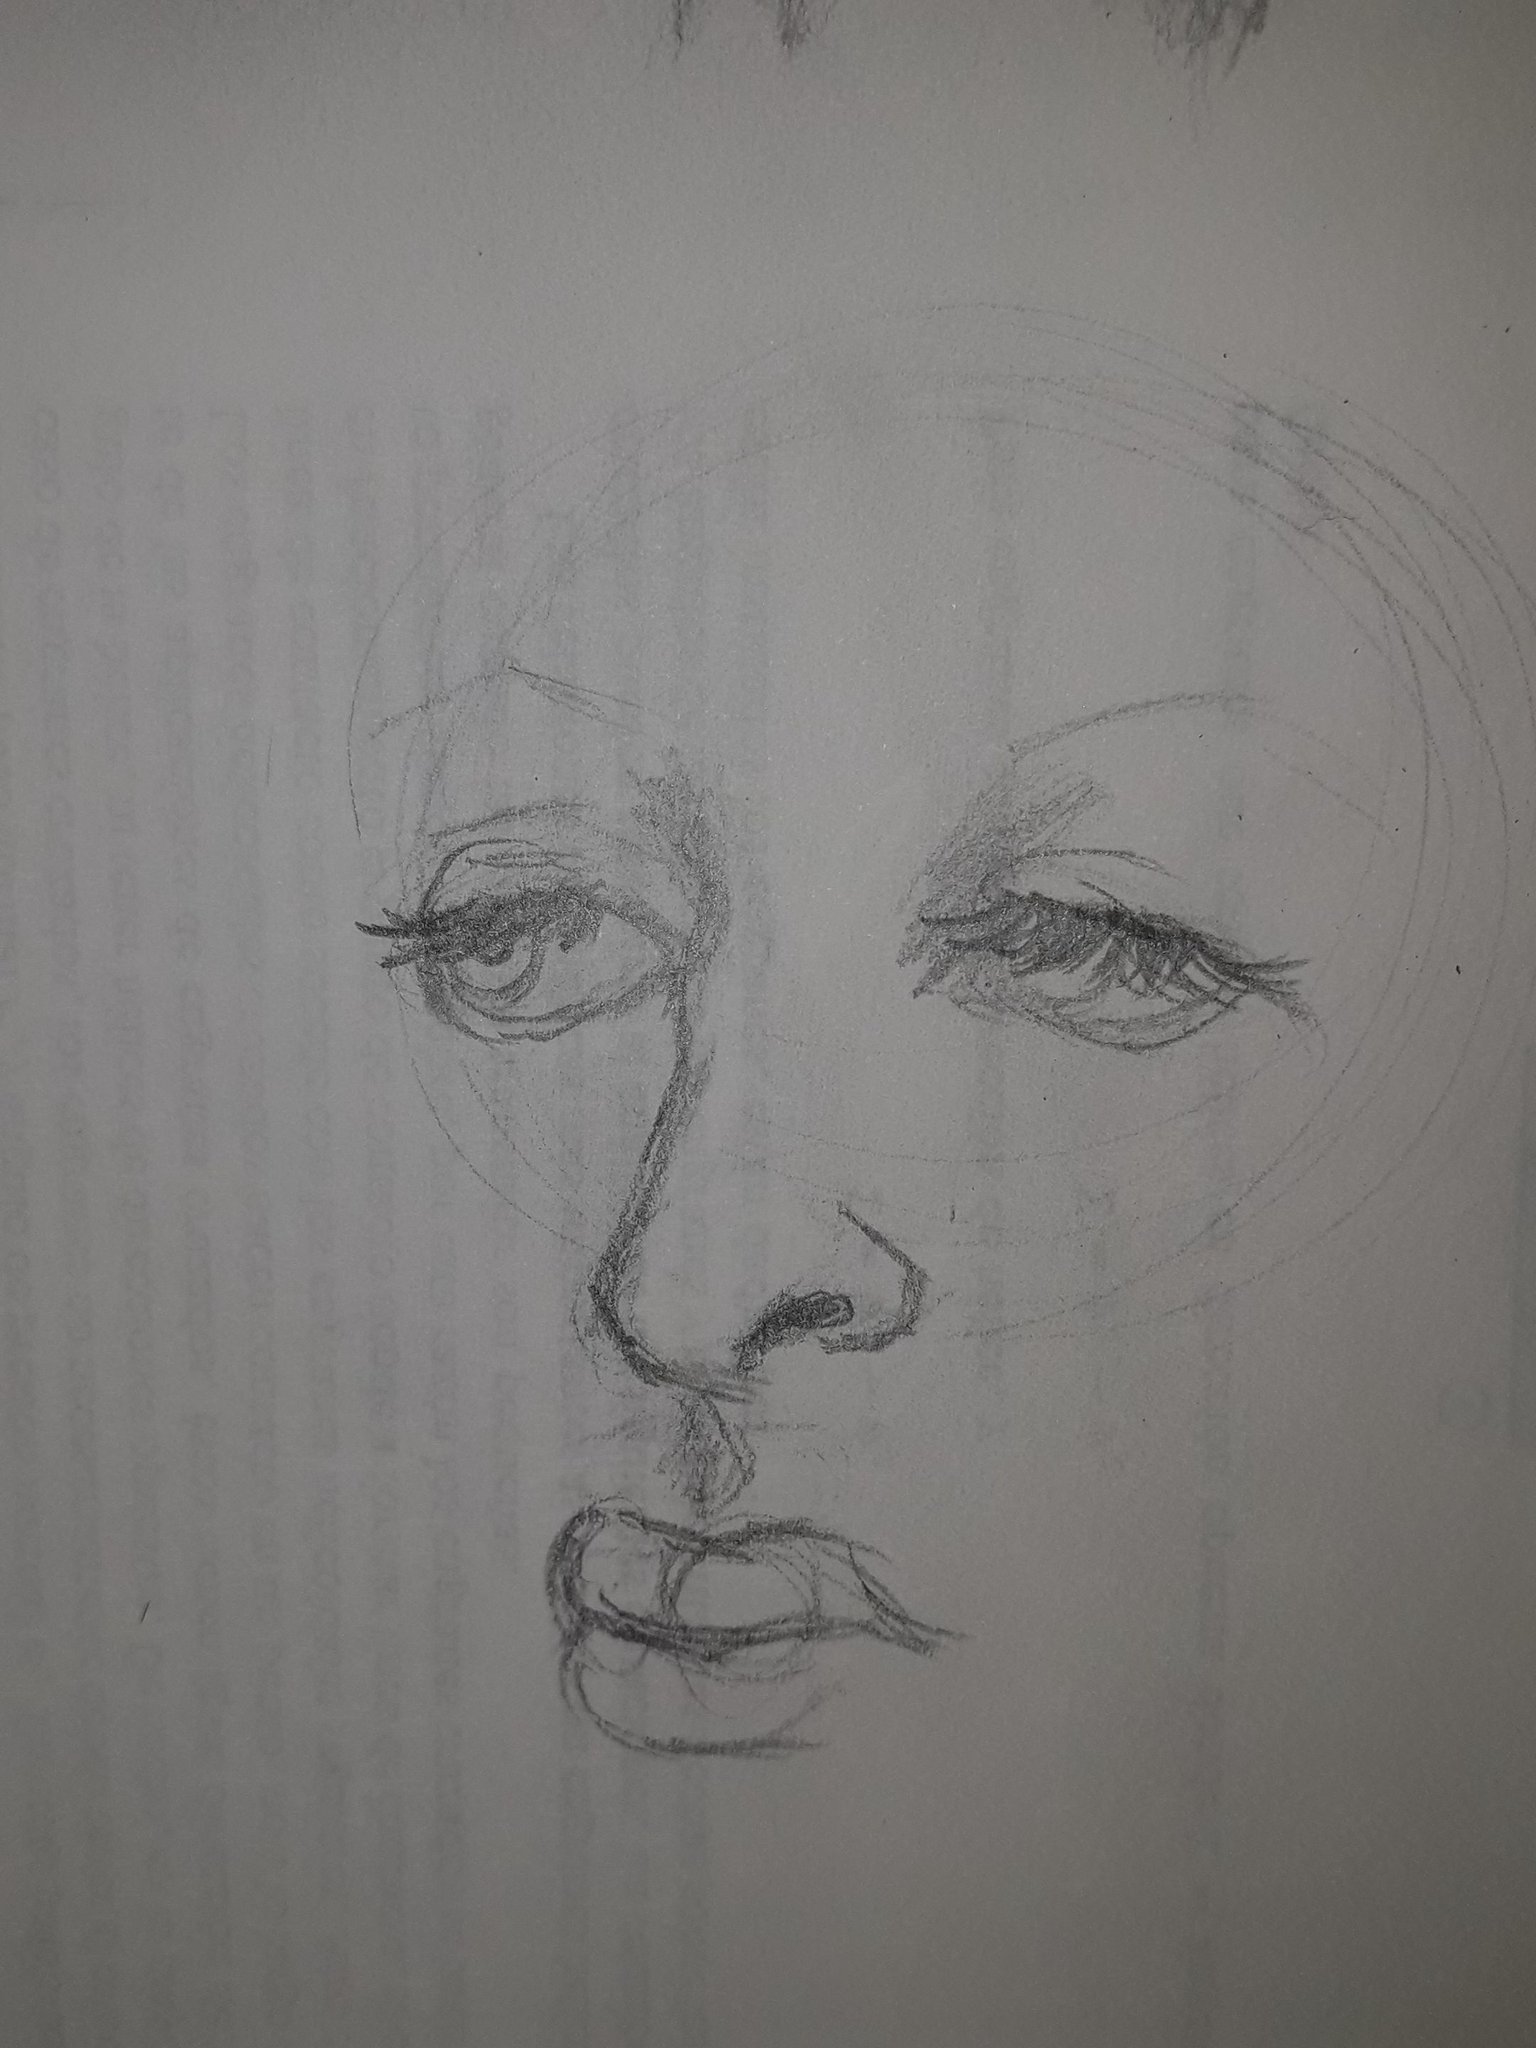
Here I only made eyelashes, which are oriented downwards, since the eyes are looking in that direction, and I detailed a little the inner part of the lower eyelid.
I also took care of erasing many of the guidelines, leaving only the circle I made at the beginning, because I will use it later to make the outline of the face.
I also remarked on the septum of the nose, giving it a little curvature.
Here I gave more shadows, especially on the upper eyelid, since remember that it is made up, and that was the effect I tried to achieve. I also highlighted the eyebrows, which are thin, as is common in this type of makeup. I drew the lower lashes with short and quick strokes and made the crease that is usually done under the lower eyelid.
Not only that, but I also drew the mouth a bit more open, to make it more faithful to the reference.
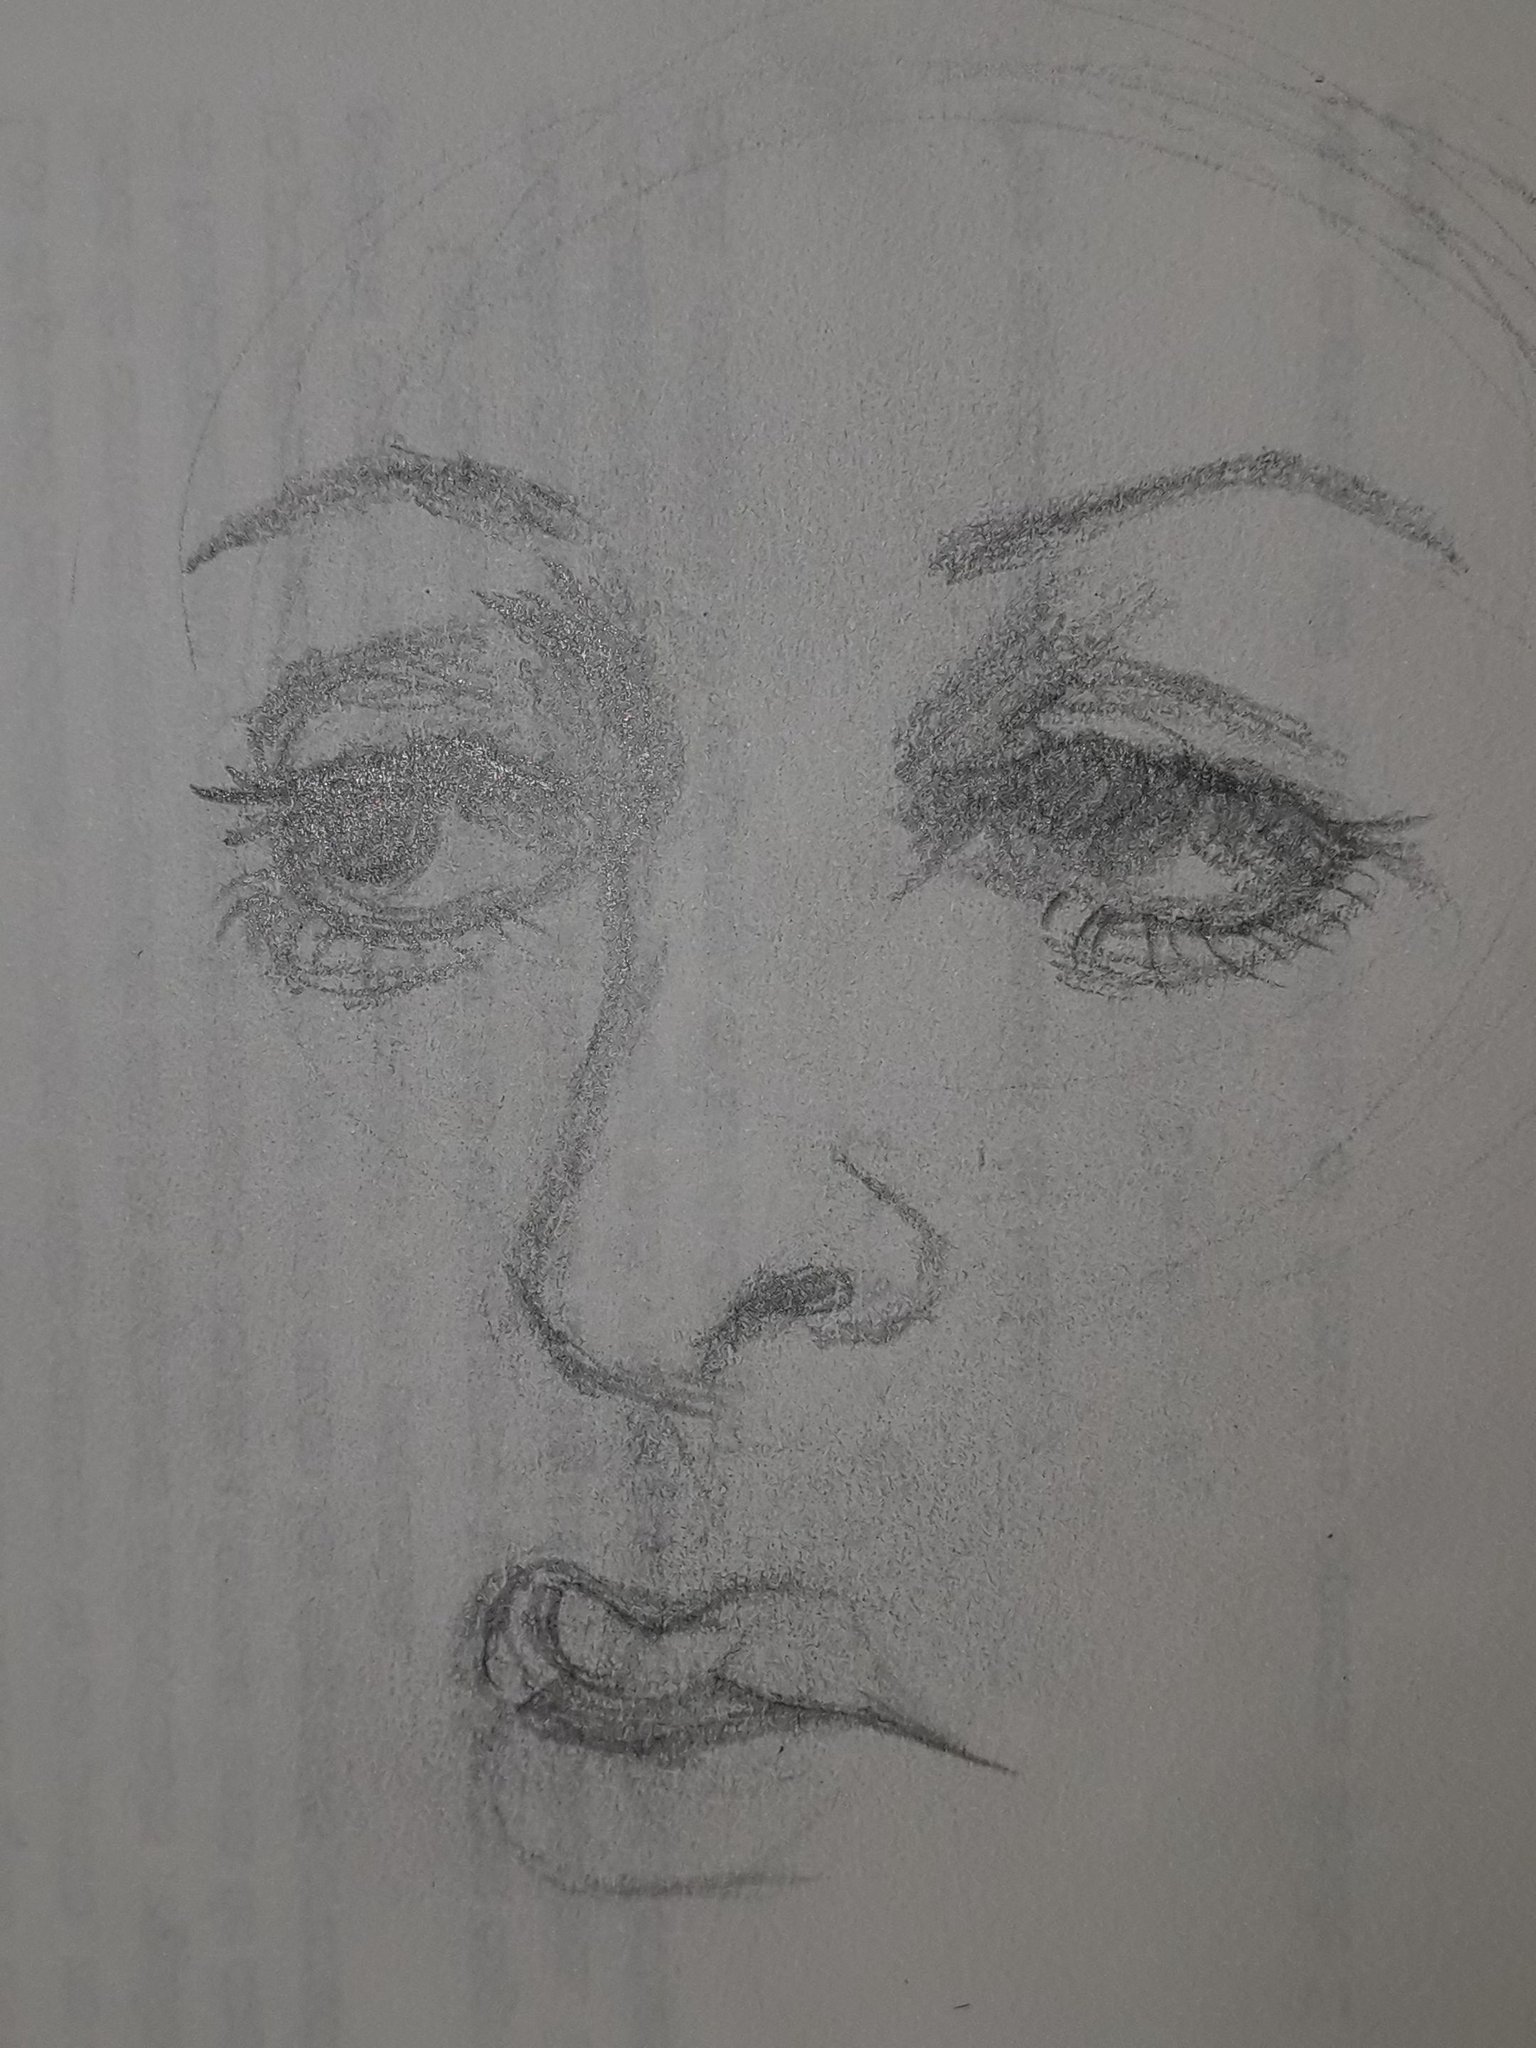
After all this, I ran my fingers over the entire drawing to blend a bit. I like to do this because this way I spread the graphite all over the drawing, and as I don't like it to look white, I feel it looks empty like this.
I added more shadows again, as they had faded after blending. And in certain areas I took care to give deeper shadows, such as the part where the septum of the nose meets the eye socket. I've noticed that this is one of the areas of the face where there is usually more shadow, and I think it's because it's technically an indentation.
Anyway, I also darkened the lashes, giving more strokes here and there, and darkened the iris.
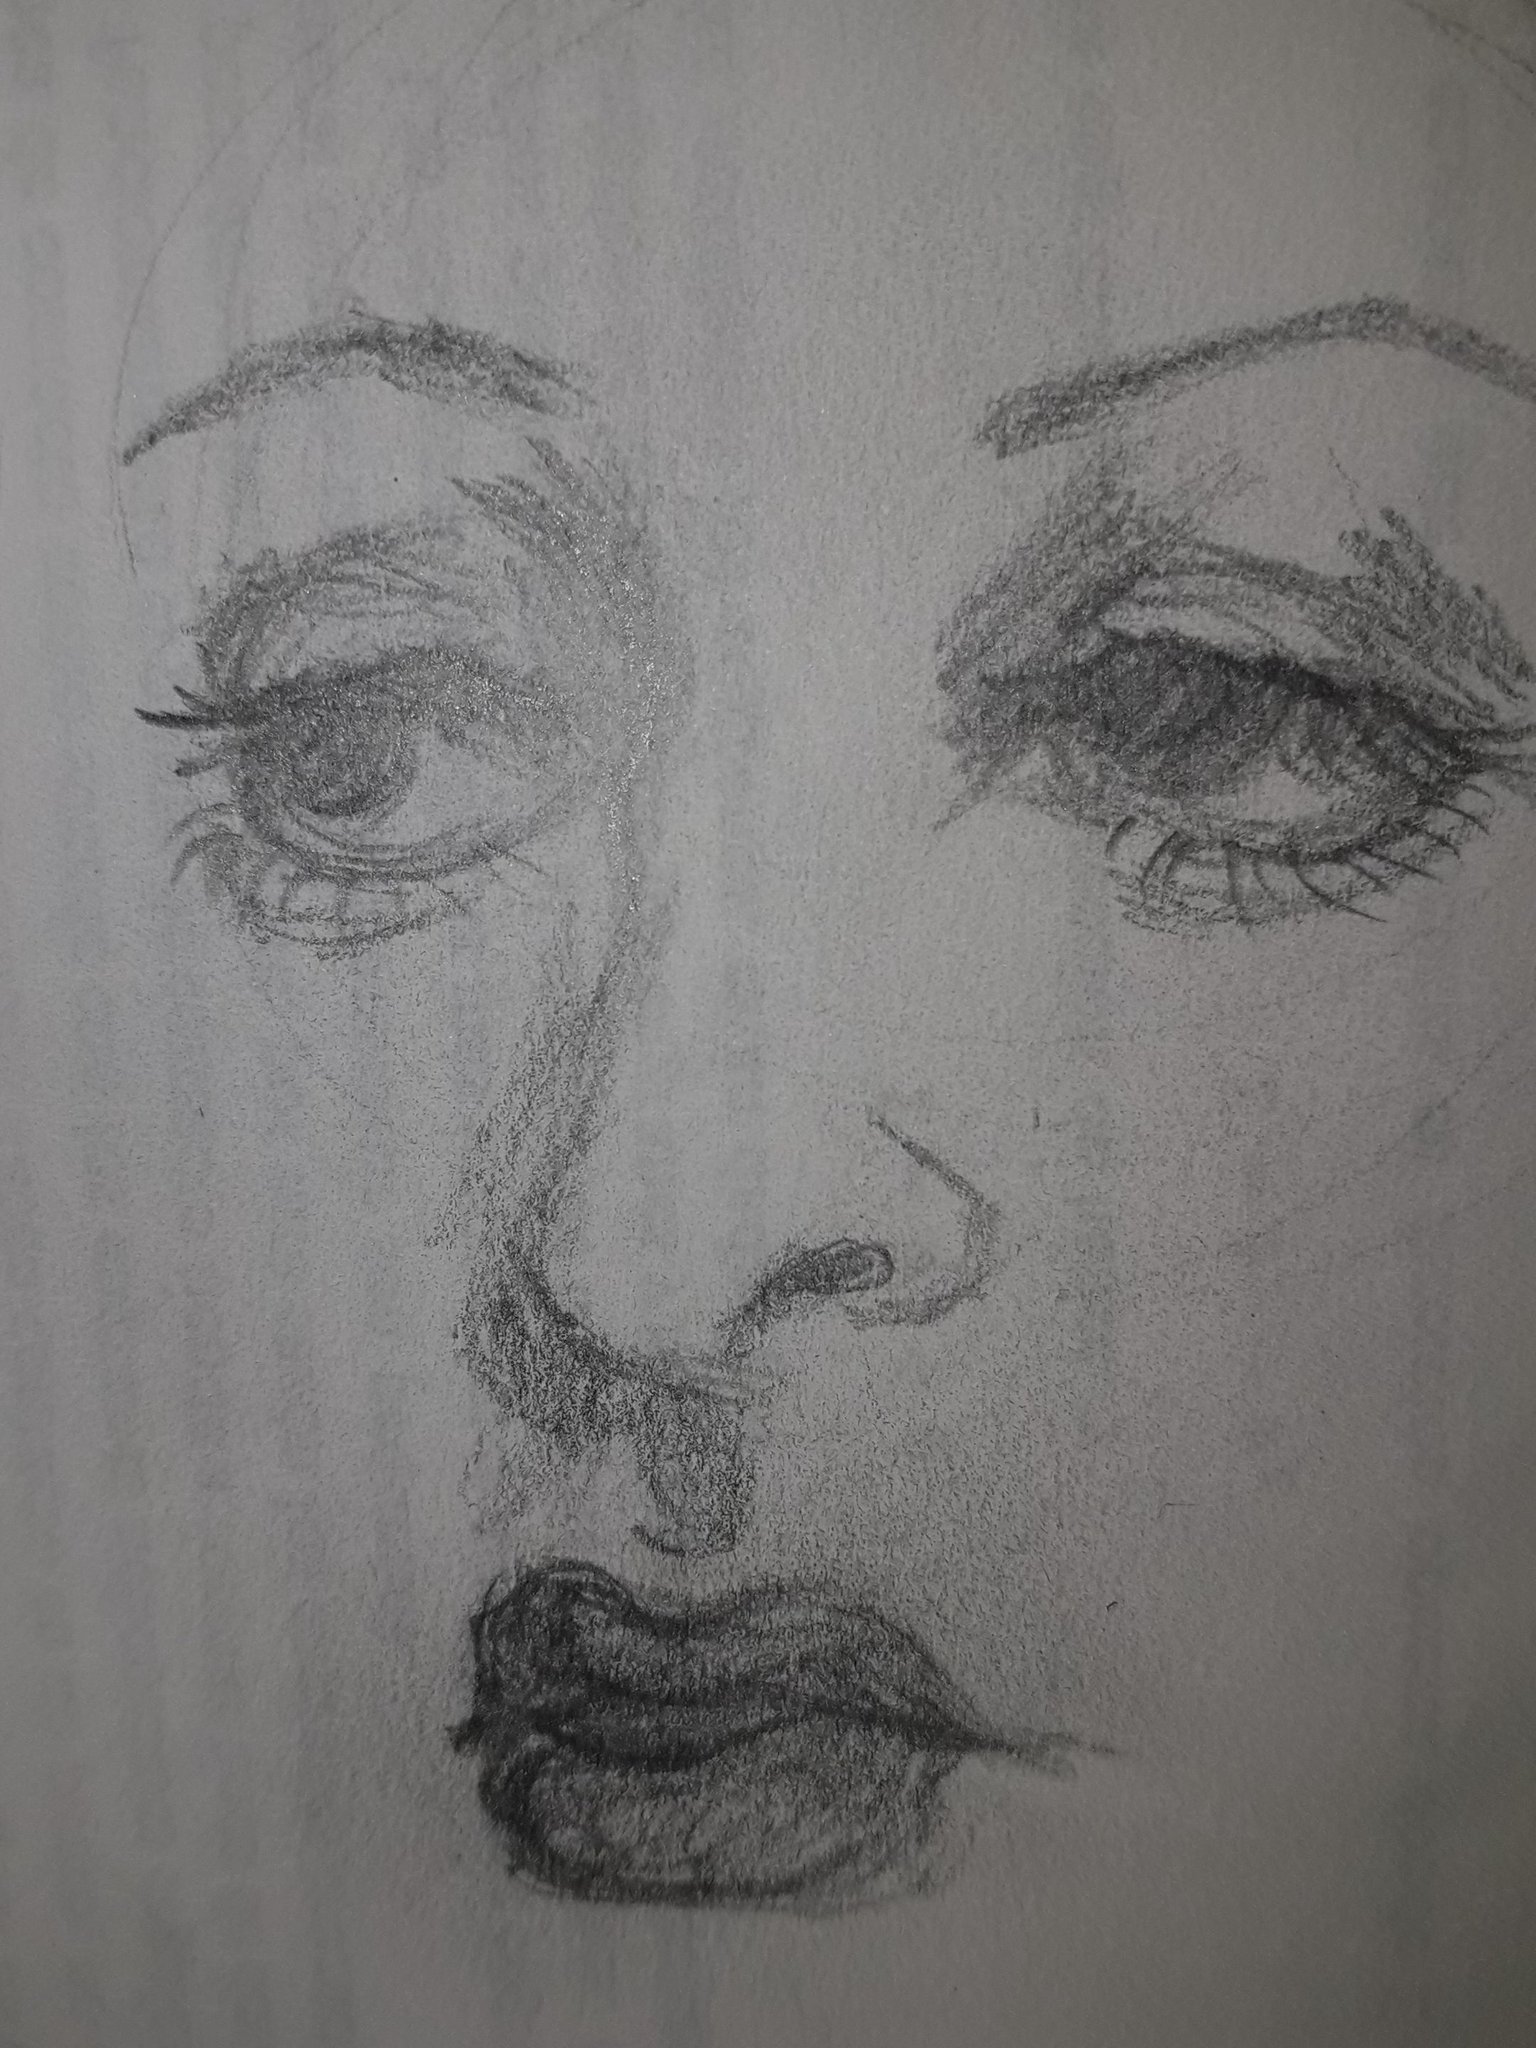
More shadows here. In the corners of the eyes, I put shadows, for example. One thing I learned, was to make the shadow strokes, directing them more or less towards where I felt the direction of the skin was. Do you know what I mean? For example, in the corners of the eyelids, I directed them outwards.
I also drew the shadow that the nose is casting and darkened the shadow of the nasolabial fold.
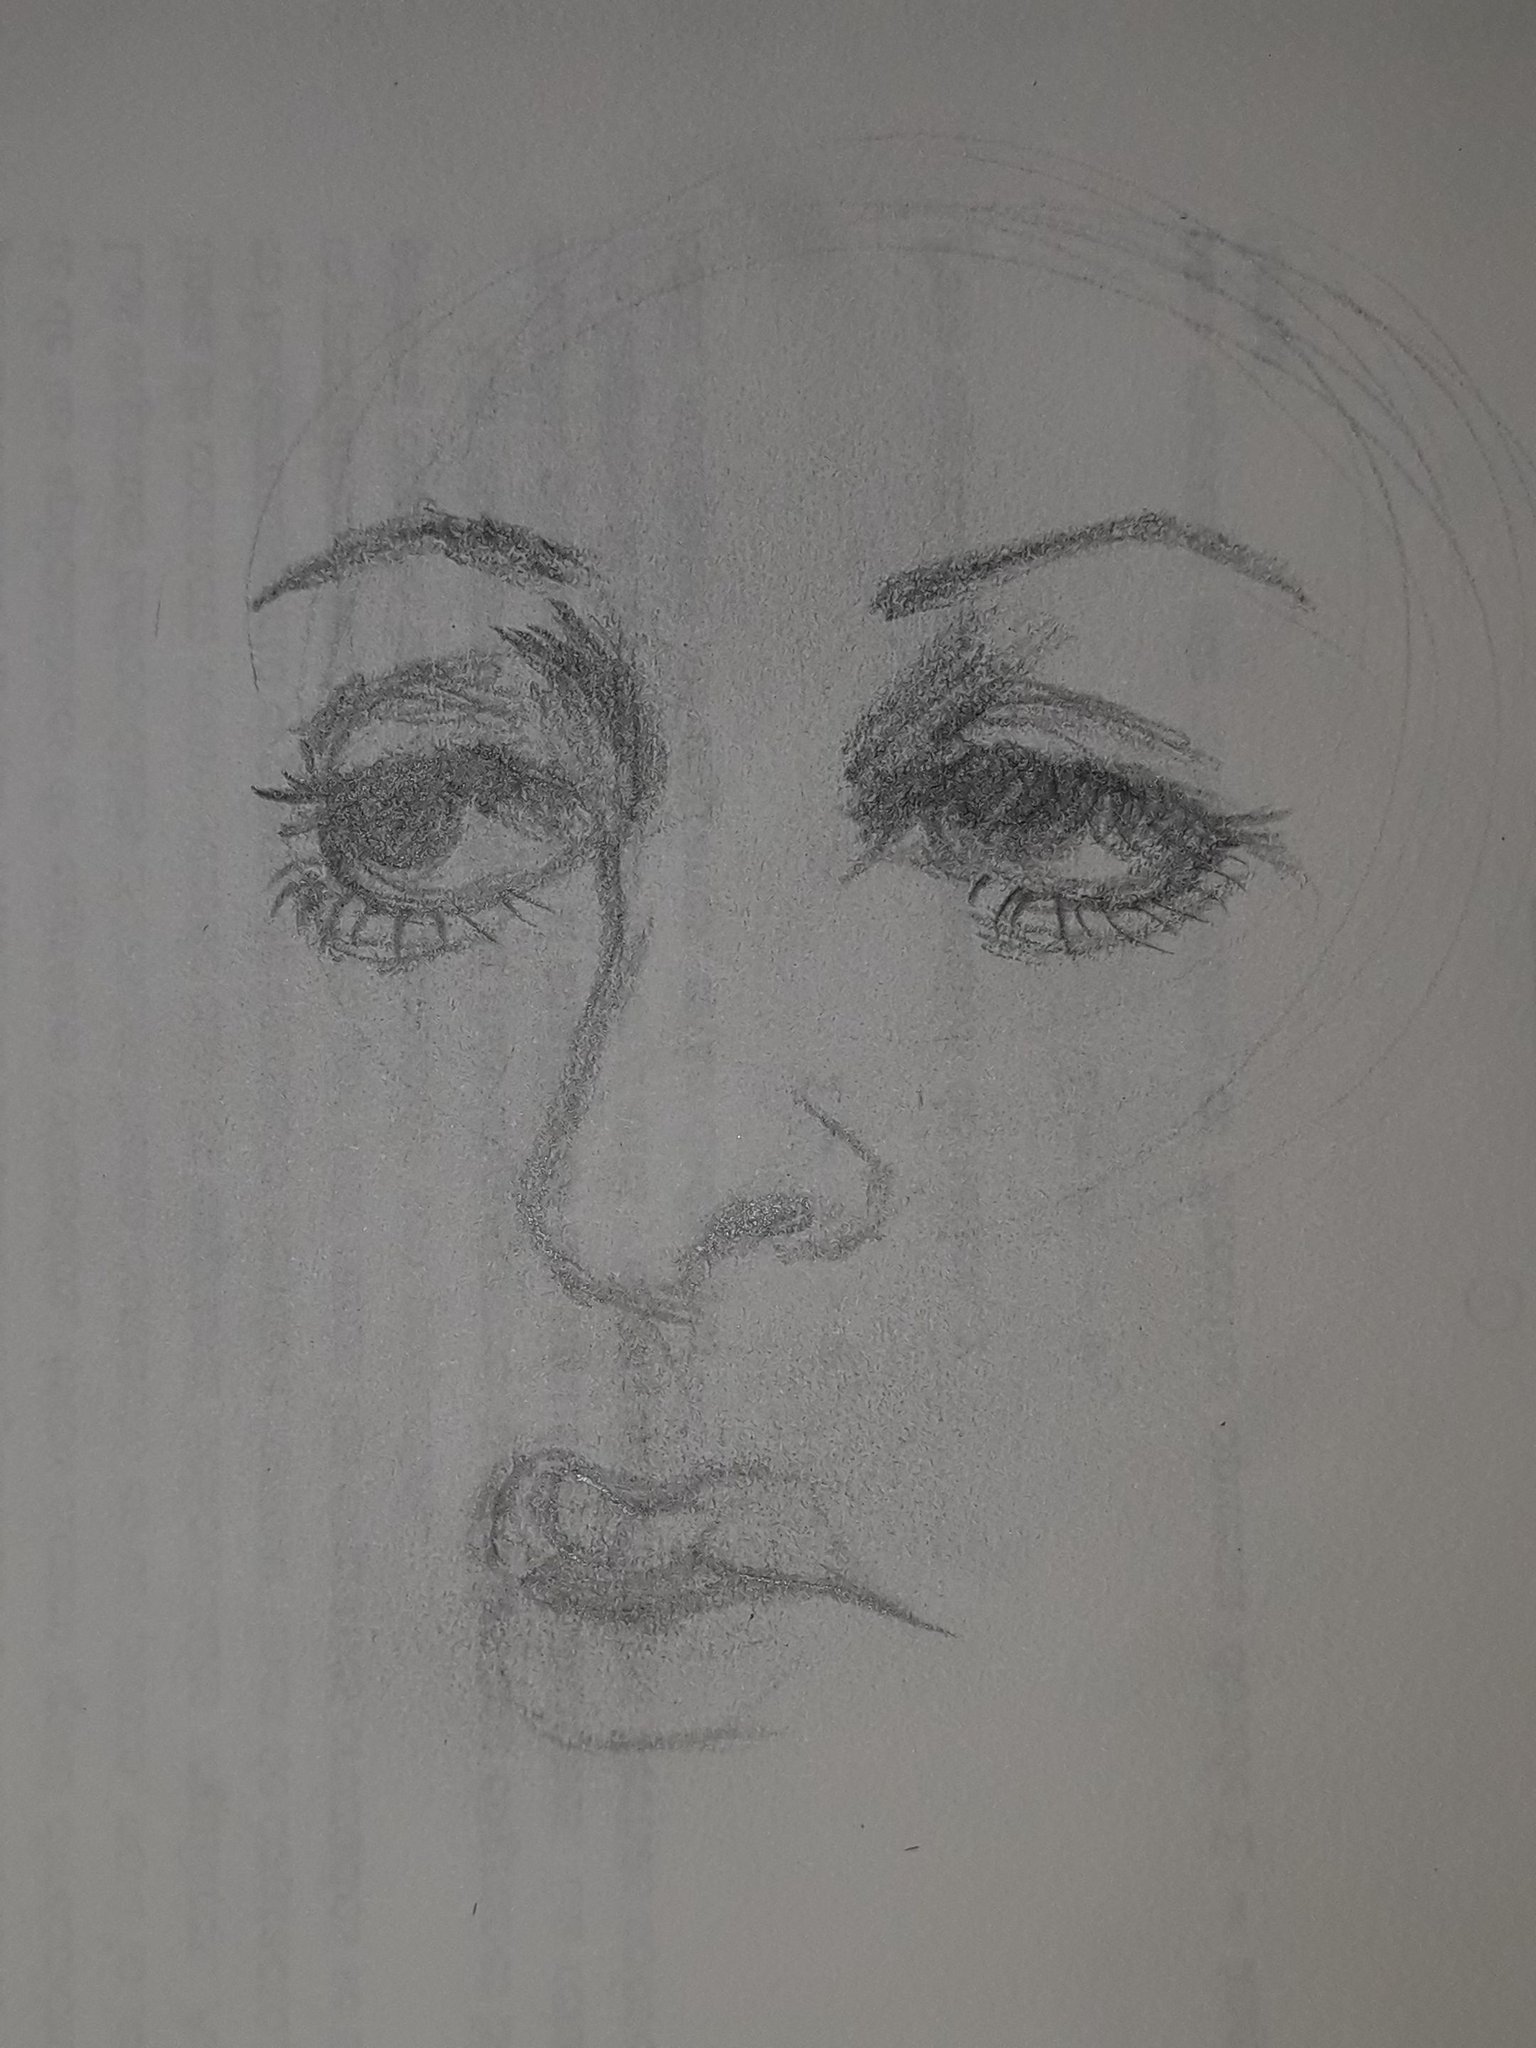
Finally, I gave “color” to the lip, with circular strokes. Don't forget the lip shadows, too, which I also did with circular strokes, in a section that is on the left side of the face since the shadows are coming from the right.
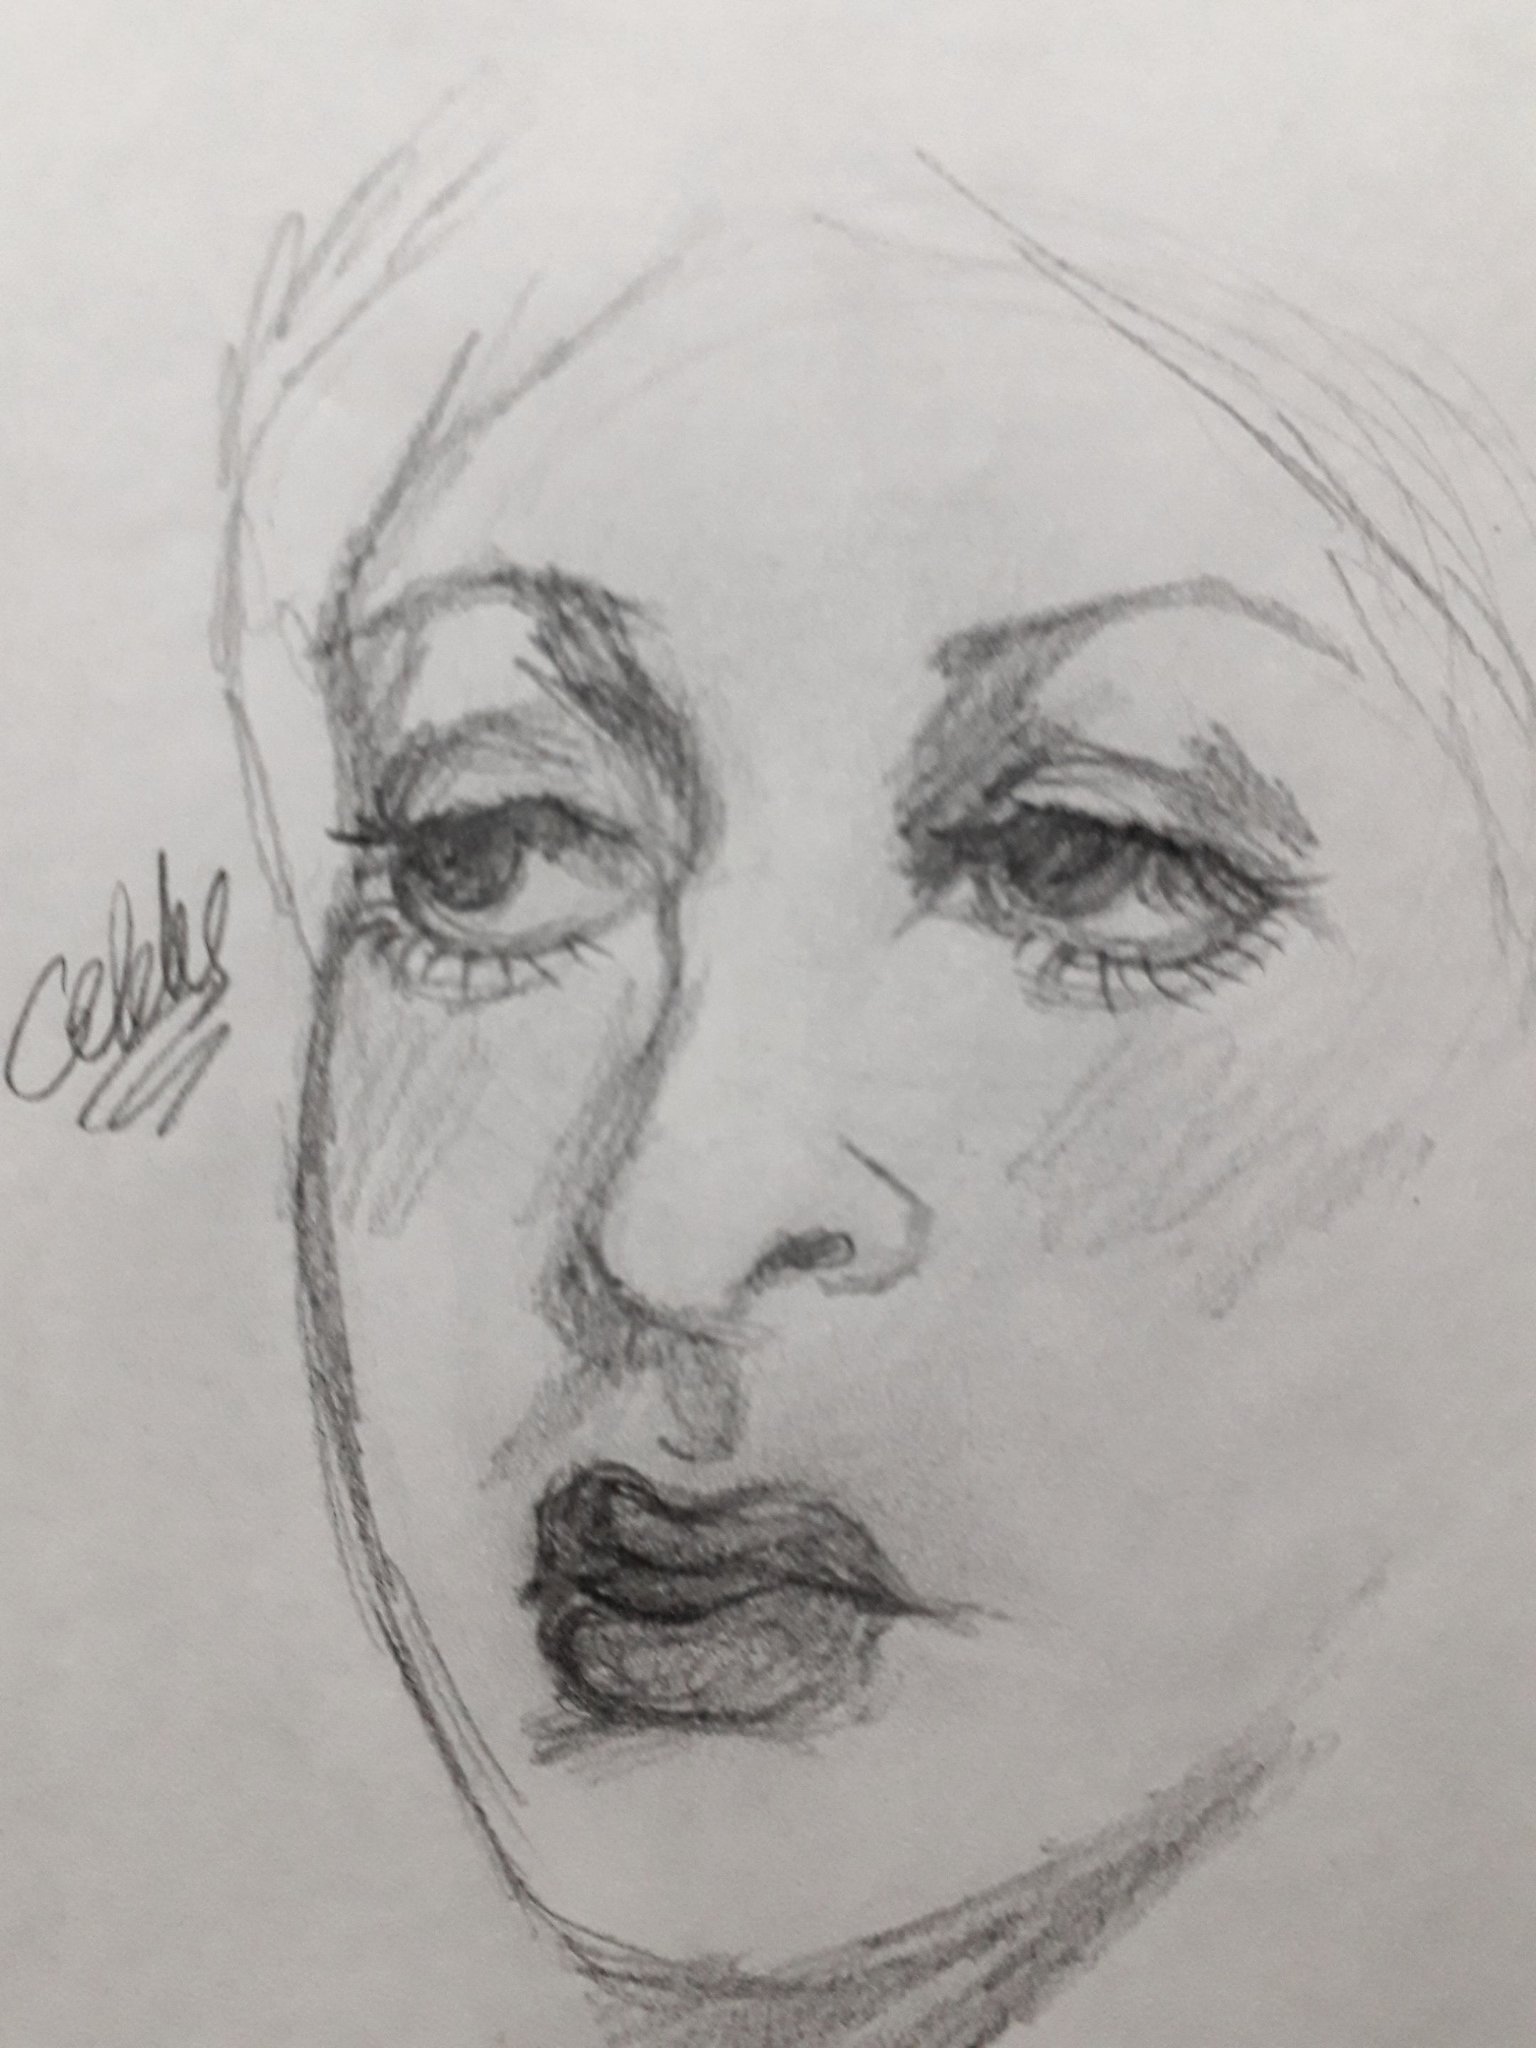
Lastly, I drew the outline of the face. I like to do it last now, because I use the elements of the face to guide me in addition to the reference. For example, I know that the area where the eyes are is a little more “sunken,” while in the area where the mouth is, the stroke is already leaning to make what would be the jaw.
I gave some strokes on the cheeks to give that idea of blush. I also loosely drew the idea of hair. Furthermore, I feel like this is more like a sketch, because where I wanted to focus more was on the face and try to draw makeup. Lastly, I did a bit of shadow under the jaw, where it's also almost always present.
And that was it.
This drawing is of drag makeup, more or less. My favorite element was the eyebrows. I would have liked to draw more, but the reference photo was of that area only.
Without anything else to add… Take care, drink water, and don't forget to smile. Love you! See you in the next post, bye!

Español
Holiii, amigos de la comunidad de Sketchbook, tiempo sin venir por acá. ¿Cómo se encuentran el día de hoy?, ¡Espero que muy bien!
Siempre digo que debo compartir dibujos con más regularidad, pero siempre termino haciendo un dibujo decente a la semana cuando mucho, y el resto son lo que yo considero bocetos.
Sin embargo, creo que estaré haciendo pequeños dibujos y tomando tutorial para traerlo acá. Quisiera que mi cuenta tuviera un poco más de mi arte, pues me gusta dibujar mucho y no subo con tanta regularidad como quisiera.
Así que en este post les mostraré un dibujo rápido de un rostro interesante, ¡vamos allá!
Comencé por hacer un bosquejo de los rasgos faciales, empezando por los ojos. Ya saben que no hago curvas para esto, sino que uso solo líneas rectas, igualmente con las cejas. La base de la nariz la dibujé a partir de un círculo, igualmente que para los labios utilicé formas circulares, intentando dar esta sensación de volumen.
Aquí añadí los iris, junto con un poco de sombra, en los pliegues del parpado superior.
También añadí sombras en la fosa nasal y en el huequito que tenemos entre los labios y la nariz, el cual se llama surco nasolabial (sí, lo acabo de Googlear)
Luego, guiándome de los círculos que hice anteriormente, tracé el contorno de los labios, haciendo las curvaturas necesarias para que diera más esa idea de volumen.
Acá solo hice pestañas, las cuales están orientadas hacia abajo, ya que los ojos están mirando en esa dirección, y detallé un poco la parte interna del párpado inferior.
También me encargué de borrar muchas de las líneas guía, dejando únicamente la del círculo que hice al principio, porque de ella me guiaré más adelante para hacer el contorno del rostro.
También remarqué el tabique de la nariz, dotándolo de una pequeña curvatura.
Acá di más sombras, especialmente en el párpado superior, ya que recordemos que está maquillado y ese era el efecto que intenté. También remarqué las cejas, las cuales son delgaditas, como es común en este tipo de maquillaje. Dibujé las pestañas inferiores con trazos cortos y rápidos e hice el pliegue que se suele hacer debajo del párpado inferior.
También dibujé la boca un poco más abierta, para hacerlo más fiel a la referencia.
Después de todo esto, pasé mis dedos por encima de todo el dibujo para difuminar un poco. Me gusta hacer esto porque así esparzo el grafito por todo el dibujo, pues no me gusta que se vea blanco, siento que luce vacío así.
Volví a dar más sombras, pues se habían desvanecido después del difuminado. Y en ciertas zonas me encargué de dar sombras más profundas, como lo son la parte donde se une el tabique de la nariz con la cuenca del ojo. Me he dado cuenta de que esa es una de las zonas del rostro donde suele haber más presencia de sombra, y creo que es porque es, técnicamente, una hendidura.
En fin, también oscurecí las pestañas, dando más trazos aquí y allá, y oscurecí los irises.
Más sombras acá. En las esquinas de los ojos puse sombras, por ejemplo. Una cosa que aprendí, fue a hacer los trazos de las sombras, direccionándolos más o menos hacia donde yo sentía que era la dirección de la piel. ¿Sí me explico? Por ejemplo, en las esquinas de los parpados, las direccioné hacia afuera.
También dibujé la sombra que está proyectando la nariz y oscurecí la sombra del surco nasolabial.
Por fin le di “color” al labio, con trazos circulares. No olviden las sombras de los labios, también, las cuales también hice con trazos circulares, en una sección que está del lado izquierdo de la cara, ya que las sombras vienen de la derecha.
Por último, dibujé el contorno del rostro. Me gusta hacerlo de último ahora, porque uso los elementos del rostro para guiarme, además de la referencia. Por ejemplo, sé que la zona donde están los ojos es un poco más “hundida”, mientras que en la zona donde está la boca, ya el trazo se va inclinando para hacer lo que sería la mandíbula.
Di algunos trazos en las mejillas para dar esa idea de rubor. También dibujé vagamente la idea de cabello… Siento que esto es más como un boceto, pues donde quise centrarme más fue en el rostro e intentar dibujar maquillaje. Por último, hice un poco de sombra debajo de la mandíbula, donde también casi siempre está presente.
Y ya estaría.
Este dibujo es de un maquillaje drag, más o menos. Mi elemento favorito fueron las cejas. Me hubiera gustado dibujar más, pero la foto de referencia era de esa área nada más.
Sin nada más que añadir… Cuídense, tomen agua, y no se olviden de sonreír. ¡Se les quiere! Nos vemos en el próximo post, ¡chau!

Credits | Créditos
- English translation DeepL (sorry for any mistakes, English is my second language)
- Traducción al inglés DeepL (lo siento por cualquier error, el inglés es mi segundo idioma.)
- Dividers, and banners made in Canva
- Separadores y banners hechos en Canva
- Photos used in the post were taken by me, using a Samsung Galaxy J6
- Las fotos usadas en el post fueron tomadas por mí, usando un Samsung Galaxy J6
Hermoso! Cada vez dibujas mejor nena. Eres prueba de que la práctica hace al experto, te felicito. 🥰🫂👏🏻👏🏻👏🏻👏🏻
Espero que sea así, aunque aún me falta muchísimo, pero me alegra que te haya gustado qwq
Sending Love and Ecency Curation Vote!
 Please Vote for our New Proposal! 🙏
Thank you for your support✨
You're welcome! :)