
✨🩷✨🩷✨🩷✨🩷✨🩷✨🩷✨
Hola hiver's y comunidad artesana ! El día de hoy les traigo mi post para el #activate n#17 de #hivediy , de la temática con tarjetas decorativas , así que les trago este post con un tutorial para esta tarjetita en 3D de rosas con muchos detalles que hice para regalarla a mi mamá en su cumpleaños y que es un bonito detalle si quieres obsequiar una tarjeta diferente y única.
Materiales
🩷 Cartulina y papeles de colores
🩷Pega
🩷 Pistola de silicona y barritas
🩷 regla y compás
🩷 Retazos de Foami
🩷 Cartulina espejo dorada
🩷 Hilo plateado
Manos a la obra
English Version
✨🩷✨🩷✨🩷✨🩷✨🩷✨🩷✨🩷✨🩷✨🩷✨
Hello hiver's and artisan community! Today I bring you my post for get active #17, on the theme with decorative cards , so I bring you this post with a tutorial for this 3D rose card with many details that I made to give to my mother on her birthday and that is a nice detail if you want to give a different and unique card.
Materiales
🩷 Cardboard and colored papers
🩷 school white glue
🩷 Silicone gun and bars
🩷 ruler and compass
🩷 Foami Scraps
🩷 Gold mirror cardboard
🩷 silver thread
Let's do it
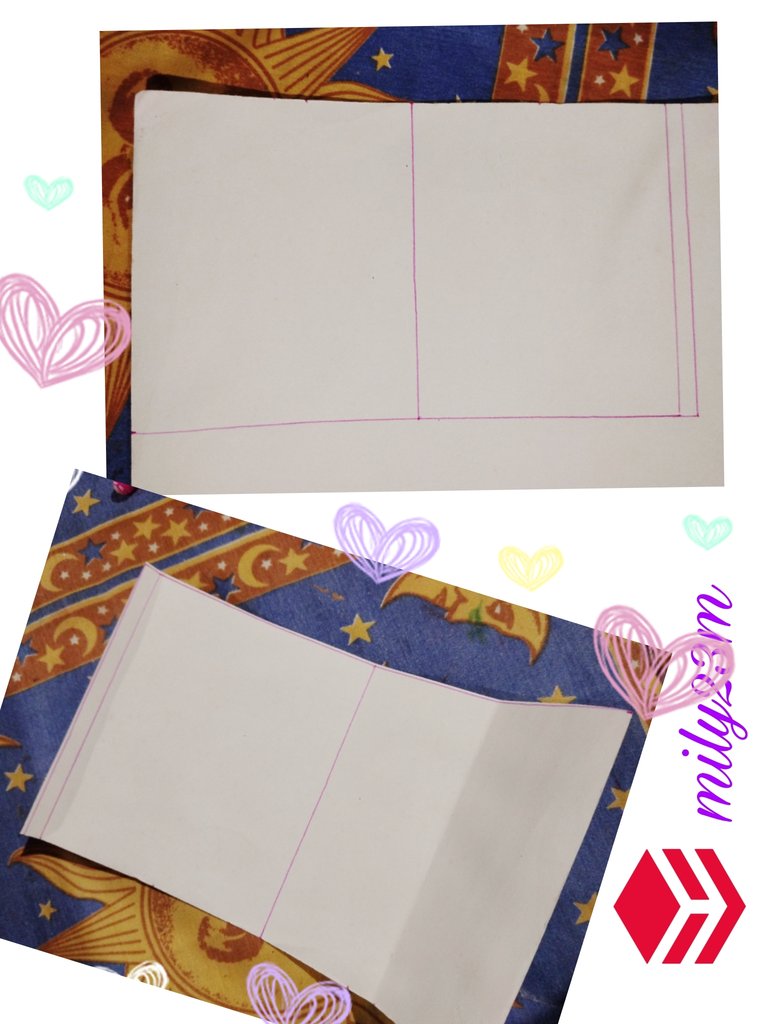
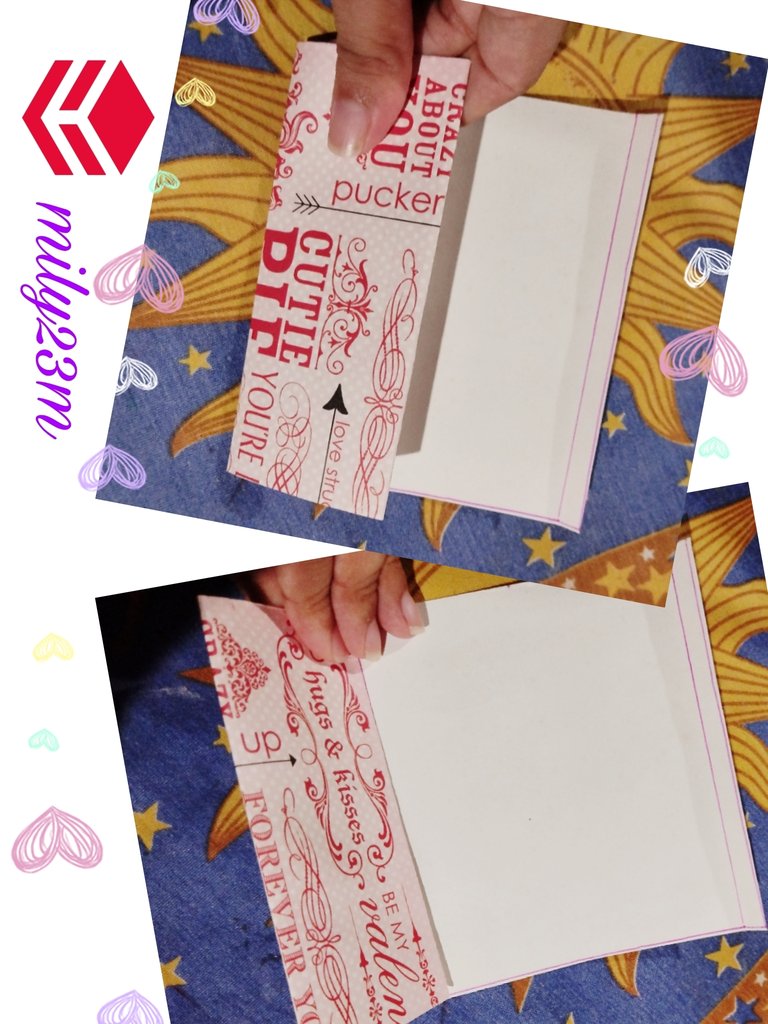
#1 Para el primer paso tomaremos una cartulina para el cuerpo de la tarjeta, la hice pequeña de 10 CM de ancho x 12 CM de largo para cada lado, serían unos 20,5 CM por qué serían dos lados ,y una pestañita de 0,5cm que deje pero es más opcional, Teniendo en cuenta que para la primera cara de la tarjeta mediremos la mitad que serían 5cm a la mitad y la doblas , yo la doble hacia adentro ,pero también funciona solo doblas hacia afuera.
English Version
#1 For the first step we will take a piece of cardboard for the body of the card, I made it small, 10 CM wide x 12 CM long for each side, it would be about 20.5 CM because it would be two sides,y a little tab of 0.5cm that I leave but it is more optional. Taking into account that for the first side of the card we will measure half, which would be 5cm in half and you fold it, I fold it inwards, but it also works if you just fold it outwards.
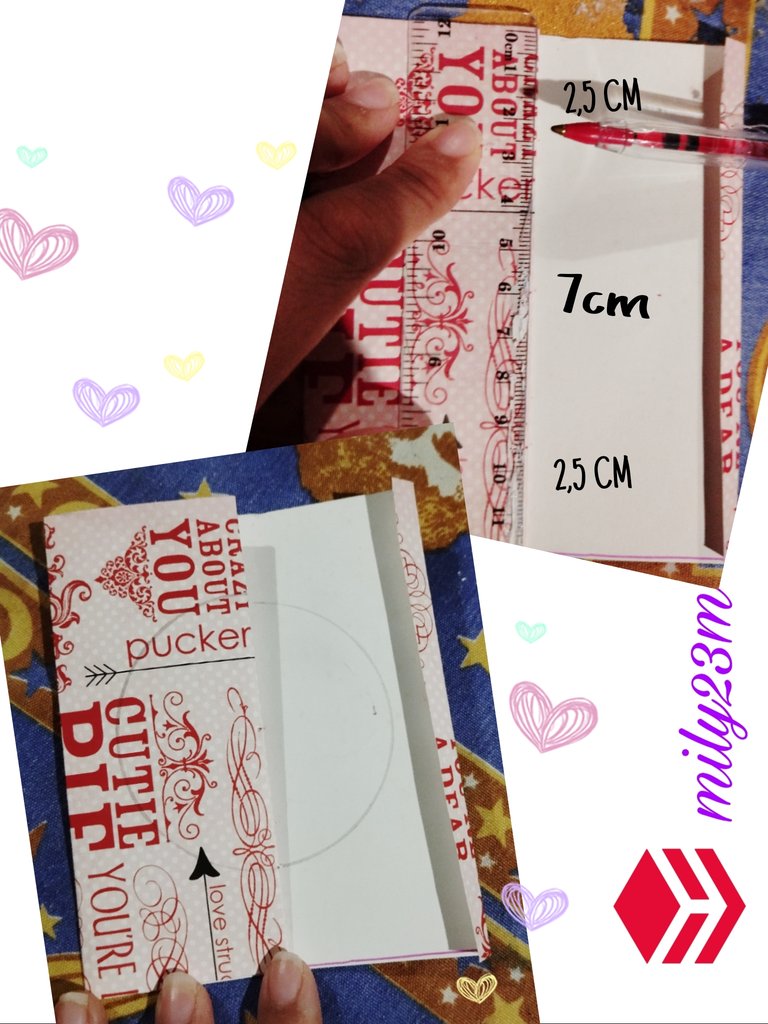
#2 Una vez que se dobla a la mitad la cara delantera de la tarjeta a la mitad, en el doblez medí unos 2,5cm desde el inicio y marqué un puntito, y en la parte inferior unos 2,5cm también ,dejándome unos 7 CM en el medio , aquí sacando la mitad y ayudándome de un compás hice un círculo usando como referencia ese espacio tanto para la cara delantera de la tarjeta,como marcando el círculo adentro de la tarjeta.
English Version
#2 Once the front face of the card is folded in half, at the fold I measured about 2.5cm from the beginning and marked a small dot, and at the bottom about 2.5cm too, leaving me about 7 CM in the middle, here taking out half and using a compass I made a circle using that space as a reference both for the front face of the card, and marking the circle inside the card.
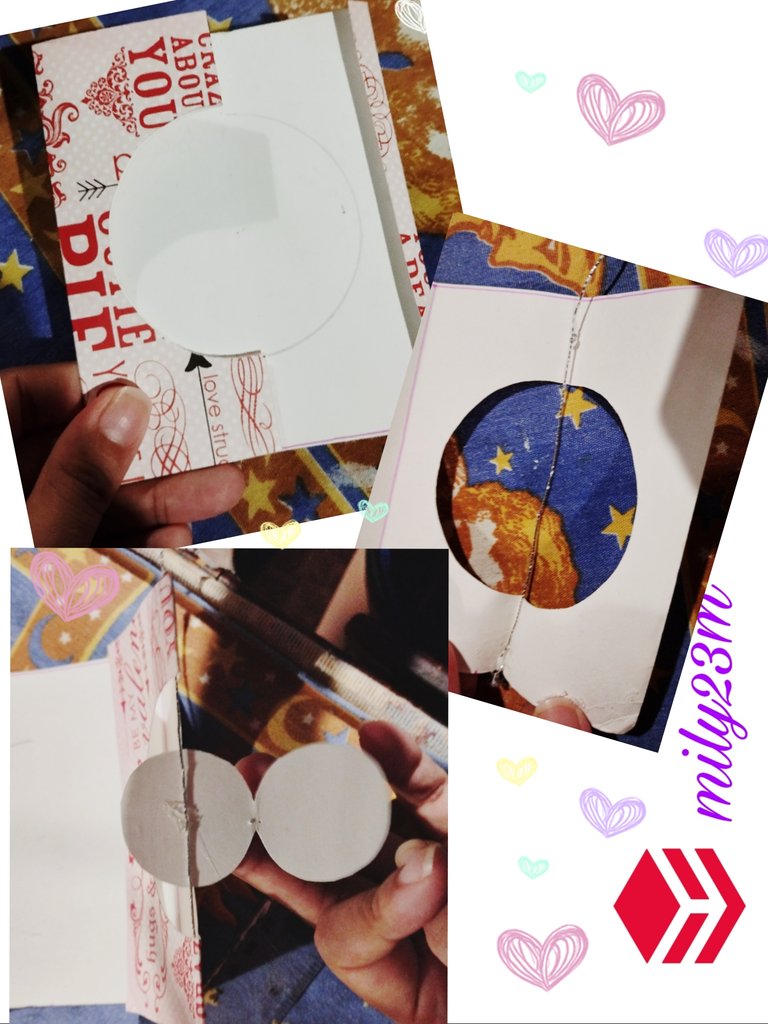
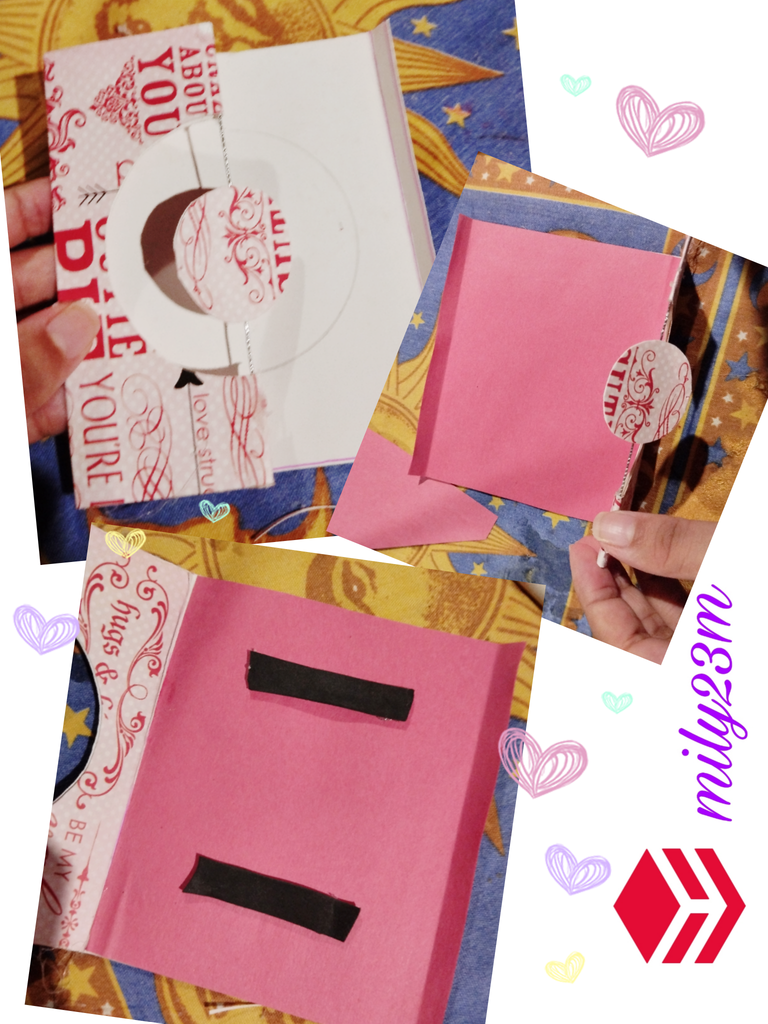
#3 Cortando el círculo ⏺️ de la tarjeta (en en ambos lados del doblez, usando un hilo 🧵 en este caso uno plateado , medí la distancia del largo de la tarjeta,y la pegué con silicón caliente, la idea es qué quede tenso el hilo, luego aprovechando la misma mitad de círculo que me quedó, la use dando un pequeño círculo dejándole una pequeñísima union entre ambas caras del círculo,lo abrí y lo pegué justo en medio del hilo.
English Version
#3 Cutting the circle ⏺️ from the card (on both sides of the fold, using a thread 🧵 in this case a silver one, I measured the distance of the length of the card,and I glued it with hot silicone, the idea is to keep the thread taut, then taking advantage of the same half of the circle that I had left, I used it making a small circle, leaving a very small union between both sides of the circle, I opened it and glued it right in the middle of the thread.
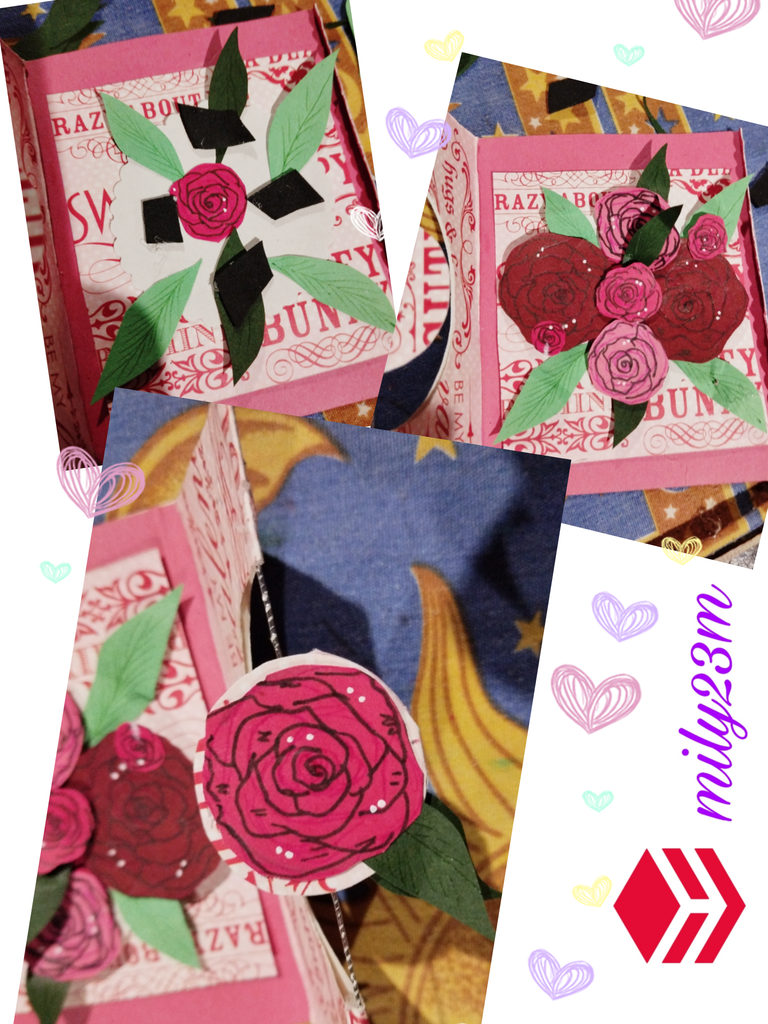
#4 Una vez que esté bien asegurado el círculo del centro se pega muy bien el doblez de la cara delantera de la tarjeta para que no se vean las uniones , con una cartulina de construcción color rojo pegué y corté del tamaño del la tarjeta por la parte de adentro (esto se lo pueden saltar si quieren dejarla del mismo fondo que tenía la cartulina pero la mía estaba un poco manchada), cortando unas tiras de foami negro las pegué al nivel de la mitad de la tarjeta esto será para darle un poco de tridimensionalidad ,(aquí también puedes en vez de ponerlo de forma horizontal , puedes poner las tiras verticales a los lados dejando un espacio en medio para crear un espacio que sirva para meter alguna nota con dedicatoria o incluso un billete).
English Version
#4 once the center circle is well secured, the fold of the front of the card is glued very well so that the seams cannot be seen, with a red construction cardboard I glued and cut the size of the card on the inside (you can skip this if you want to leave it the same background as the cardboard but mine was a little stained), cutting some strips of black foam I glued them at the level of the middle of the card, this will give it a little three-dimensionality, (here you can also instead of putting it horizontally, you can put the vertical strips on the sides leaving a space in the middle to create a space that can be used to put a note with a dedication or even a bill).
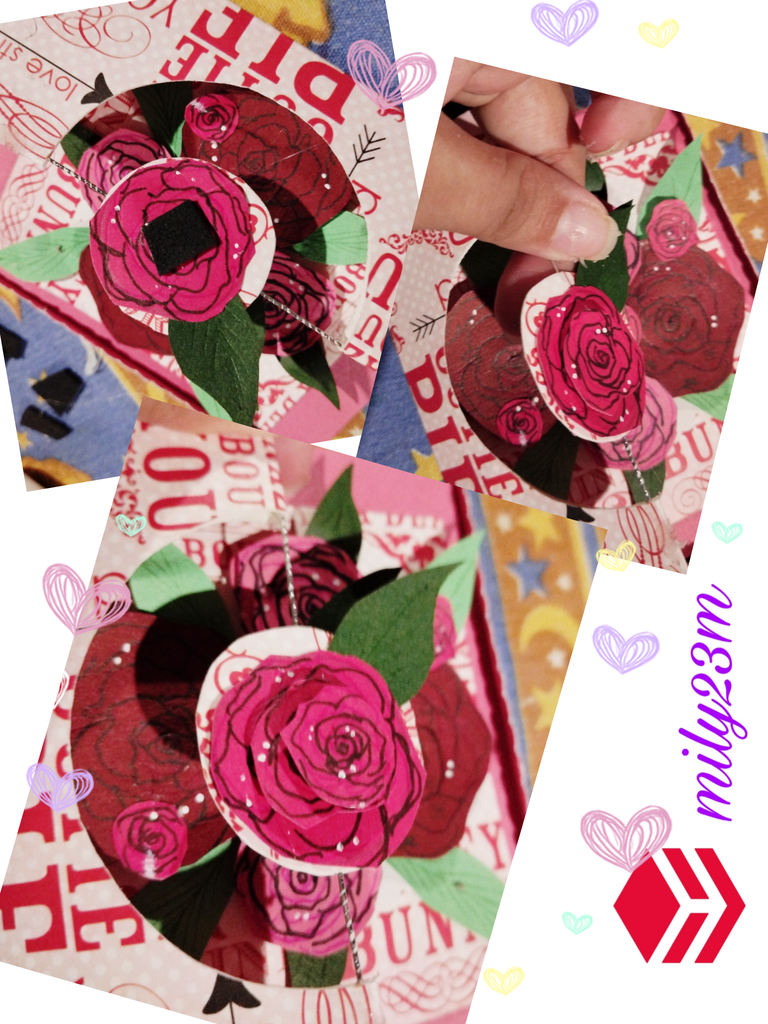
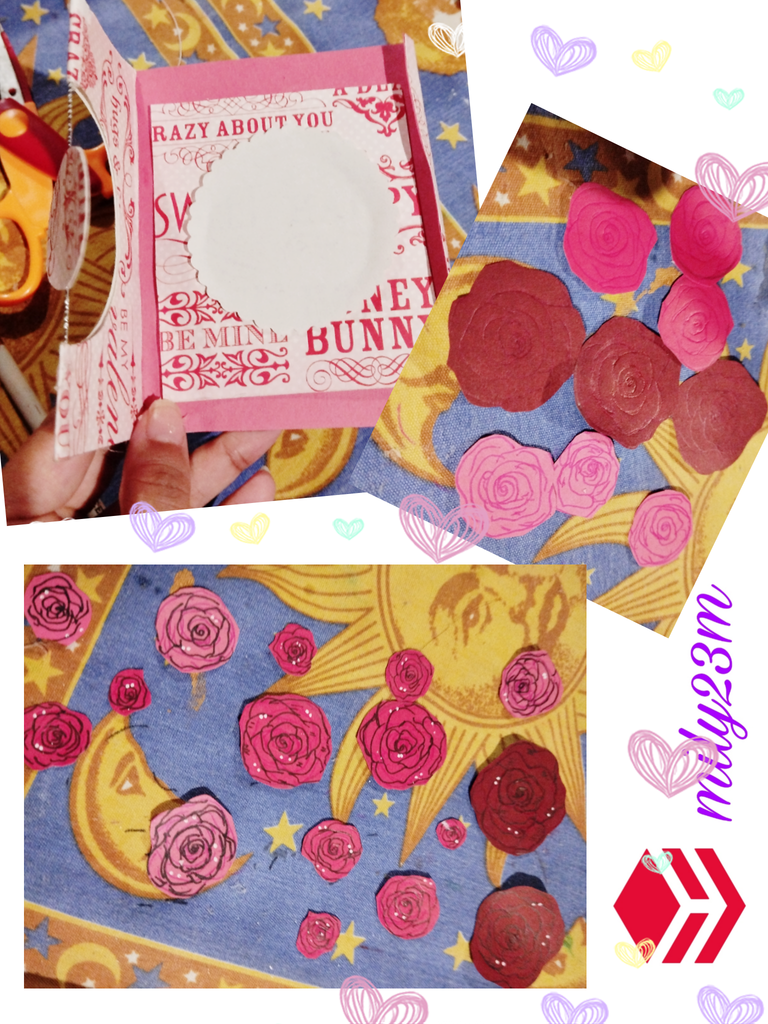
#5 Una vez pegada los rectángulos del Foami, luego agregué un rectángulo de cartulina del mismo diseño que tiene la parte exterior , lo hice de 8,5cm x 9,5 CM de largo y también corté un círculo del mismo tamaño que el círculo que corté en la tarjeta , para colocarlo en el centro , aunque esté círculo es opcional ya que con las flores no se notará mucho, las rosas las hice en tres cartulinas de diferentes tonalidades de rojo ❤️ , la idea es crear rosas de diferentes tamaños ,primero las dibuje con algunos rayones con bolígrafo rojo, y marcador negro punta fina , y algunos puntitos de pintura Blanca, con la idea de hacer tres niveles para la rosa principal, también corté algunas hojitas verdes de dos tonalidades 🌿 .
En el círculo blanco empecé a distribuir las hojas con el diseño, y corté algunas cuadrados de foami para crear nivel de altura, pegué cuatro y distribuí las flores por tamaño , y para las más pequeñas , pegué otros cuadritos de foami para llevarlas aún más y hacer ese efecto 3D. También pegué una rosa al círculo en el hilo plateado.
English Version
#5 Once the Foami rectangles were glued, then I added a cardboard rectangle of the same design as the outside, I made it 8.5cm x 9.5 CM long and I also cut a circle the same size as the circle I cut on the card, to place it in the center, although this circle is optional since with the flowers it will not be very noticeable, I made the roses on three cardboards of different shades of red ❤️ , the idea is to create roses of different sizes, first I drew them with some scratches with a red pen, and a fine-tipped black marker, and some white paint dots, with the idea of making three levels for the main rose, I also cut some green leaves of two shades 🌿 .
On the white circle I started to distribute the leaves with the design, and I cut some foam squares to create a height level, I glued four and distributed the flowers by size, and for the smaller ones, I glued other foam squares to make them even bigger and create that 3D effect. I also glued a rose to the circle with the silver thread.
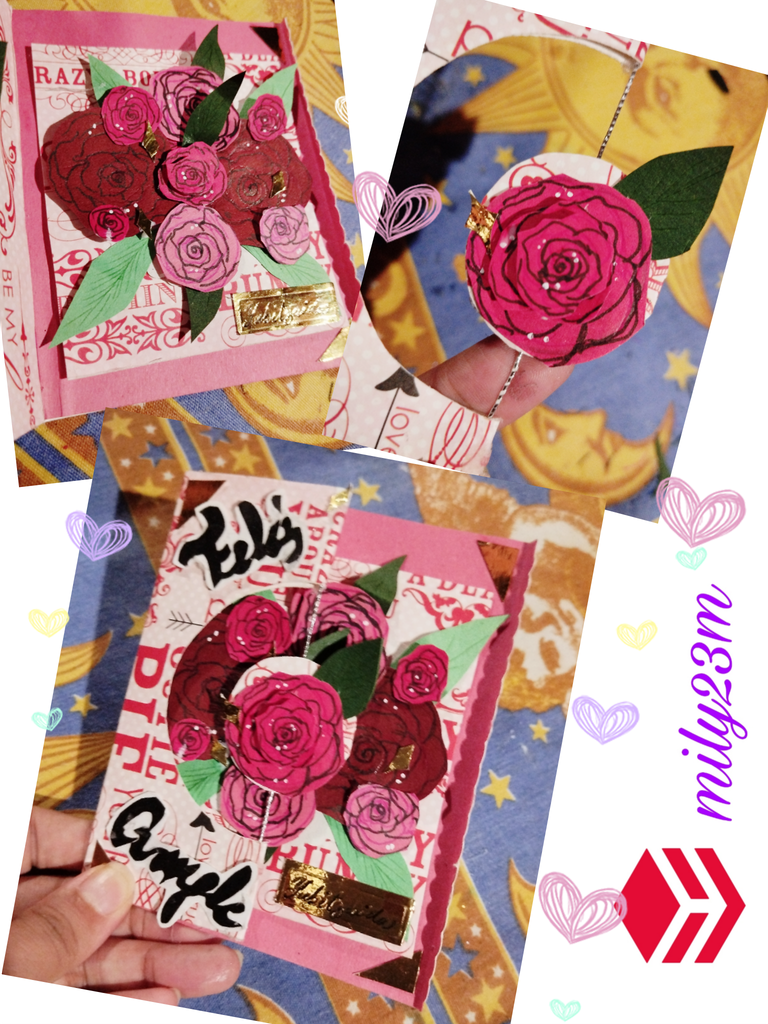
#6 Para poder armar la rosa en 3D en el círculo del hilo 🧵 plateado ya habiendo pegado ambas rosas por delante y detrás y sus respectivos hojitas verdes, para la parte delantera serán tres partes la primera ya está pegada directamente, luego se pega otro cuadrito de Foami para darle separación, y pegar una rosa mediana igual , a está también le pegué otro cuadrito de foami para separar y por último pegué una rosa aún más pequeñita para el centro , esto le dará un aspecto bonito en 3D.Con cartulina espejo dorada le agregué unos pequeñísimos destellitos para darle un toque elegante y , también corté unos triángulos (4) y los coloqué uno en cada esquina en la parte interna que queda descubierta (derecha),y en la parte exterior de la tarjeta (izquierda), cortando un rectángulo y haciendo presión con un bolígrafo ✒️ afilado escribí el nombre de a quién está destinada la tarjeta, y luego por encima lo repase con bolígrafo punta fina negro. Para el feliz cumpleaños lo escribí en cartulina negra de construcción, lo recorté ,y luego lo pegué las letras en una cartulina blanca,dejándole un poco de grosor al blanco para que se destaqué el feliz cumpleaños en el frente de la tarjeta.
English Version
#6 In order to assemble the 3D rose in the circle of silver thread 🧵 having already glued both roses in front and behind and their respective green leaves, for the front there will be three parts, the first one is already glued directly, then another Foami square is glued to separate it, and a medium rose is glued the same, to this one I also glued another foami square to separate it and finally I glued an even smaller rose for the center, this will give it a nice 3D look. With gold mirror cardboard I added some very small sparkles to give it an elegant touch and, I also cut some triangles (4) and placed them one in each corner on the inner part that is uncovered (right), and on the outside of the card (left), cutting a rectangle and applying pressure with a sharp pen ✒️ I wrote the name of who the card is for, and then on top I went over it with a black fine tip pen. For the happy birthday I wrote it on black construction cardstock, cut it out, and then glued the letters onto white cardstock, leaving a little thickness to the white so that the happy birthday would stand out on the front of the card.
❤️✨❤️✨❤️✨❤️✨❤️✨❤️✨❤️✨
Y este es el resultado! Me gustó mucho como quedó , con el efecto en 3D y dinámico con la rosa en el aire qué una vez que le das vuelta en sí misma varias veces ,cuando la sueltas girará ,lo que me parece un detalle bien diferente e interactivo, y no es tan difícil de hacer por si te gusta hacer este tipo de detalles creativos y tarjetas diferentes!
Espero que les haya gustado ☺️! Muchas gracias por leerme ! , si me dejan un comentario ,con mucho gusto se los responderé!❤️
Fotos tomadas por mí, en mi equipo xiaomi redmi note 12, editadas en pics art y gifs en apps creador de gifs, texto traducido en Google traductor, ✨mi idioma principal no es el inglés, lamento si hay algunas inconsistencias con la traducción ✨
English Version
❤️✨❤️✨❤️✨❤️✨❤️✨❤️✨❤️✨
And this is the result! I really liked how it turned out, with the 3D and dynamic effect with the rose in the air that once you turn it around itself several times, when you let it go it spins, which seems to me to be a very different and interactive detail, and it's not that difficult to do if you like to make this type of creative details and different cards!
I hope you liked it ☺️! Thank you very much for reading me! , if you leave me a comment, I will gladly answer it! ❤️
Photos taken by me, on my Xiaomi Redmi Note 12 device, edited in pics art and gifs in gif creator apps, text translated in Google Translate, ✨My main language is not English, I'm sorry if there are some inconsistencies with the translation ✨
Posted Using InLeo Alpha
Posted Using InLeo Alpha
Wow! que linda y creativa tarjeta, los colores de las rosas me encantan.
Saludos!
Muchas gracias amiga 🌹✨☺️
Me encantó💘💘💘
Muchas gracias @elyyr 😸✨
Me encantan las rosas, esta tarjeta es linda, además de creativa, a tu mamá le va a gustar mucho.
Muchas gracias amiga ! Las rosas siempre le dan un toque elegante y bonito 🌹
❤️🤗
Muy bella y creativa tarjeta 🤗
Jejej muchas gracias!😸🩵@marile21
Te quedo muy linda, siempre querido aprender a hacerlas y no me animo jajaja.
Jejje muchas gracias @sarangzg7 de verdad que no es tán complicado, todo es papeles bonitos y tener paciencia 😸✨
¡Muy bella! 👏🏻✨ este es el color y la flor favorita de mi mamá, la voy hacer para su cumpleaños aunque todavía falta jeje ☺️ ¡gracias por compartir!
Es verdad, es un regalo muy bello para una madre, porque son flores que durarán por siempre 🌹
Awwww que lindo comentario amiga @verdeayer oye perfecto ! Esta justo entonces para que la sorprendas en su cumpleaños con un lindo detalle de rosas 🌹✨
Está genial esta propuesta tuya, esta tarjeta de verdad que es demasiado original, y ya quiero darle vuelta a la flor 🤣🤣🤣
Felicitaciones por esta gran participación, y suerte en la Iniciativa
Jejej es la parte divertída ver cómo da vueltas jajaj así que es anti estrés , también se puede decorar con mil motivos y dar diferentes resultados divertidos jejje , muchas gracias por el apoyo! @yennysferm71 , gracias hive diy por compartírlo!
Congratulations @mily23m! You have completed the following achievement on the Hive blockchain And have been rewarded with New badge(s)
<table><tr><td><img src="https://images.hive.blog/60x70/https://hivebuzz.me/@mily23m/upvoted.png?202407200830" /><td>You received more than 5000 upvotes.<br />Your next target is to reach 6000 upvotes. <p dir="auto"><sub><em>You can view your badges on <a href="https://hivebuzz.me/@mily23m" target="_blank" rel="noreferrer noopener" title="This link will take you away from hive.blog" class="external_link">your board and compare yourself to others in the <a href="https://hivebuzz.me/ranking" target="_blank" rel="noreferrer noopener" title="This link will take you away from hive.blog" class="external_link">Ranking<br /> <sub><em>If you no longer want to receive notifications, reply to this comment with the word <code>STOPTe quedó hermosa la tarjeta para tu mami , el efecto de la rosa en 3D la hace diferente, muy original ❤️