EN
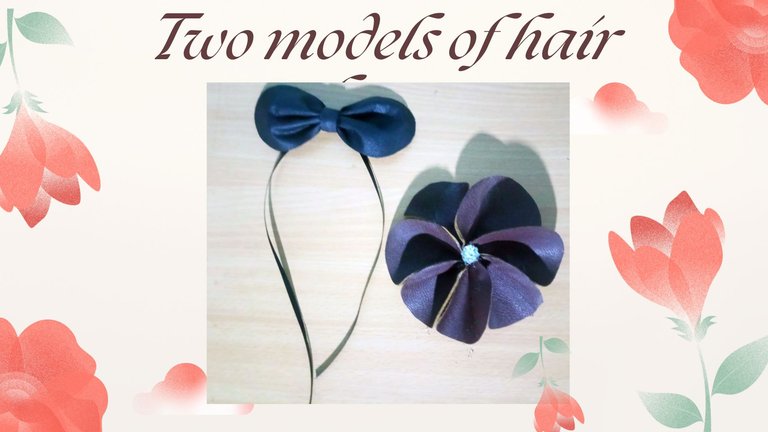
In this opportunity I bring you the realization of two models of leather bows, these bows are designed for all ages because its design is adapted for it, since the use of leather material offers elegance.
Without further ado, here are the materials we are going to use to make the bows
Materials for bow number one
Black leather
Scissors
Bow mould
Thin black ribbon
Silicon
Needle, thread for sewing leather
Hair clip.
Pins
Making
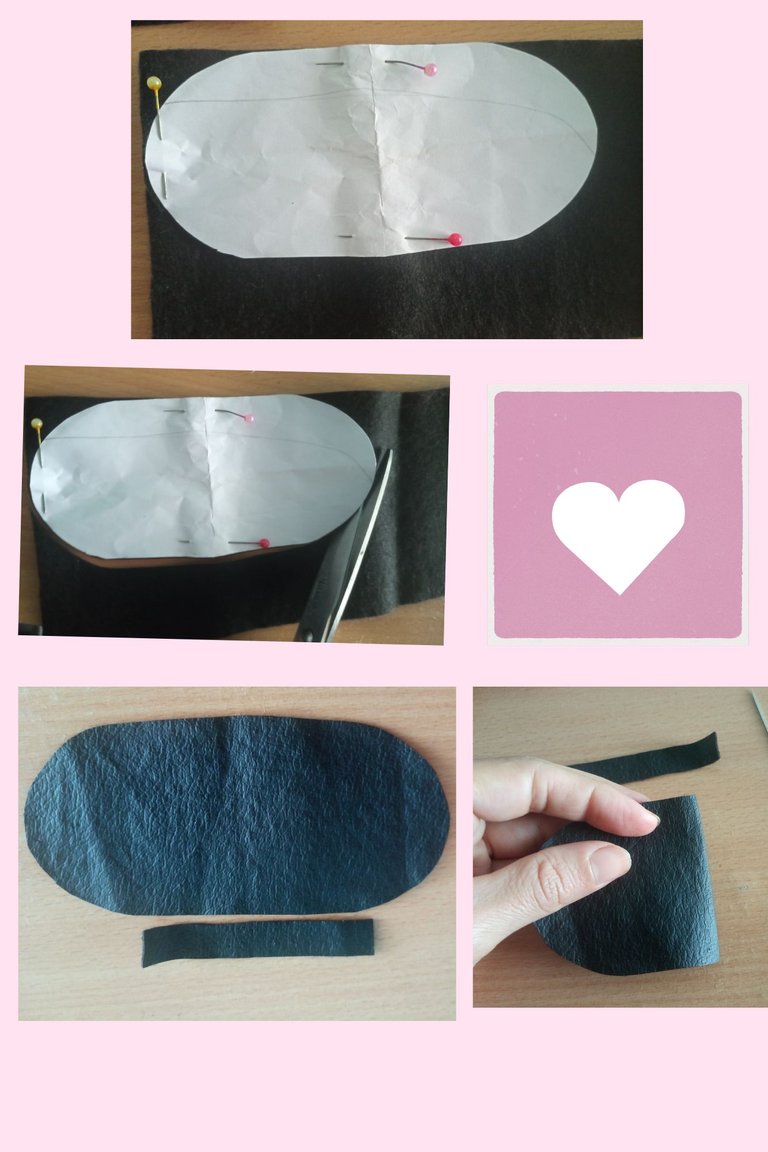
Place the leather on the back and adjust the mould to the edge and pin the mould, then cut it out, then place the second mould, fix it with a pin and cut it out.
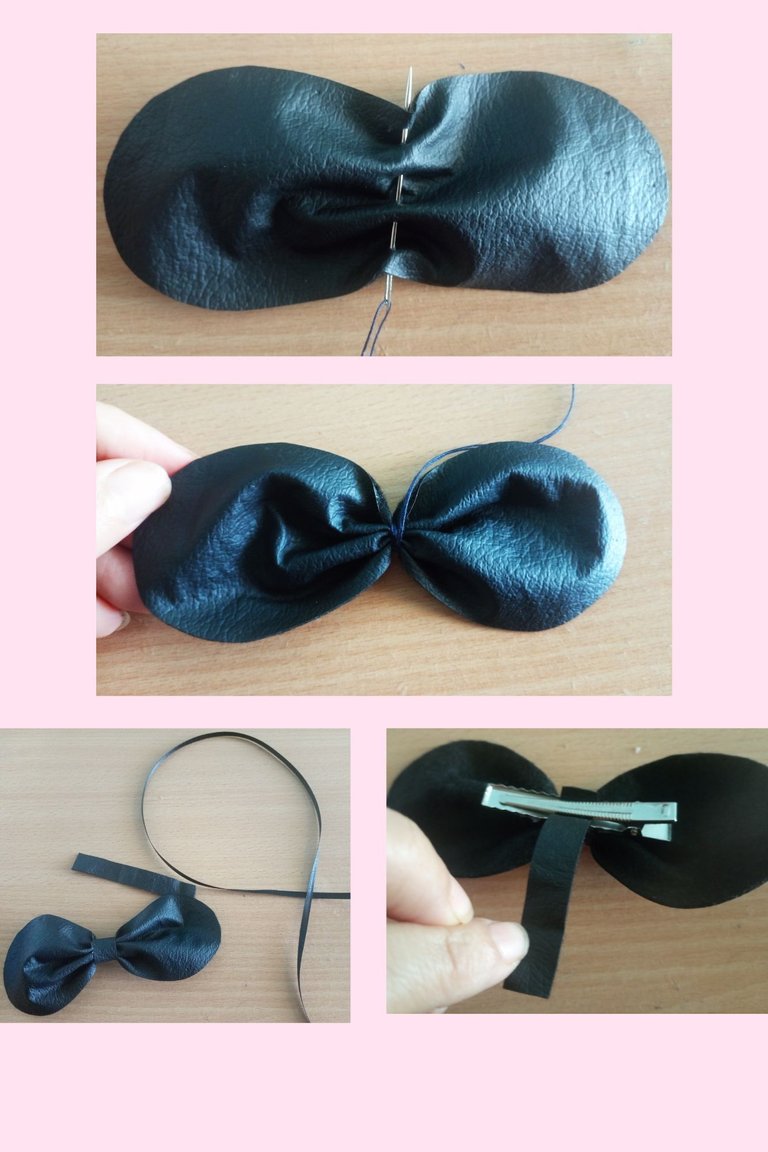
Fold the leather in half and press down trying to mark a line, unfold and sew along the marked line with the thread and needle, then cut the thread where the needle is, sew so that a bow is left and tie, then pass the thread around it to reinforce it and prevent the thread from coming loose.
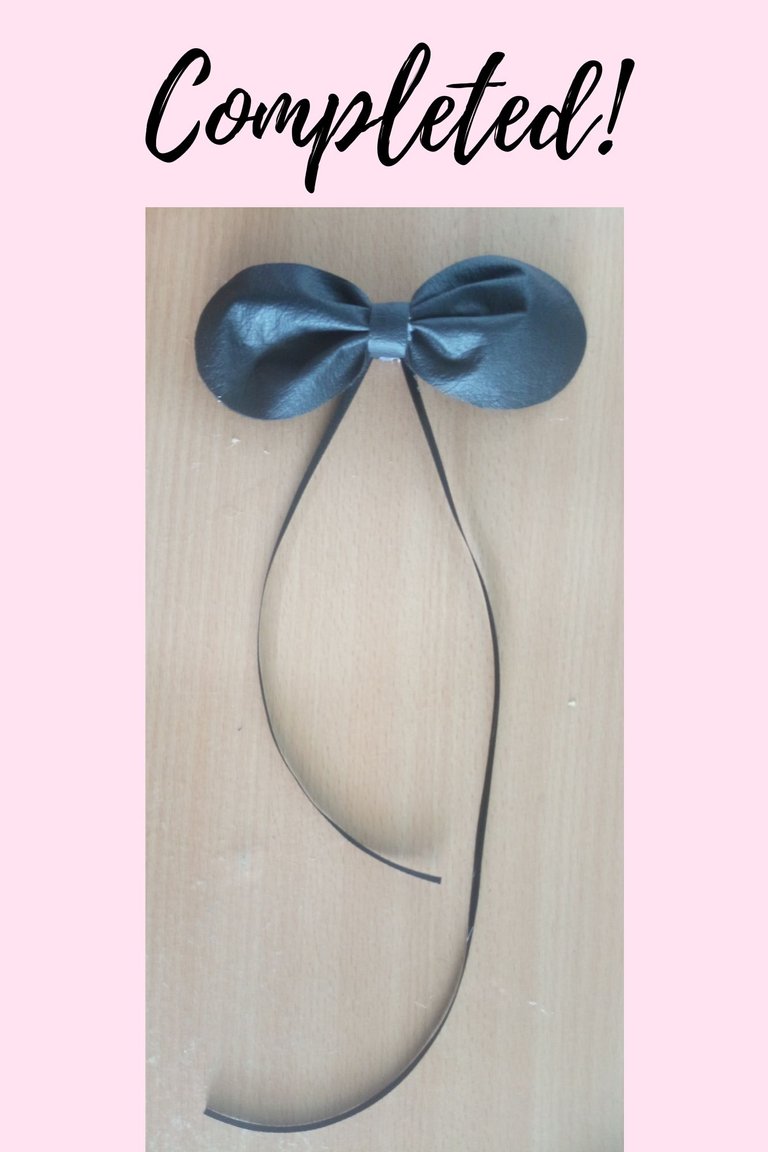
We place the bow, we take the hair clip and we stick with hot silicone a rectangular strip around the clip, we take the ribbon and we fold it in an irregular way so that one side is higher and the other lower, we stick it on the hair clip, then we stick another strip passing it around the hair clip so that it seals and reinforces the clip and the ribbon that we put on it.
The ribbon is arranged so that the folds fit well and now we have made our first hair ribbon.

Loop two
For the second loop we will need:
Dark brown leather.
Mould
An appliqué
Black leather thread
Silicon
A hook
A piece of thick leather.
Black marker for marking
Scissors
Making
For the second loop, take the mould, fix it to the leather on the back with the pins and the pattern, trace it and make seven rounds, then cut them out.
Each round is folded in half at the back, placed in a row, and with brown thread and needle is inserted almost at the end of the rounds,
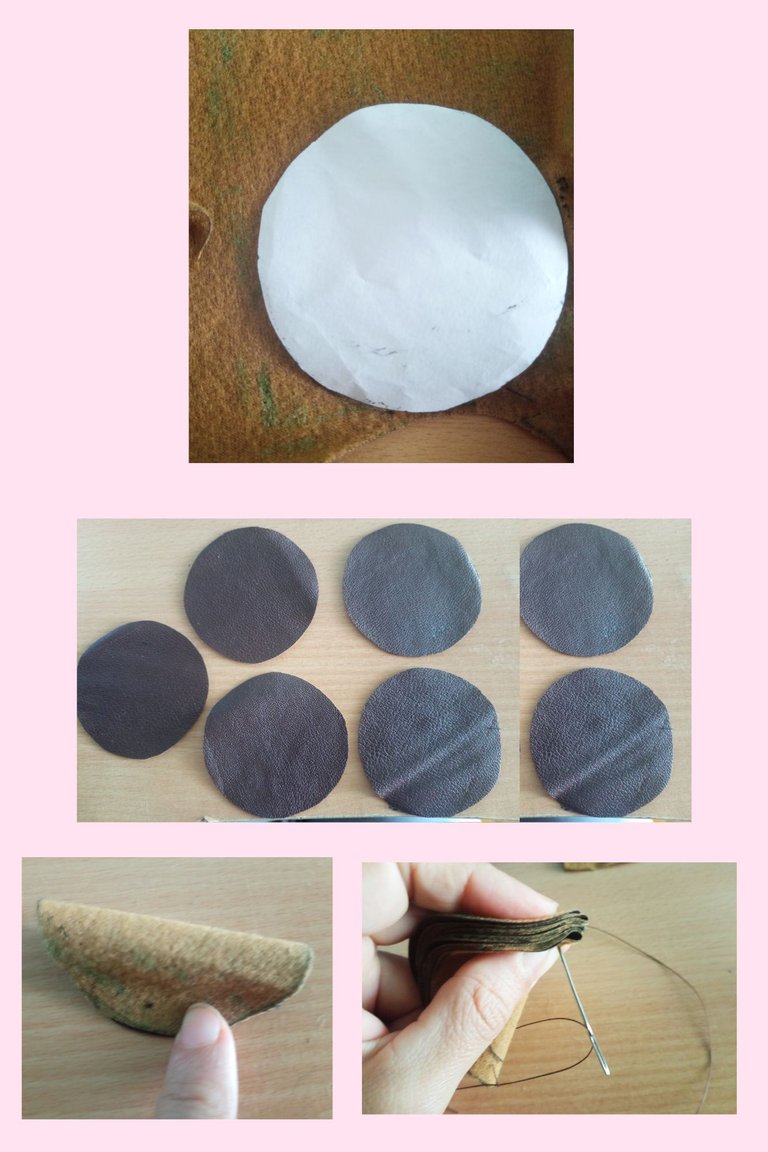
then cut the thread where the needle is and join the threads together, form the roundel with each of the petals where the flower will be formed.
Take the thick leather and cut it out with the rounded mould, apply silicone and stick it to the back of the flower, then stick silicone between the petals so that it stays in the same position, stick the appliqué in the middle of the flower, then stick the hook horizontally.
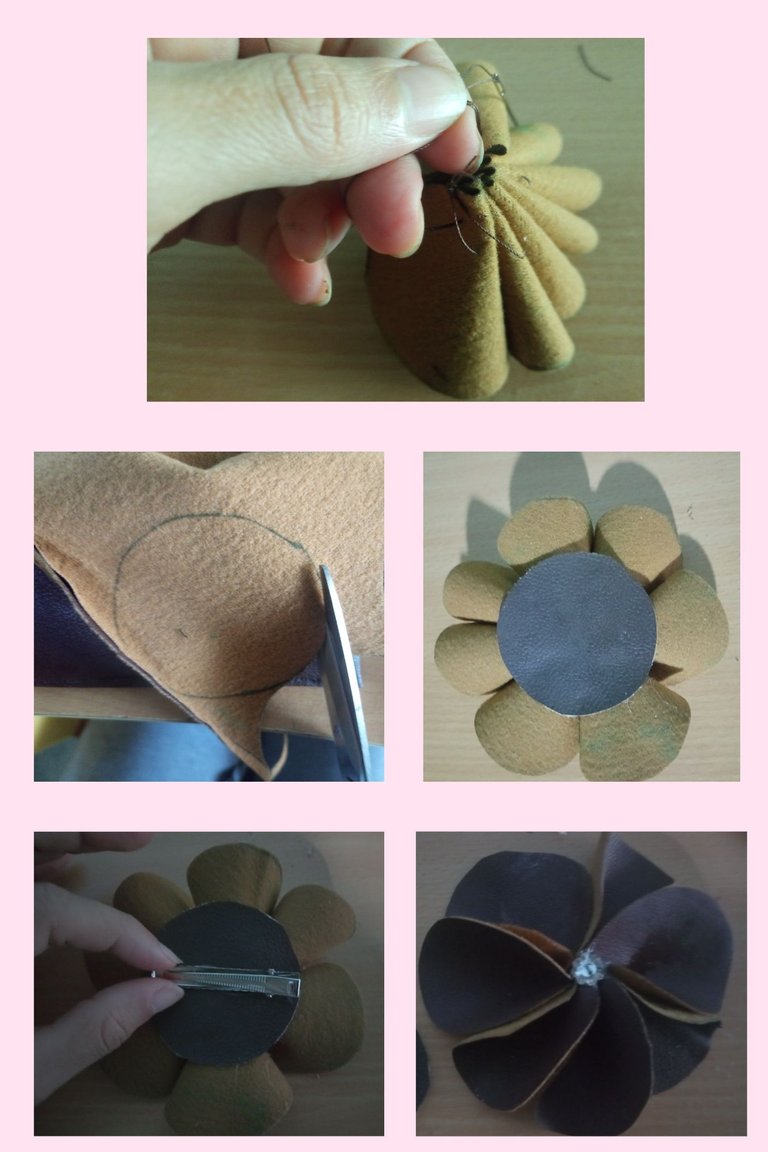
And this is how we have our beautiful flower-shaped hook.
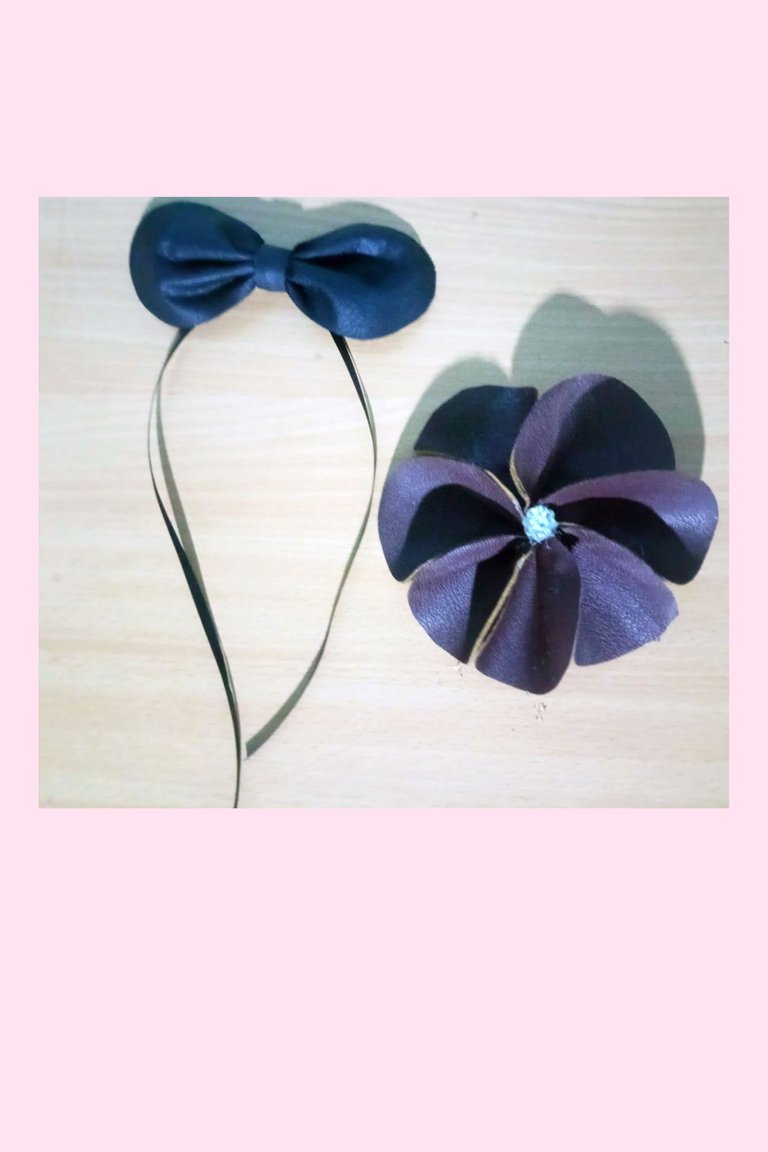
And this is the final work of both hooks that are ideal for all types of clothing since their colors are neutral and can be combined with most colors. And this is how our two hair accessories look.
What do you think about it? Do you dare to do this craft? If so, I encourage you to do it.
Well friends, this is all for today's post, I hope you liked it, if you read this far I want to thank you, see you soon in a new craft in this beautiful community, blessings to all.
ES
En esta oportunidad les traigo la realización de dos modelos de lazos de cuerina, estos lazos están diseñados para todas las edades ya que su diseño está adaptado para ello, ya que el uso de material de cuerina ofrece elegancia.
Sin más les escribo los materiales que vamos a ocupar para la realización de los lazos
Materiales del lazo número uno
Cuerina de color negro
Tijera
Molde de lazo
Cinta delgada color negro
Silicon
Aguja, hilo para coser cuero
Gancho de cabello.
Alfileres
Elaboración
Colocamos la cuerina por la parte trasera y ajustamos el molde a la orilla y ajustamos con los alfileres el molde, posteriormente recortamos, luego procedemos a colocar el segundo molde, fijamos con un alfiler y recortamos.
Doblamos la cuerina a la mitad y hacemos presión tratando de marcar una línea, desdoblamos y por la línea marcada cosemos con el hilo y la aguja en recta, luego recortamos el hilo donde está la aguja, cosemos de manera que quede un lacito y atamos, luego pasamos alrededor el hilo para reforzar y no se suelte el hilo.
Acomodamos el lazo, tomamos el gancho de cabello y pegamos con silicona caliente una tira rectangular alrededor del gancho, tomamos la cinta y la doblamos de manera irregular para que un lado quede más arriba y el otro más abajo, se pega en el gancho de cabello, luego se pega otra tira pasándola alrededor del gancho de cabello para que selle y refuerce el gancho y la cinta que se le coloco.
Se acomoda el lazo de manera que los dobleces queden bien y listo tenemos realizado nuestro primer lazo para el cabello.
Lazo dos
Para el segundo lazo vamos a necesitar:
Cuerina de color marrón oscuro.
Molde
Un aplique
Hilo de cuerina de color negro
Silicon
Un ganchito
Un pedacito de cuero grueso.
Marcador negro para marcar
Tijera
Elaboración
Para el segundo lazo se toma el molde, se fija a la cuerina por la parte de atrás con los alfileres y el patrón, se calca y se realizan siete redondeles, posteriormente se recortan.
Cada redondel se dobla por la mitad por la parte de atrás, se ponen en fila y con hilo marrón y aguja se inserta casi al final de los redondeles.
luego se corta el hilo donde está la aguja y se unen los hilos, se forma el redondel con cada uno de los pétalos donde se ira formando la flor.
Se agarra el cuero grueso y con el molde redondeado se recorta, se le echa silicon y se pega en la parte de atrás de la flor, luego se pega silicon entre los pétalos para que se mantenga en la misma posición, se pega el aplique en el medio de la flor, luego se pega el gancho de forma horizontal.
Y asi nos queda nuestro hermosa gancheta en forma de flor.
Y este es el trabajo final de ambos ganchitos que son ideales para todo tipo de vestimenta ya que sus colores son neutros pudiéndose combinar con la mayoría de los colores. Y asi quedan nuestros dos accesorios para el cabello.
¿Qué te pareció? Te atreves a realizar esta manualidad? Si es así, te animo a que la realices.
Bueno amigos esto es todo por el post del día de hoy, espero que te haya gustado, si leíste hasta aquí quiero agradecerte, nos vemos próximamente en una nueva manualidad en esta hermosa comunidad, bendiciones para todos.
Edit in Canva.com
Translated with DeepL.com (free version)
Posted Using InLeo Alpha
Last month I've been into DIY jewelry and accessories.I don't know what's in me that time but all I know is it always makes me happy and satisfied everytime I finished one.
I'm glad that you made a beautiful hair accessories.Keep doin it my friend 🥰
Yes, the world of crafts is fantastic, one never tires of creating, thank you very much for your beautiful visit and appreciate my work, greetings and blessings.
Wow
What a great handiwork from you friend.
The bow tie looks like the one I used in highschool, hehe.
Oh, thank you very much for appreciating my handicraft, hahaha, good that my bow brought back memories of high school, regards
a community encouraging first-hand content, and each individual living their best life.
Thanks