BIENVENIDOS A MI BLOG
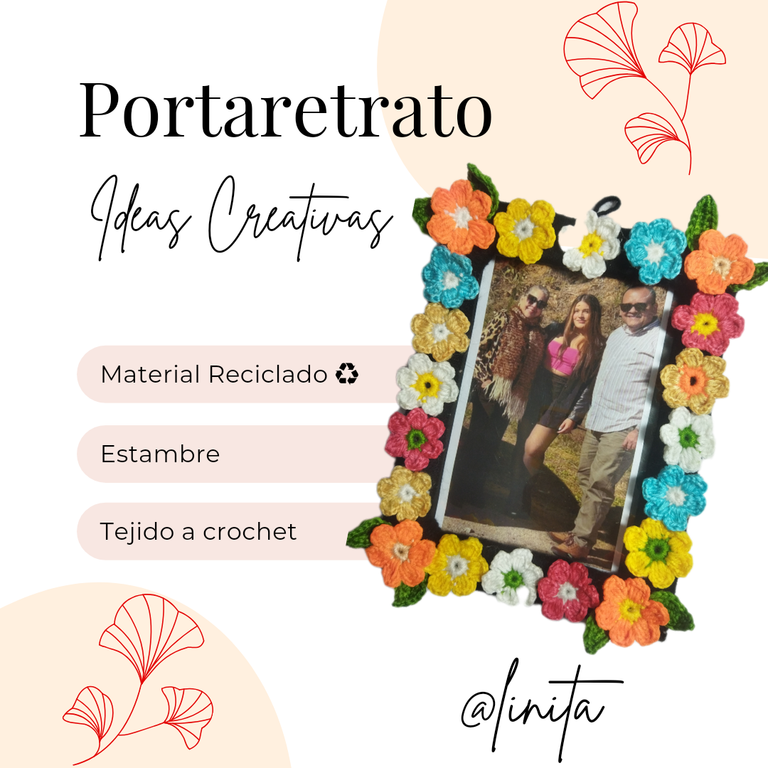
¡Holaaaa, holaaaaa! Saludos mis estimados creativos de #HiveDiy. En este tutorial les voy a enseñar como elaboré otro portaretratos para que mi madre exhiba las fotografías de sus seres queridos. Ella es una de las personas que le encanta ver y hablar con sus amados aunque sea a través de las fotos. Hace unos meses le pidió a mi hermana mayor que le enviara fotos de ella y su familia para renovar y actualizar las que tiene y mi hermana me envió unas cuantas para que las imprimiera y las montara en sus marcos. Este es el segundo portaretratos que elaboro con esta finalidad.
Para ello, uitlicé material reciclado (cartón) y realicé unas flores a crochet con estambre de diversos colores. Esta es mi primera vez que uitlizo estambre para tejer y debo decirles que me encantó tanto la elaboración del tejido como el resultado. Las flores quedan con colores muy alegres y aplicando un poco de calor con el encendedor además de eliminar las hebras que sobresalen del tejido, le otorga un brillo precioso. Ahora, sin más comencemos.
WELCOME TO MY BLOG
Hellooooo, hellooooo! Greetings my dear creatives from #HiveDiy. In this tutorial I'm going to show you how I made another picture frame for my mother to display the photographs of her loved ones. She is one of those people who loves to see and talk to her loved ones even if it's through photos. A few months ago she asked my older sister to send her photos of her and her family to renew and update the ones she has and my sister sent me a few to print and mount in her frames. This is the second picture frame I've made for this purpose.
For this, I used recycled material (cardboard) and made some crochet flowers with yarn of various colors. This is my first time using yarn to knit and I must say that I loved both the knitting and the result. The flowers have very bright colors and applying a little heat with the lighter, in addition to removing the threads that stick out of the fabric, gives it a beautiful shine. Now, without further ado, let's begin.
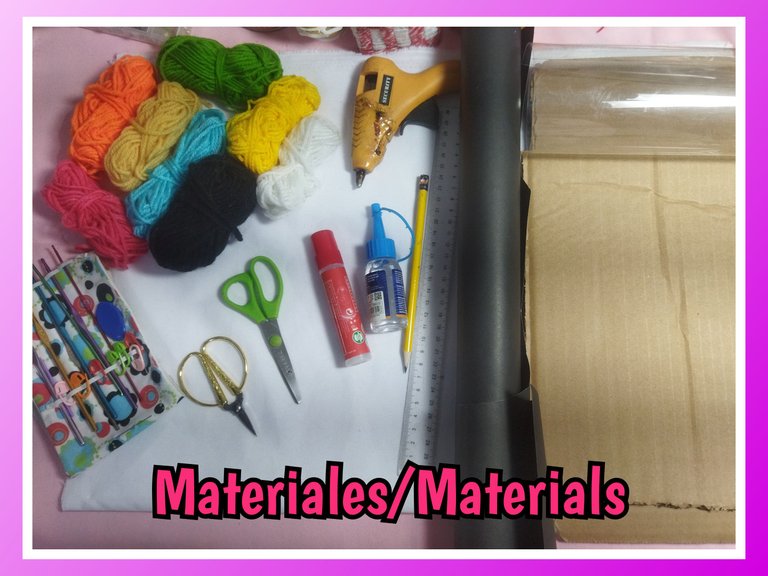
MATERIALES
- Cartón reciclado
- Estambre de colores variados
- Cartulina escolar negra
- Acetato
- Aguja de 2,5 cm para crochet
- Tijeras
- Pegamentos
- Lápiz de grafito
- Regla
MATERIALS
- Recycled cardboard
- Yarn in various colors
- Black school cardboard
- Acetate
- 2.5 cm crochet needle
- Scissors
- Glue
- Graphite pencil
- Ruler
STEP BY STEP // PASO A PASO
PORTARETRATO
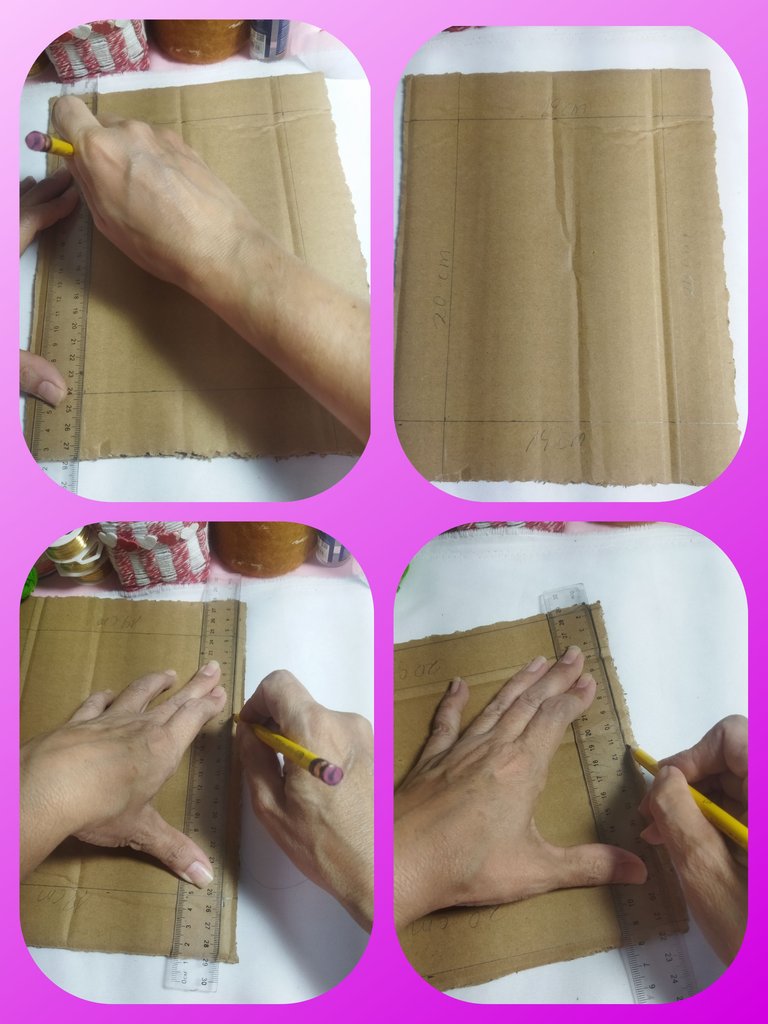
En un trozo de cartón realizamos un retángulo de 23x17 cm. Luego vamos a realizar un marco de 3 cm de cada lado para obtener un marco interno de 20x14 cm.
PORTRAIT
On a piece of cardboard we make a rectangle of 23x17 cm. Then we will make a frame of 3 cm on each side to obtain an internal frame of 20x14 cm.
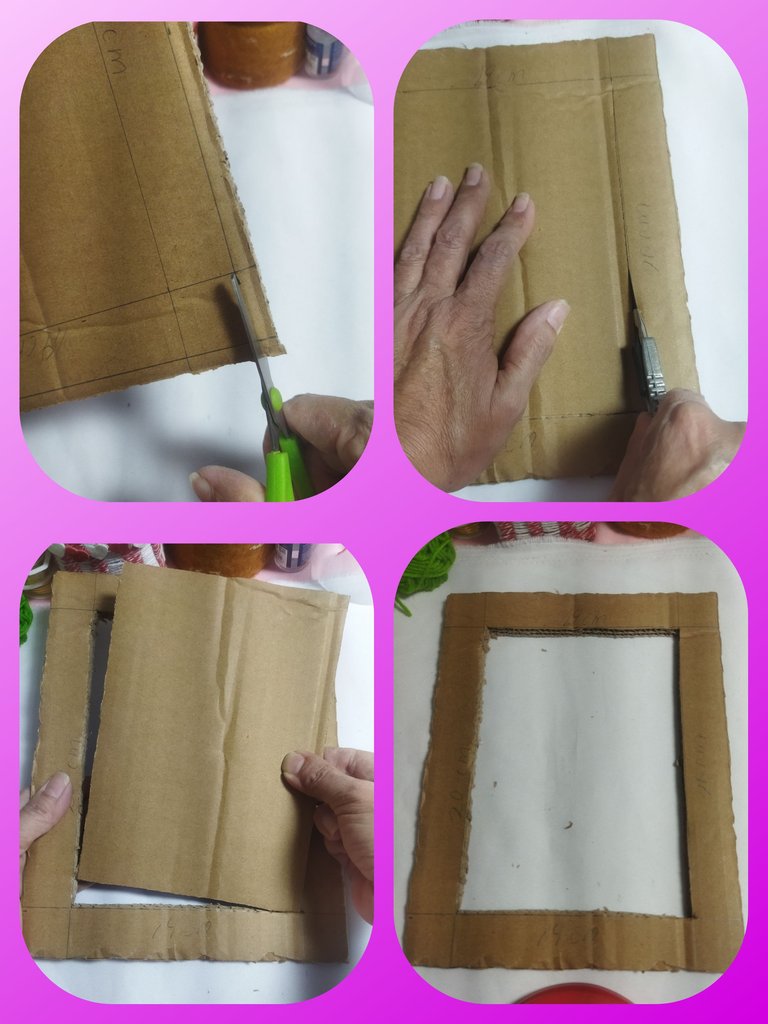
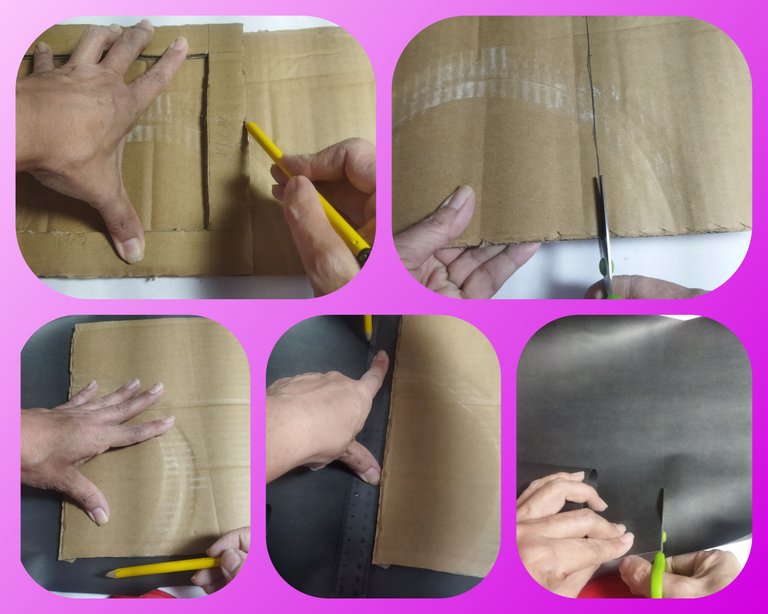
Recortamos con la tijera el exceso de cartón de la parte exterior y con un cortador o exacto la parte interior. De esta forma obtenemos el marco.
We cut off the excess cardboard on the outside with scissors and the inside with a cutter or an Exacto cutter. This way we get the frame.
Ahora con otro trozo de cartón, trazamos la misma medida del marco para realizar la parte trasera del marco, es decir, tiene que tener la misma medida, de 23x17 cm.
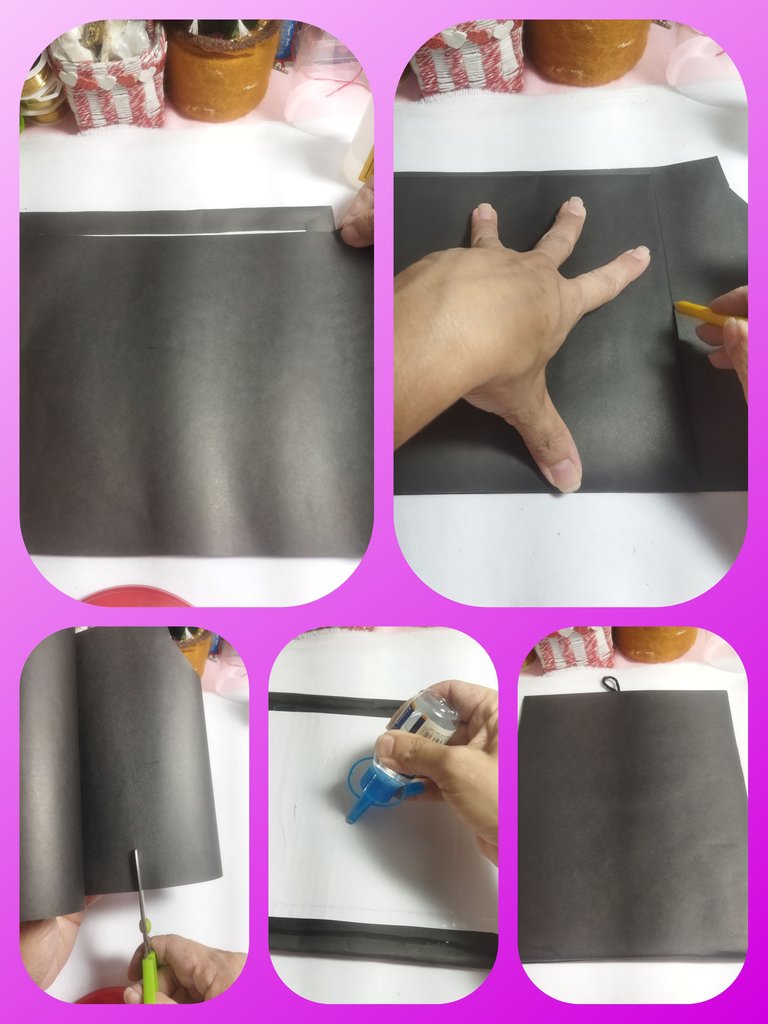
Tomamos la cartulina escolar negra y procedemos a forrar el cartón, realizando un rectángulo utilizando el mismo cartón de referencia, dejando 2 cm adicional de cada lado para hacer el doblez.
Now with another piece of cardboard, we trace the same measurement of the frame to make the back of the frame, that is, it has to have the same measurement, 23x17 cm.
We take the black school cardboard and proceed to cover the cardboard, making a rectangle using the same reference cardboard, leaving an additional 2 cm on each side to make the fold.
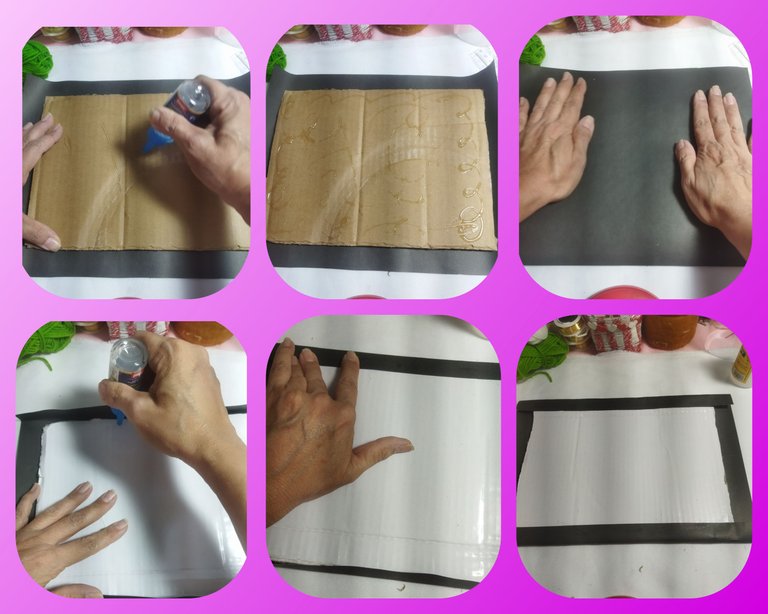
Una vez cortada la cartulina, agregamos una generosa cantidad de pegamento en el cartón y pegamos, doblamos las pestañas, agregamos silicón y pegamos.
Once the cardboard is cut, we add a generous amount of glue to the cardboard and glue, fold the tabs, add silicone and glue.
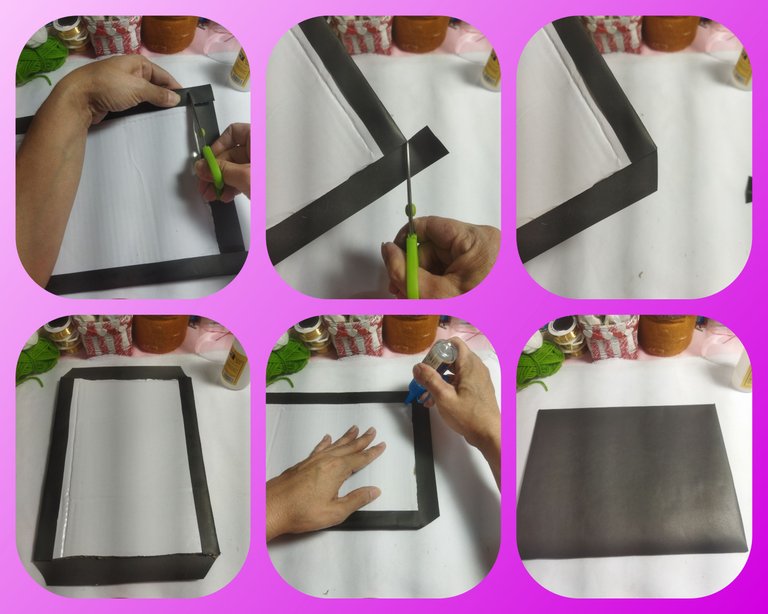
Con la tijera realizamos un corte en la pestaña de sale en el doblez y luego hacemos uno perpendicular. Este paso lo hacemos en las tres esquinas restantes. Luego doblamos y pegamos.
Using scissors, make a cut on the tab that comes out of the fold and then make a perpendicular one. We do this step on the three remaining corners. Then we fold and glue.
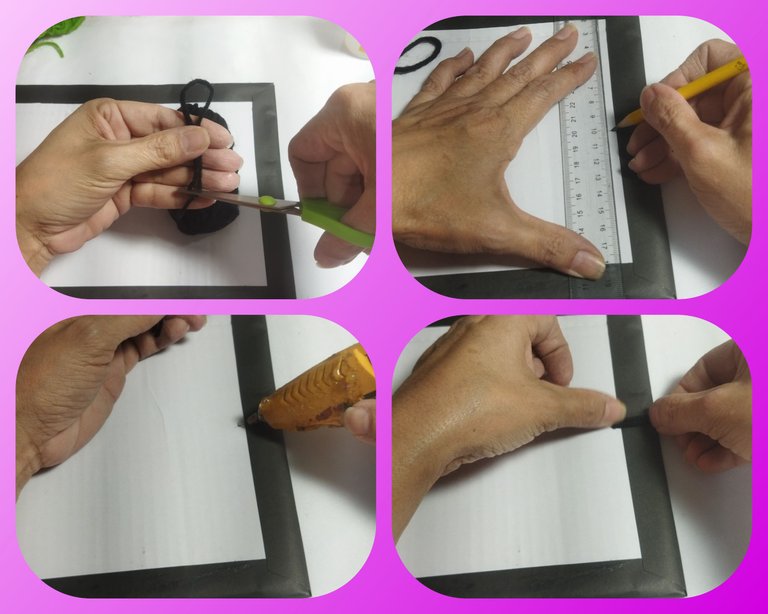
Ahora tomamos un trozo de estambre negro para realizar el colgadero. Éste lo amos a pegar con la pistola de silicón por la parte posterior del cartón forrado, justo en el centro.
Now we take a piece of black yarn to make the hanger. We glue it with the glue gun to the back of the lined cardboard, right in the center.
Cortamos un retazo de cartulina del mismo tamaño del cartón y cubrimos la otra cara donde colocamos el colgadero, agregando una cantidad generosa de pegamento.
We cut a piece of cardboard the same size as the cardboard and cover the other side where we place the hanger, adding a generous amount of glue.
ENMARCADO
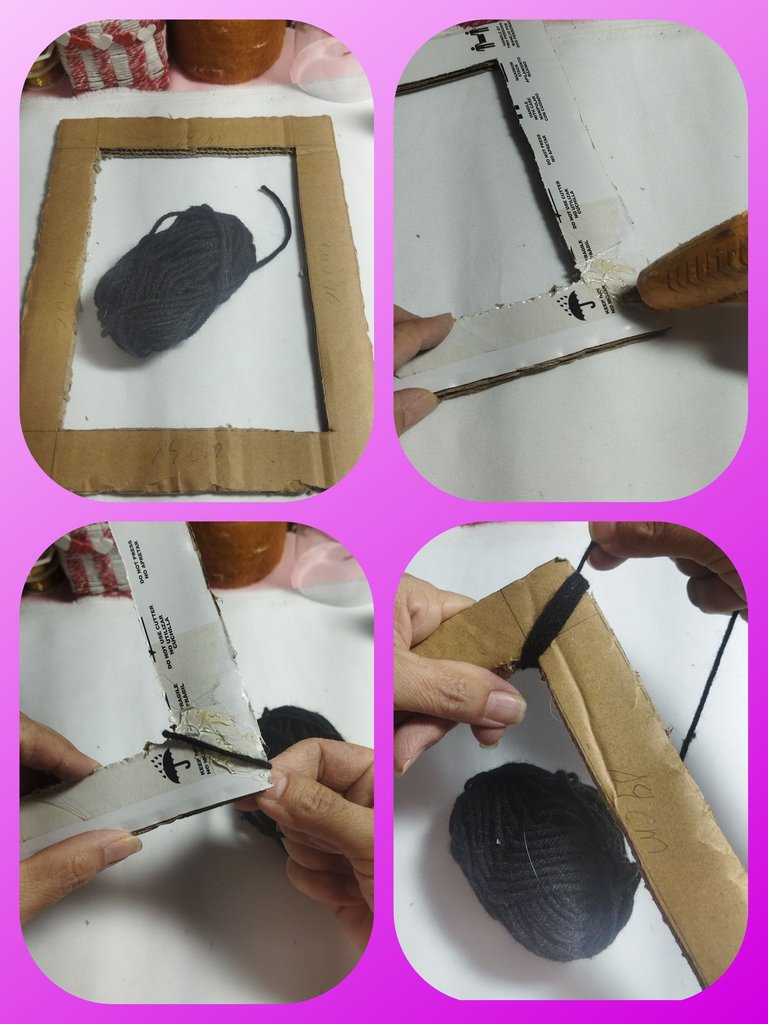
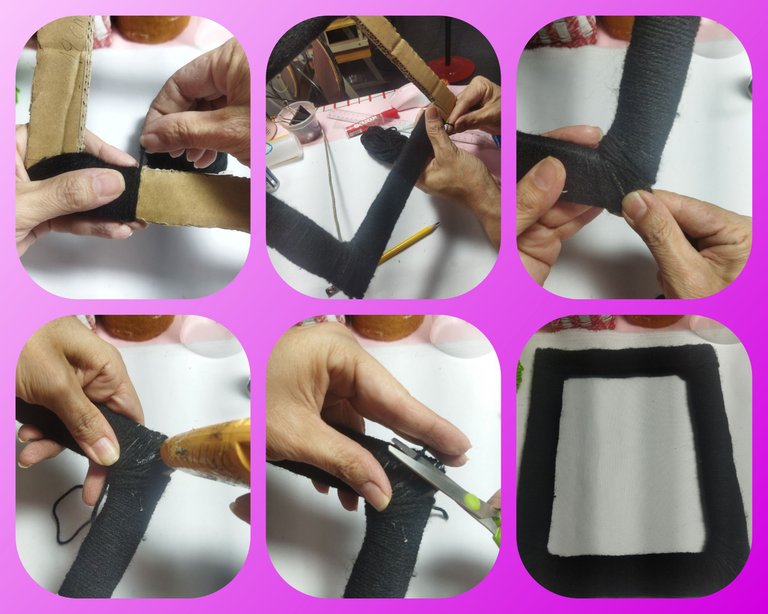
Para decorar el marco del portaretratos vamos a utilizar estambre negro. Realizamos una línea con silicón caliente en el marco, colocamos el estambre y comenzamos a enrollar el estambre alrededor de todo el marco. Al llegar al final, agregamos otro poco de silicón caliente, hacemos dos giros más y cortamos.
FRAMED
To decorate the frame of the picture frame we are going to use black yarn. We draw a line with hot glue on the frame, place the yarn and begin to wrap the yarn around the entire frame. When we get to the end, we add another bit of hot glue, make two more turns and cut.
FLORES DE ESTAMBRE
PASO #1:
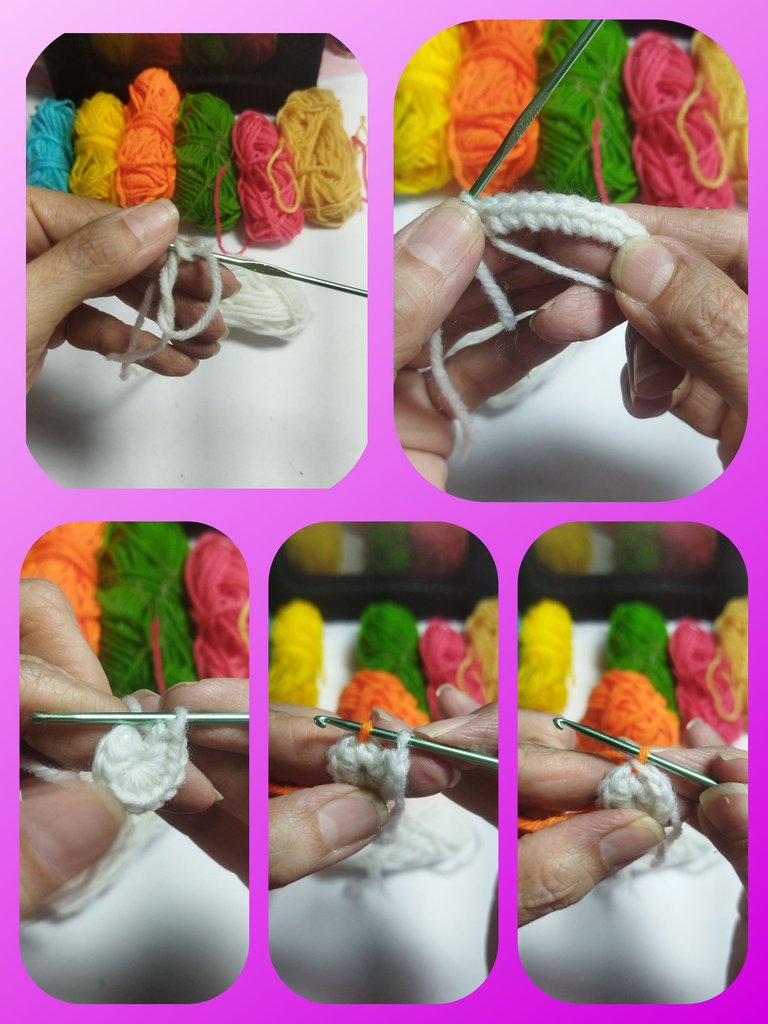
En un anillo mágico realizamos 12 puntos bajos con estambre del color de nuestra preferencia. Para realizar el cierre, tomamos la hebra de hilo de otro tono y cerramos con un punto deslizado. Este paso lo hacemos para hacer el cambio de hilo y hacer el tejido continuo.
STAMEN FLOWERS
STEP #1:
In a magic ring we make 12 low stitches with yarn of the color of our preference. To make the closure, we take the thread of yarn of another color and close with a slip stitch. We do this step to change the yarn and make the continuous weave.
PASO #2:
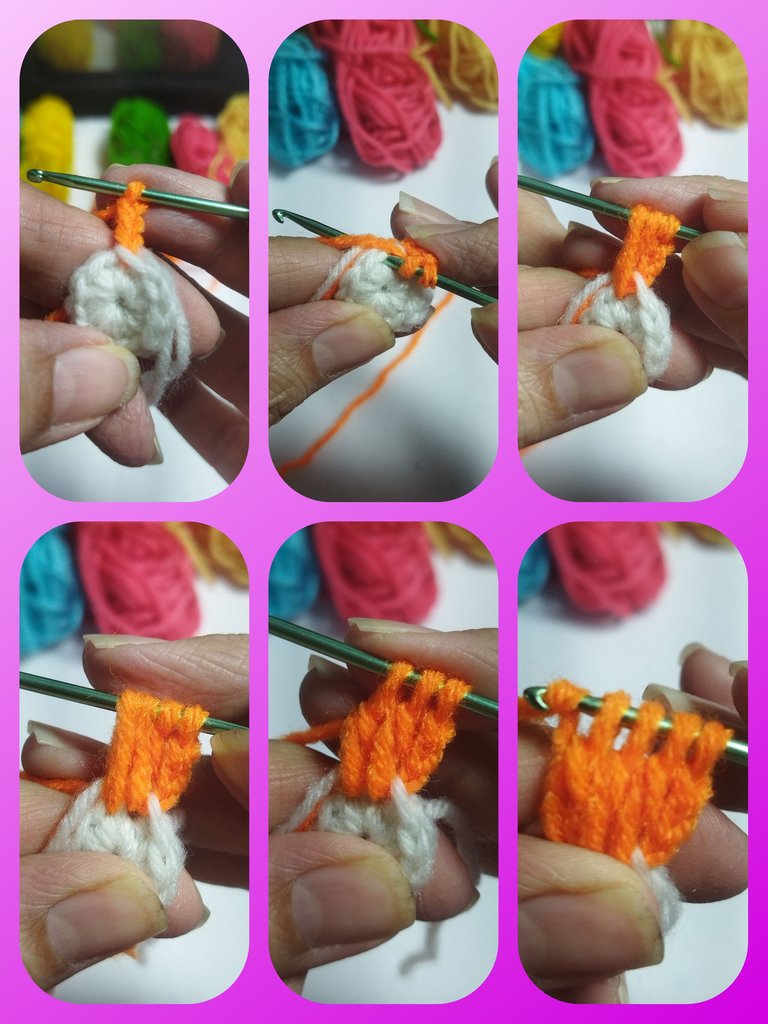
Levantamos una cadena de 3 puntos, tomamos lazada, introducimos en el mismo punto donde iniciamos la cadena y halamos el hilo hasta llevarlo a la misma altura de la cadena, cerramos el punto pasando por las dos primeras lazadas.
Tomamos lazada nuevaente e introducimos la aguja por el siguiente punto bajo, halamos el hilo hasta la misma altura, cerramos el punto y realizamos otro en el mismo punto bajo. Una vez que ya tenemos los 4 puntos, cerramos pasando la aguja por los 4 ojales.
STEP #2:
We make a chain of 3 stitches, take a loop, insert it into the same stitch where we started the chain and pull the thread until it is at the same height as the chain, we close the stitch by passing through the first two loops.
We take a new loop and insert the needle through the next single crochet, we pull the thread to the same height, we close the stitch and make another one in the same single crochet. Once we have the 4 stitches, we close by passing the needle through the 4 eyelets.
PASO #3:
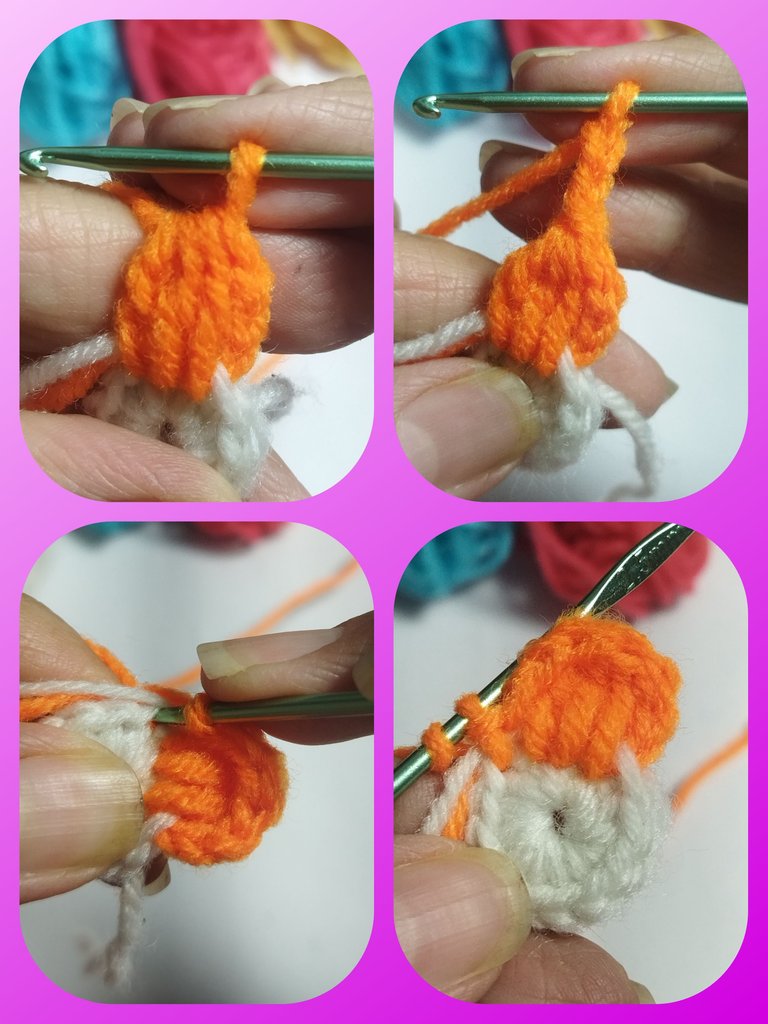
Levantamos 3 cadenas y llevamos la aguja al siguiente punto bajo y hacemos un cunto deslizado para formar el primer pétalo de la flor.
STEP #3:
We pick up 3 chains and take the needle to the next single crochet and make a slip stitch to form the first petal of the flower.
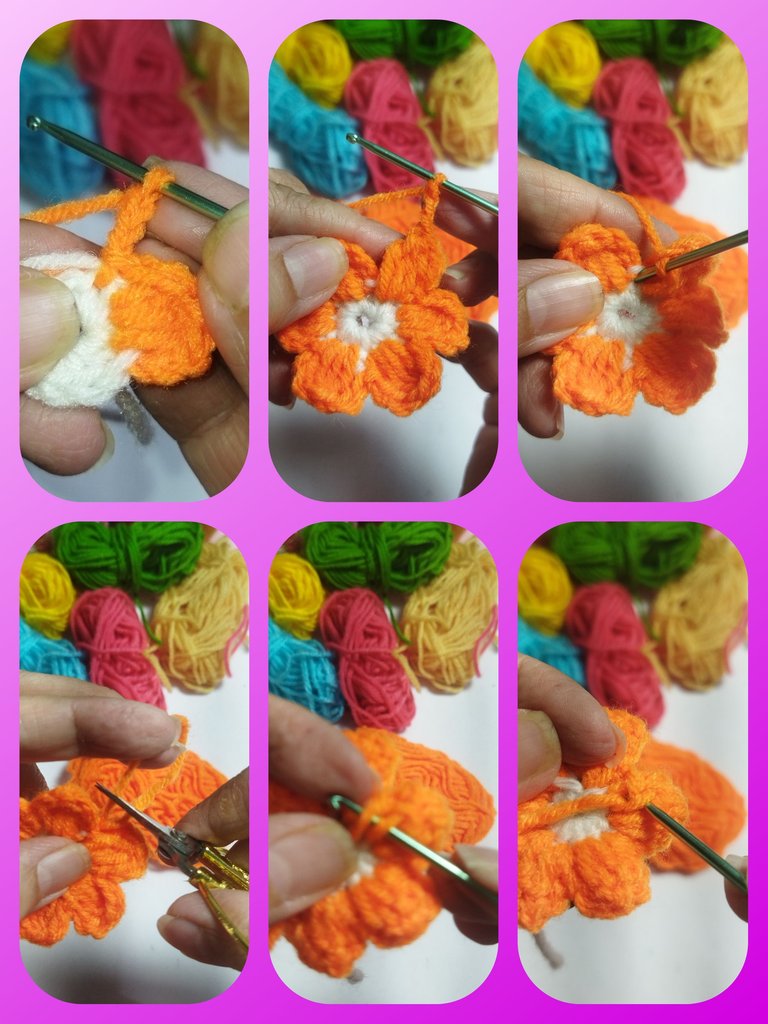
Repetimos los pasos 2 y 3, hasta formar 5 pétalos más y formar una flor de 6 pétalos. Cerramos con un punto deslizado en el inicio del primér petalo.
Cortamos el hilo, escondemos el exceso por detrás de la flor y cortamos el sobrante.
Repeat steps 2 and 3 until you have 5 more petals and a 6-petal flower. Close with a slip stitch at the beginning of the first petal.
Cut the thread, hide the excess behind the flower and cut off the remainder.
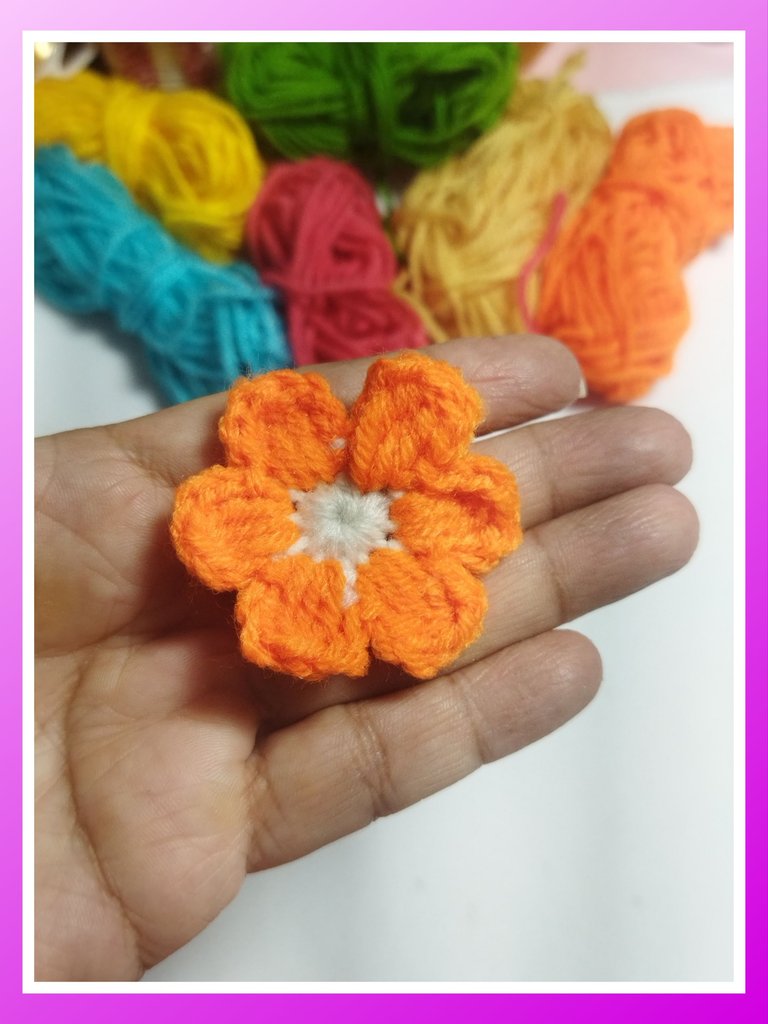
Y este es el resultado. Realizamos 19 flores más en los colores que más nos guste, para obtener 20 flores.
And this is the result. We made 19 more flowers in the colors we liked the most, to obtain 20 flowers.
HOJAS
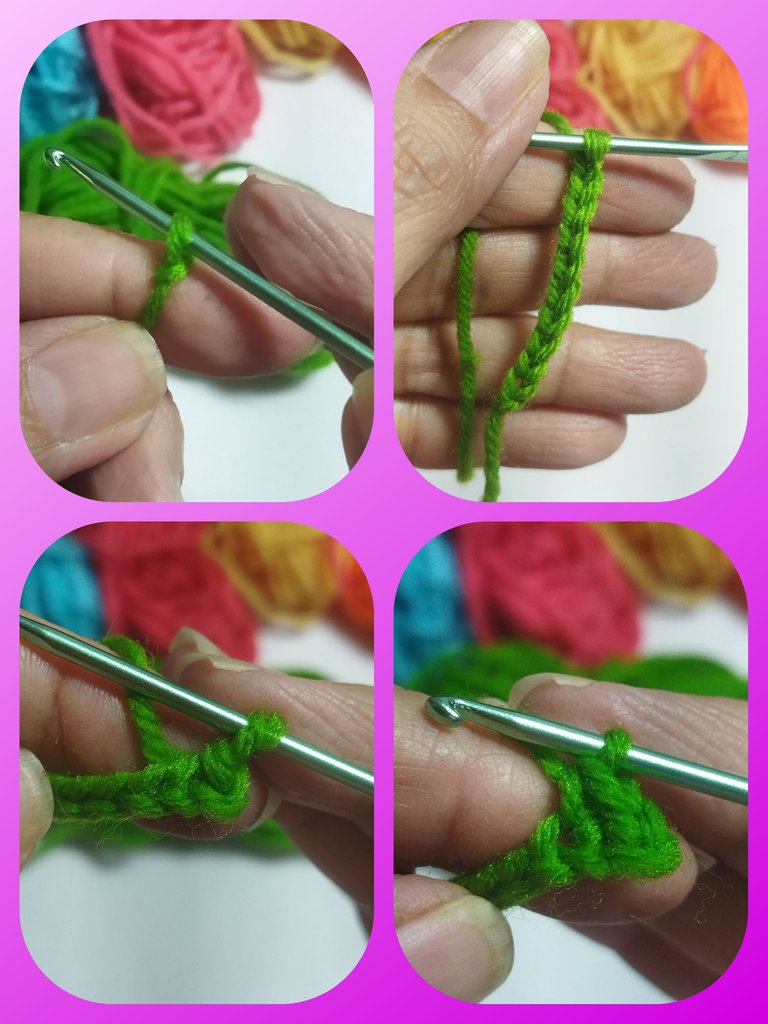
PASO #1:
Para realizar las hojas vamos a iniciar con una cadena de 11 puntos.
Luego realizamos un punto deslizado en el segundo punto de la cadena para realizar la punta de la hoja.
SHEETS
STEP #1:
To make the leaves, we will start with a chain of 11 stitches.
Then we make a slip stitch in the second stitch of the chain to make the tip of the leaf.
PASO #2:
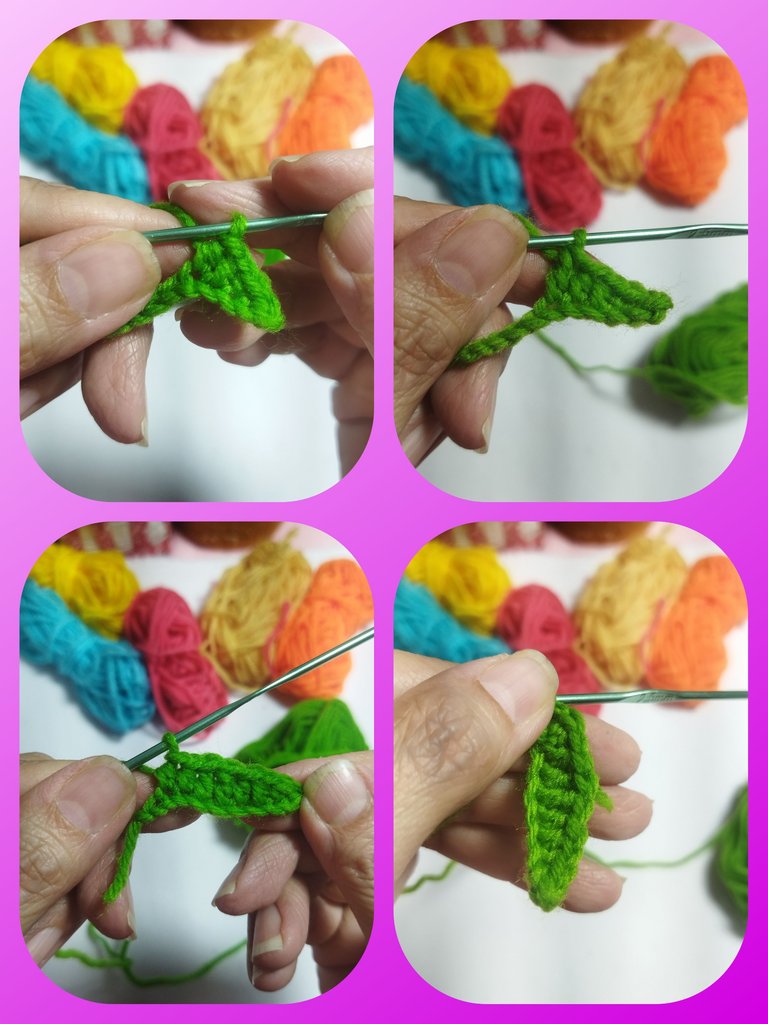
Seguidamente realizamos 1 punto bajo.
Luego 2 medio punto (cada punto en un punto de la cadena).
Despúes 2 puntos altos (cada punto en un punto de la cadena).
Ahora realizamos 2 medio punto (cada punto en un punto de la cadena).
Luego 1 punto bajo y cerramos con 1 punto deslizado en el inicio de la cadena.
STEP #2:
Next, we make 1 single crochet.
Then 2 half double crochets (each stitch in a stitch of the chain).
Then 2 double crochets (each stitch in a stitch of the chain).
Now we make 2 half double crochets (each stitch in a stitch of the chain).
Then 1 single crochet and close with 1 slip stitch at the beginning of the chain.
PASO #3:
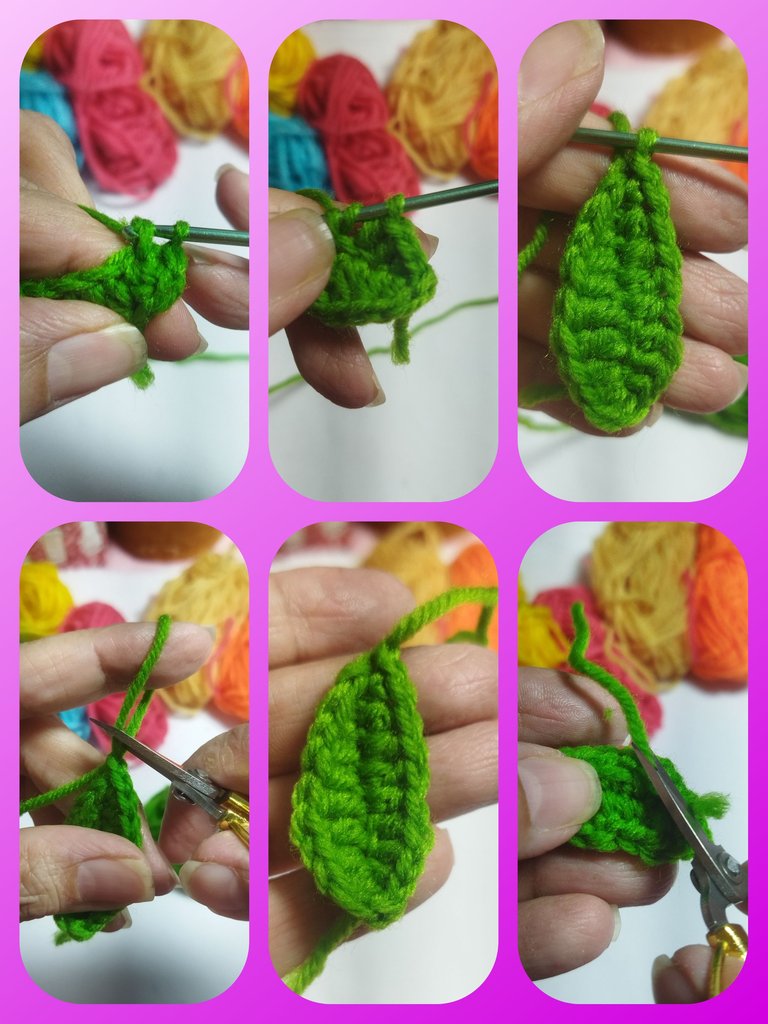
Ahora repetiremos el paso anterior, esta vez del lado opuesto de la cadena para realizar la otra cara de la hoja.
Una vez terminada la vuelta cerramos con un punto deslizado, cortamos el hilo y lo escondemos por la parte trasera de la hoja y cortamos el exceso.
STEP #3:
Now we will repeat the previous step, this time on the opposite side of the chain to make the other side of the leaf.
Once the row is finished, we close with a slip stitch, cut the thread and hide it on the back of the leaf and cut off the excess.
Vamos a realizar 20 flores y 8 hojas.
We are going to make 20 flowers and 8 leaves.
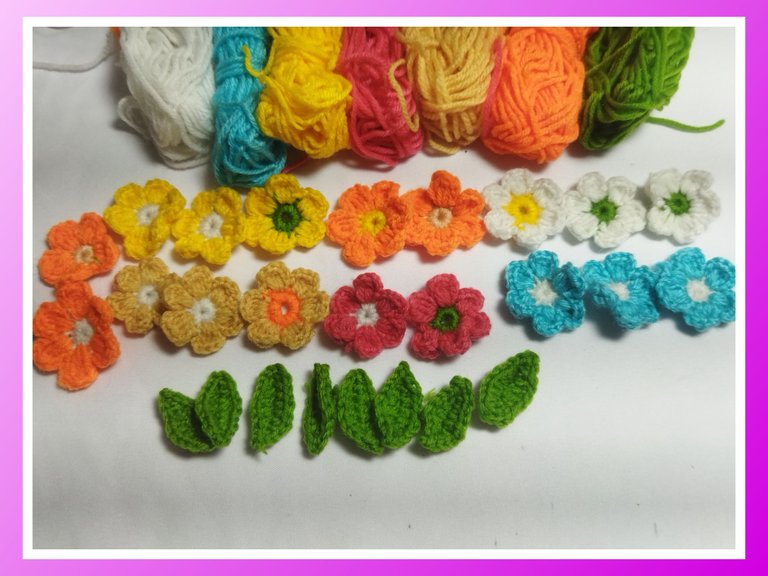
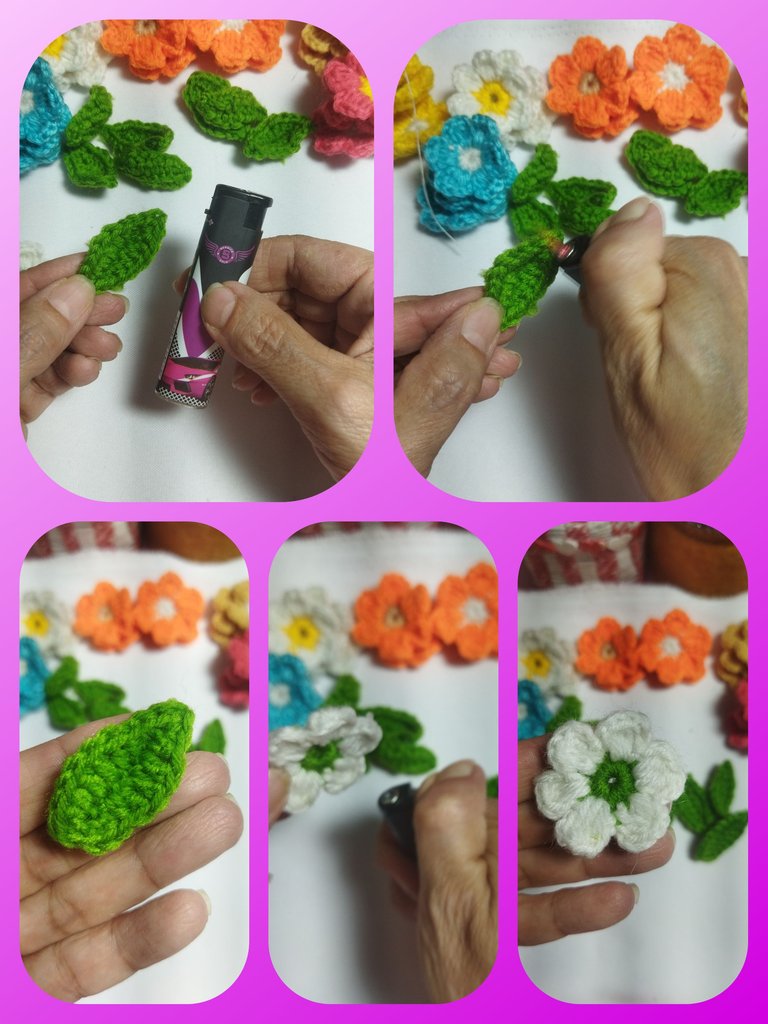
Ahora con un encendedor vamos a pasarlo muy rápidamente por cada una de las flores y las hojas para eliminar las hilachas que forma el estambre y a su vez nos permite darle un mejor acabado a las flores.
Now, with a lighter, we are going to pass it very quickly over each of the flowers and leaves to remove the threads that form the stamen and at the same time allow us to give the flowers a better finish.
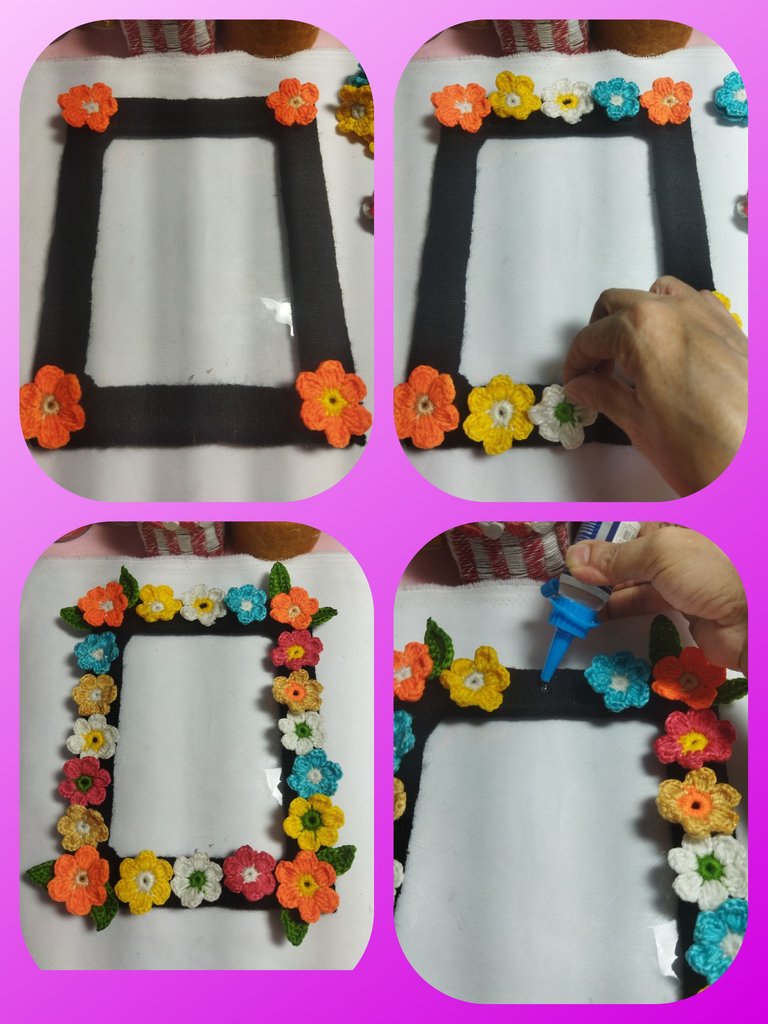
Ubicamos las flores y las hojas alrededor del marco y vamos pegando una a una en la posición que las colocamos.
We place the flowers and leaves around the frame and glue them one by one in the position where we placed them.
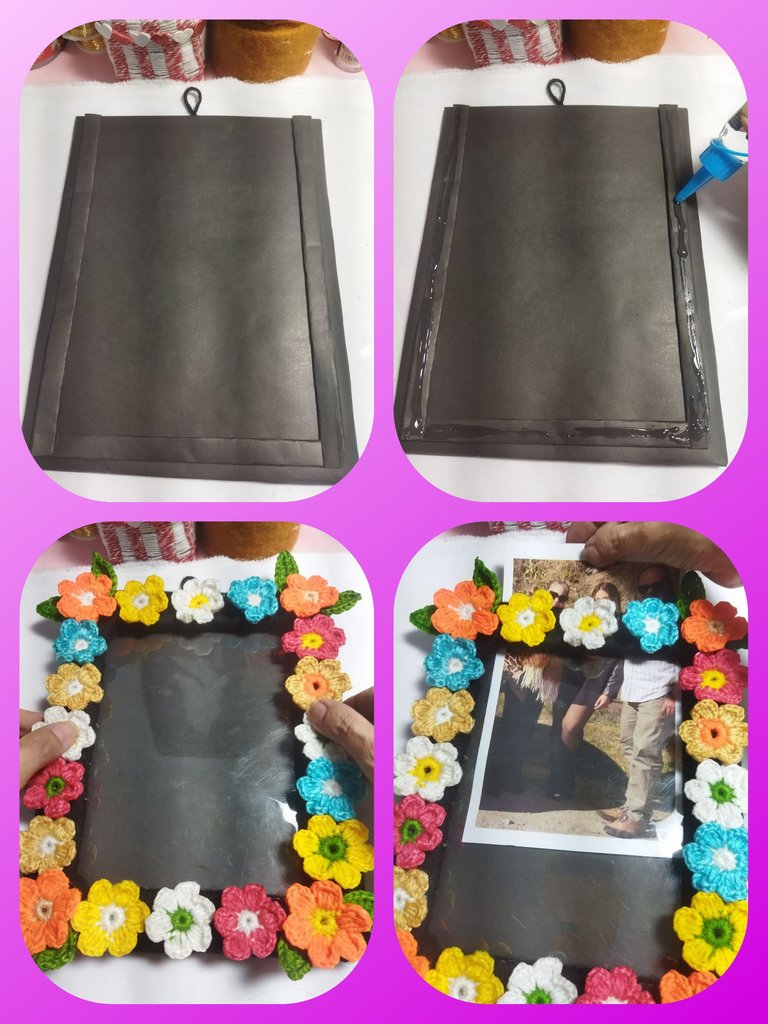
En la pieza que realizamos para la parte de atrás del marco, vamos a pegar 3 tiras de cartulina do 3 doblez cada una para formar la división entre el marco y la base, para poder deslizar la fotografía sin ningún problema. Luego pegamos el marco y colocamos la fotografía seleccionada.
On the piece we made for the back of the frame, we are going to glue 3 strips of cardboard with 3 folds each to form the division between the frame and the base, so that we can slide the photograph in without any problem. Then we glue the frame and place the selected photograph.
PROYECTO FINALIZADO
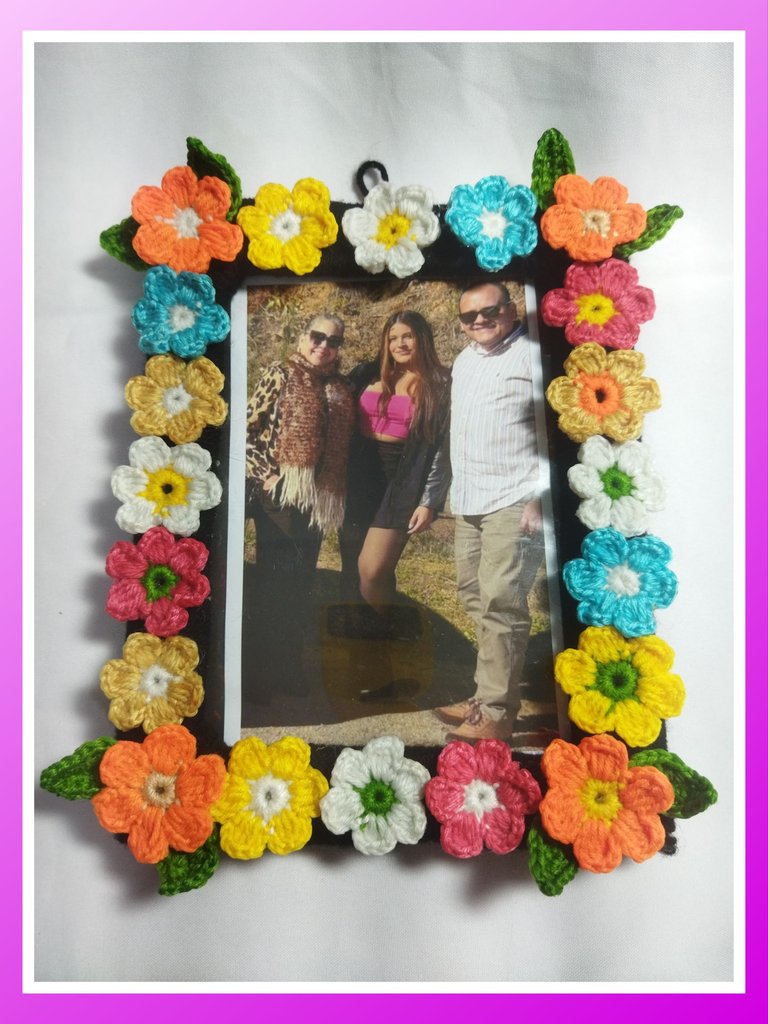
Y así quedó este bello y colorido portaretratos para decorar y enmarcar esas fotos para tener siempre presente a nuestros seres queridos. Estoy más que segura que a mi madre la va a encantar. espero que a ustedes también les guste. Nos vemos en la próxima.
PROJECT COMPLETED
And so this beautiful and colorful photo frame turned out to decorate and frame those photos to always have our loved ones in mind. I am more than sure that my mother will love it. I hope you like it too. See you next time.
Esto quedó tan lindo que me hizo recordar a la madrina de mi mami, que tenía en su casa muchos adornos con estambre. Que cosita tan linda, te felicito.
Las flores quedan muy lindas, primera vez que tejo con estambre, es muy suave para manejar y además los colores son vivos, resaltan mucho. Me alegro que te haya gusta. Saludos.
It looks impressive. The way you represent it, that's amazing. Nice work! Keep it up!
Thank you!
Creativo y muy tierno, un excelente proyecto bien explicado. Excelente
https://inleo.io/threads/view/hive-130560/re-leothreads-2m1vgx8ox
Muchas gracias 😊
Bellísimo! 😱😍 me parece muy bonito que cada flor tenga en el centro un color diferente al de los pétalos, eso hace mucho más llamativo y bonito el portaretrato🌷 a tu madre le gustará muchísimo 😁
Muchas gracias, me alegro que te guste. Pues si, mi mamá quedó encantada y me encargó dos más, a´s´que ya estoy en ello. Saludos.