A few days ago I saw in this community a contest of decorative and useful things for the kitchen and I decided to participate.
Hace unos días que ví por esta comunidad un concurso de cosas decorativas y útiles para la cocina y me animé a participar.
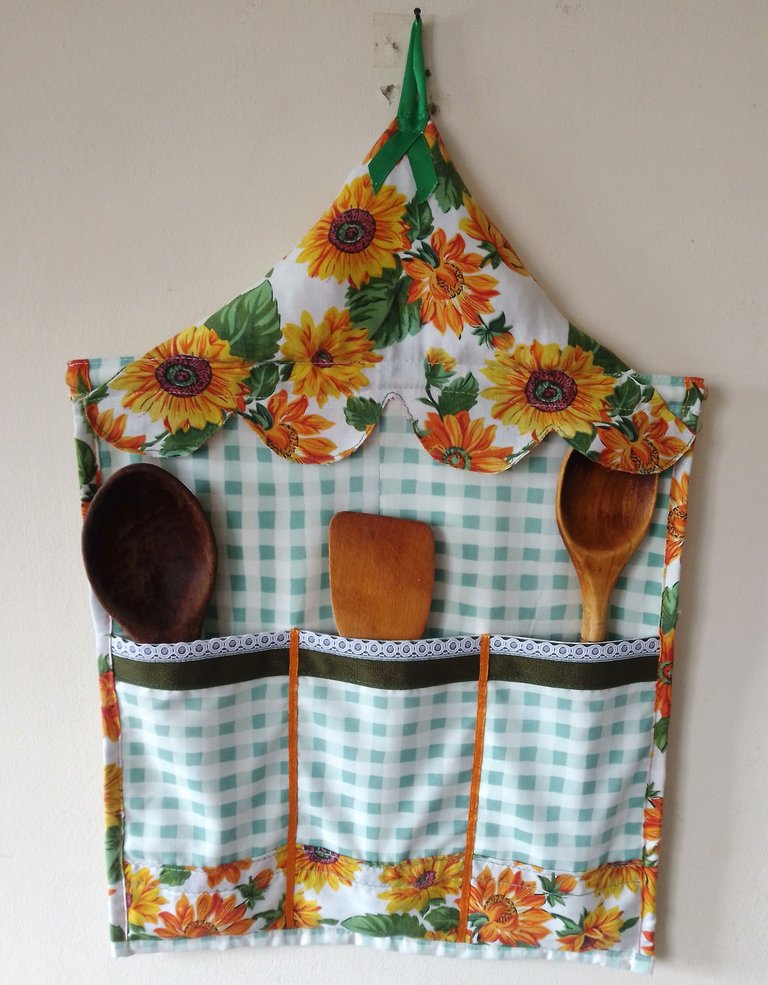
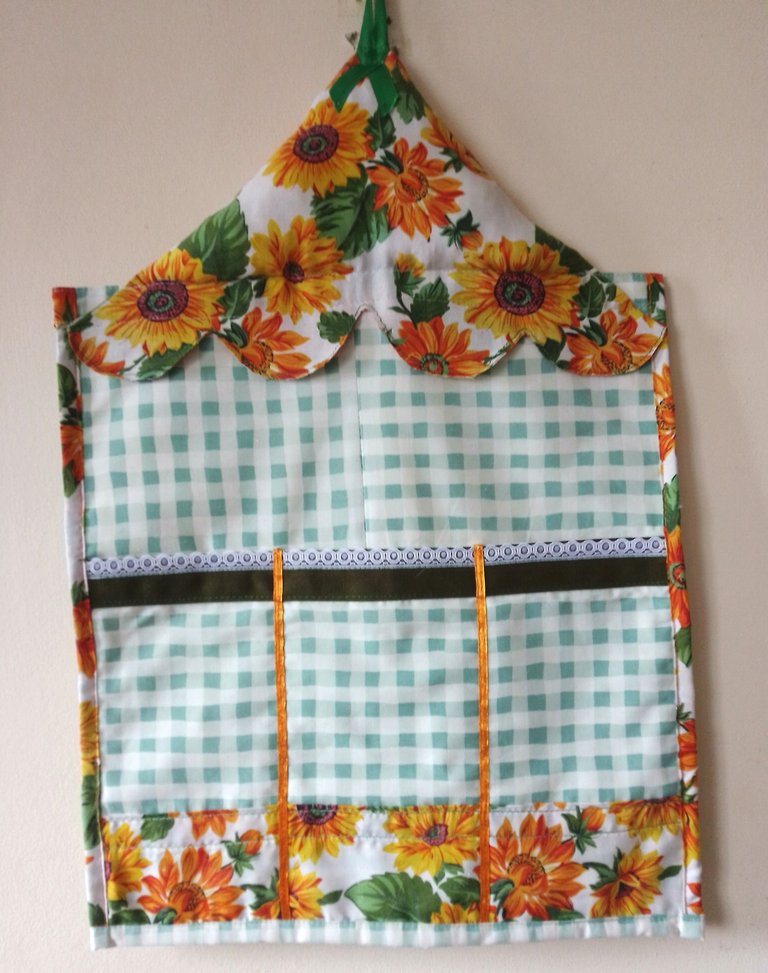
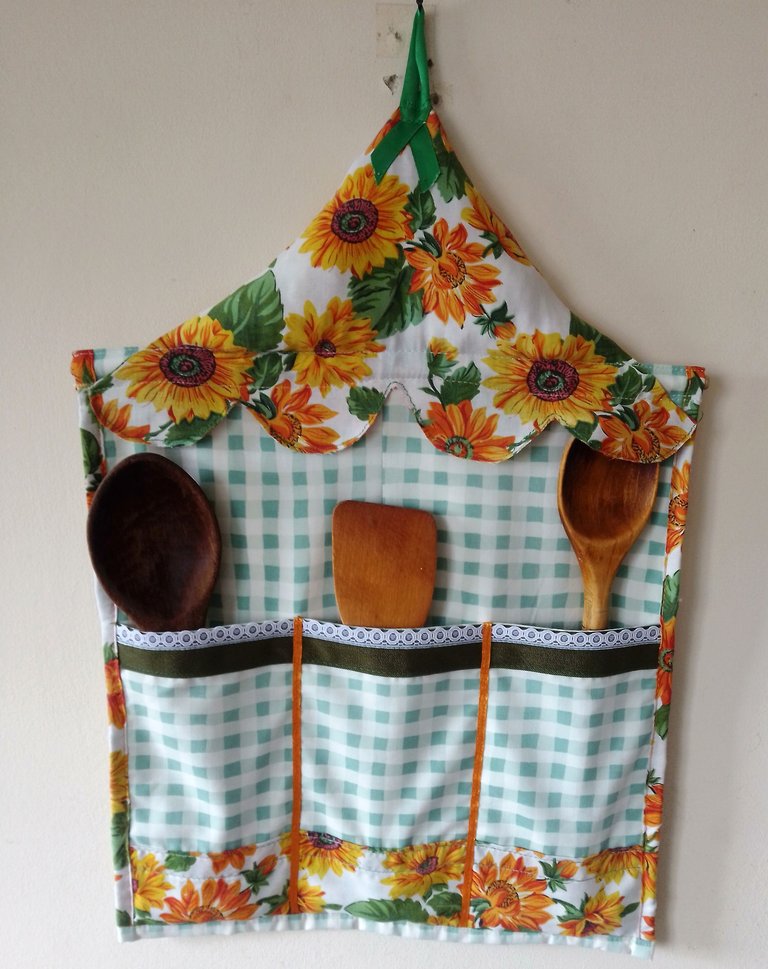
Well, my kitchen is not very big, and since I use several wooden utensils and they don't have a hole to hang them, I thought it was a great idea not only for the contest but also for personal use and little space in my kitchen. So I thought, why not make a hanging spoon holder and store them there?
Bueno, mi cocina no es muy grande, y como utilizo varios utensilios de madera y no tienen hueco para colgarlos, me pareció una idea estupenda no sólo por el concurso sino también para uso personal y poco espacio en mi cocina. Entonces pensé, ¿por qué no hacer un portacucharas colgante y guardarlas ahí?
I looked for some scraps I had left over, because as I am a seamstress I always have pieces of fabric left over, I made the combination and made it. What I did was to first cut 2 pieces of equal size, 42 cm high and 39 cm wide. The fabric in the front is thinner than the one in the back, which is thick, as a support.
Busqué unos retazos que me quedaban, porque como soy costurera siempre me sobran pedazos de telas, hice la combinación y lo confeccioné. Lo que hice fue cortar primero 2 piezas de igual medida, 42 cm de alto y 39 cm de ancho. La tela del frente es más delgada que la que va atrás, que es gruesa, como soporte.
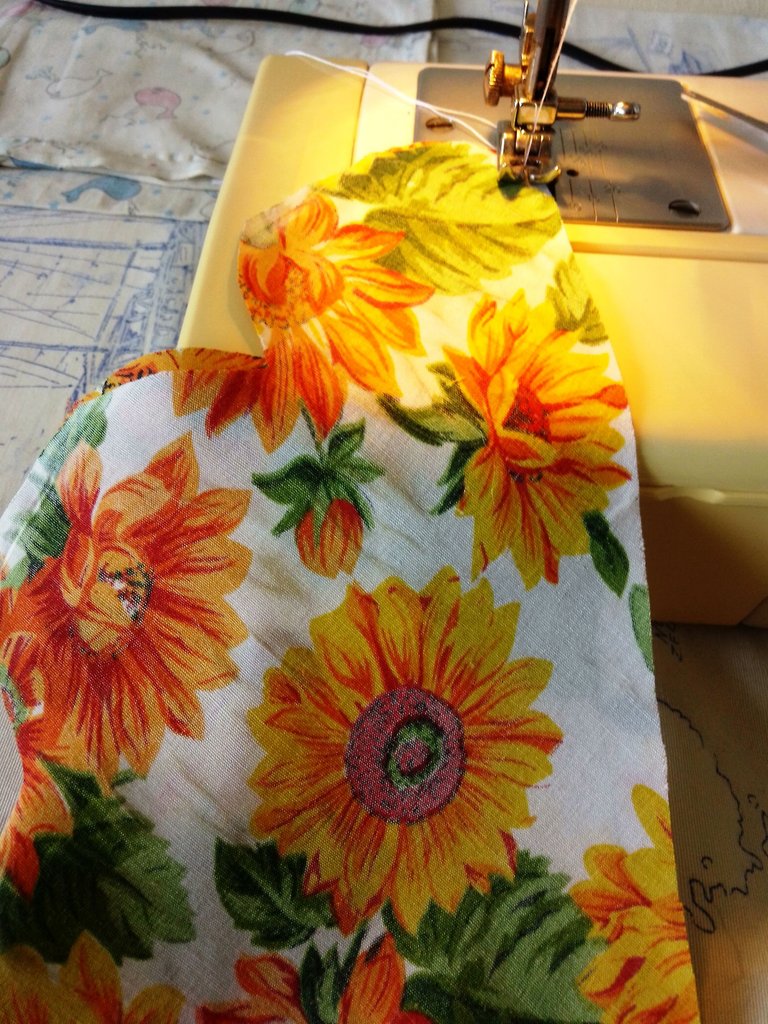
Now for the lower part I cut piece N°2 with these measures: 39 cm wide and 25 cm high. I cut the piece N°3 of sunflowers, which goes over the previous one, folding 1/2 centimeter at the top. Measurements: 39 cm wide and 10 cm high.
Ahora para la parte inferior corté la pieza N°2 con estas medidas: 39 cm de ancho y 25 cm de alto. Corté la pieza N°3 de girasoles, que va sobre la anterior doblando 1/2 centímetro en la parte de arriba. Medidas de 39 cm de ancho y 10 cm de alto.
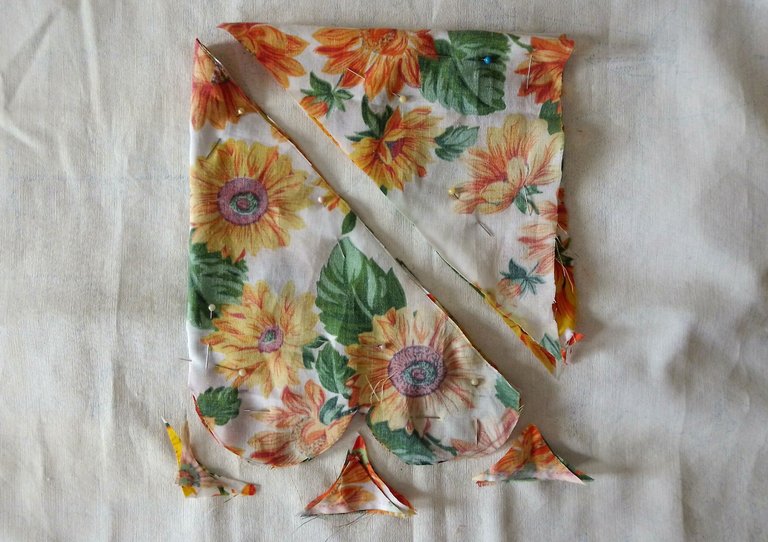
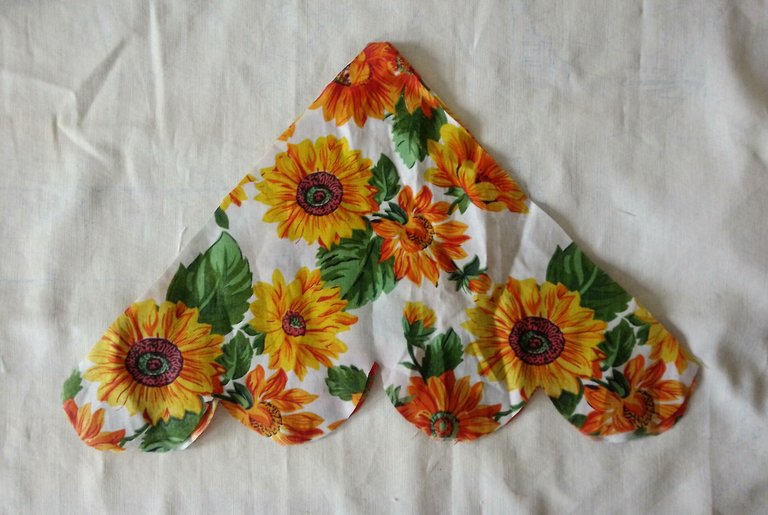
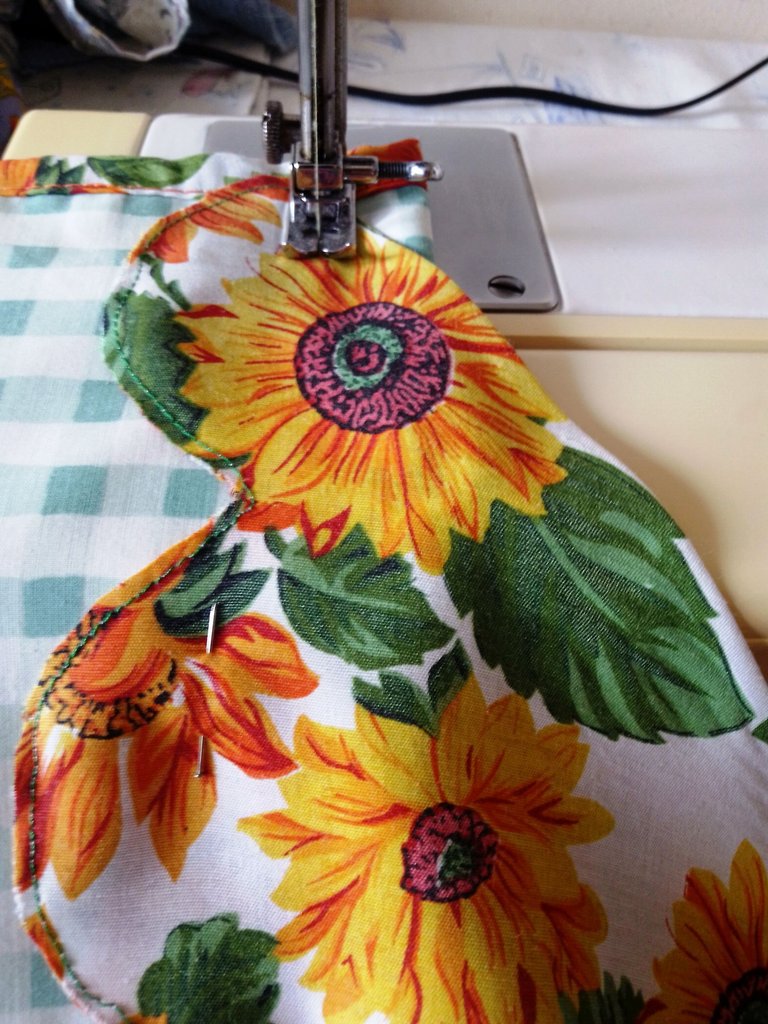
Now for the top cover I cut 2 equal triangles taking into account that it has the same size, that is 42 cm wide. Then with the help of a glass I marked the waves in the shape of a tongue and sewed a straight seam around the triangle that was formed.
Ahora para la tapa de arriba corté 2 triángulos iguales tomando en cuenta que tenga la misma medida, o sea 42 cm de ancho. Después con ayuda de un vaso marqué las ondas en forma de lengua y pasé costura recta alrededor del triángulo que formó.
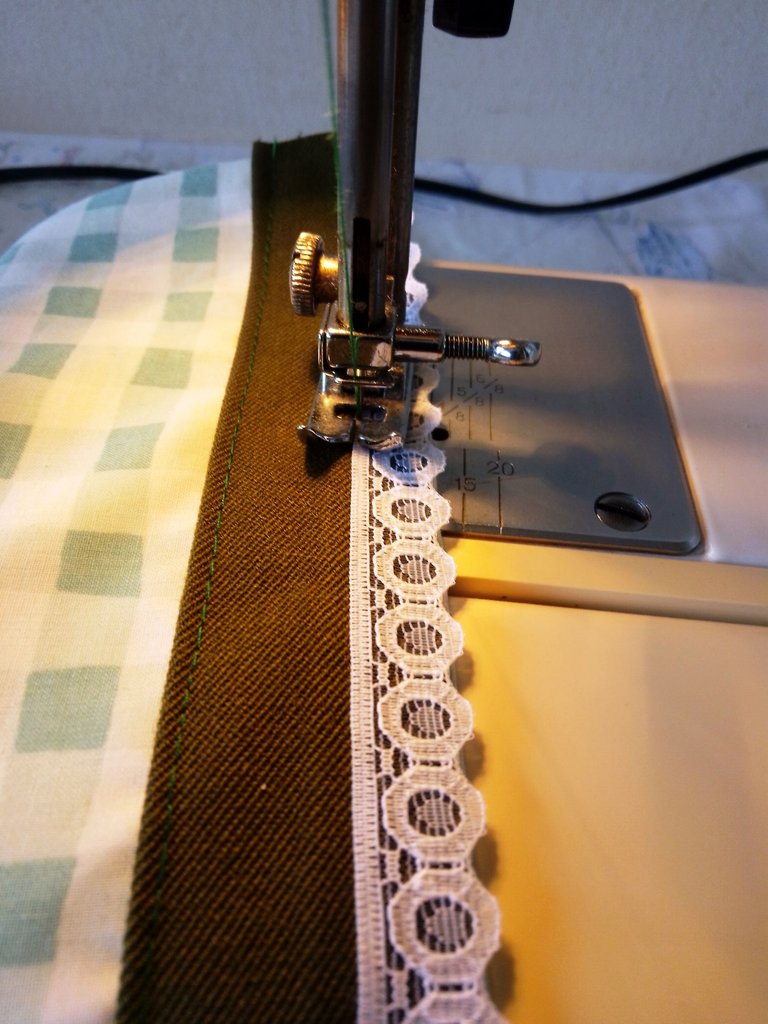
I also used a stiff decorative lace 1 cm wide and 39 cm long, and I added a green strip 4 cm wide and 39 cm long. If you want to leave it out, I liked the combination, and I added a 1/2 cm ribbon to separate each pocket.
También utilicé un encaje decorativo rígido de 1 cm de ancho y 39 cm de largo, y le puse además una tira color verde de 4 cm de ancho y 39 de largo. Si ustedes quieren no la pongan, a mí me gustó la combinación, y agregué una cinta de 1/2 cm para separar cada bolsillo.
Confection / Confección
- Join the first two pieces along the sides by sewing them straight.
- Unir las dos primeras piezas por los costados pasándoles costura recta.
- On the upper part of the piece N°2 sew the green strip and on top of it, the lace, passing seam on the lace and on the lower part of the green strip.
- En la parte superior de la pieza N°2 coser la tira verde y encima de ella arriba, el encaje, pasando costura en el encaje y en la parte baja de la tira verde.
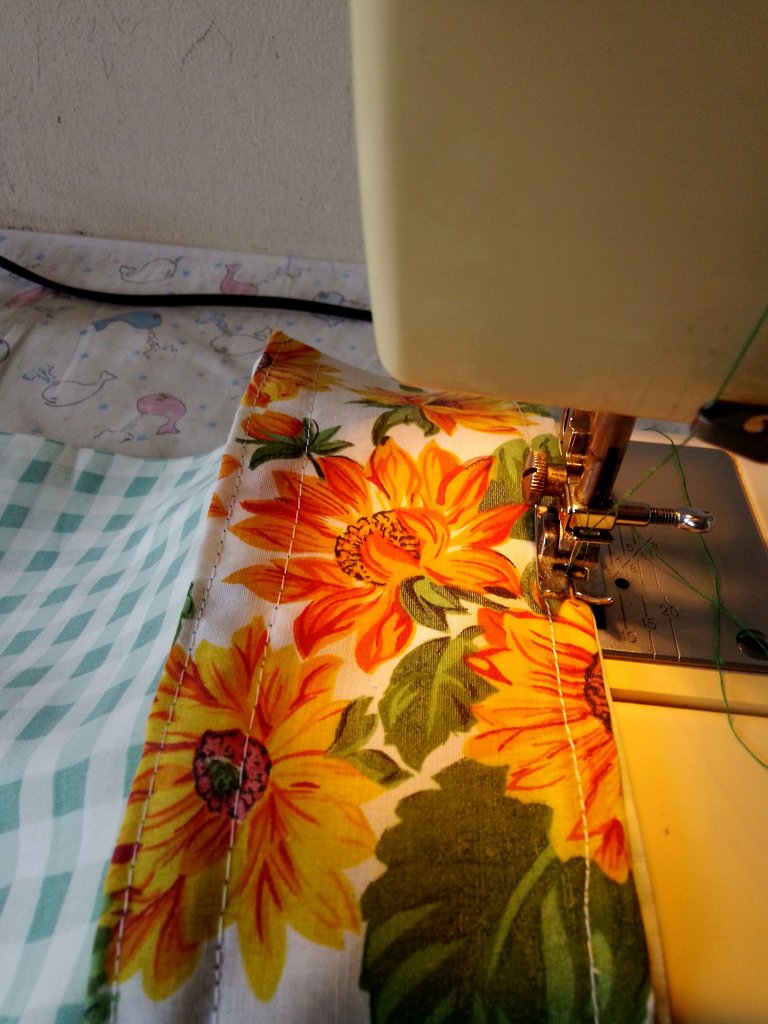
- On the lower part of the spoon holder, sew piece N°3, the sunflower piece, folding 1/2 cm and passing the seam.
- En la parte baja del portacucharas coser la pieza N°3, la de girasoles, doblando 1/2 cm y pasando costura.

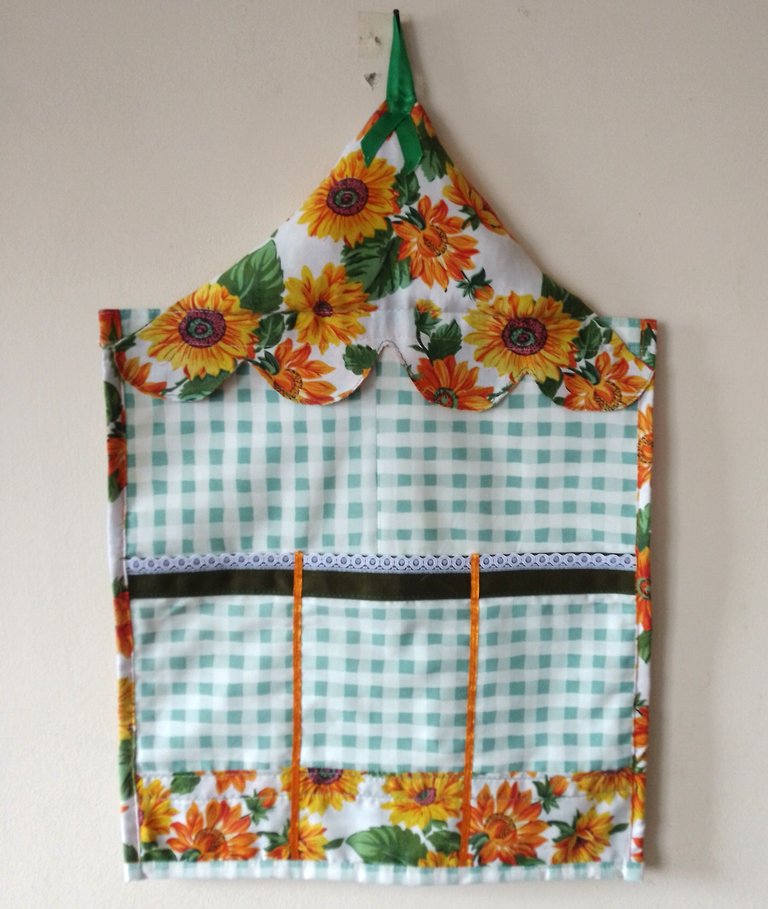
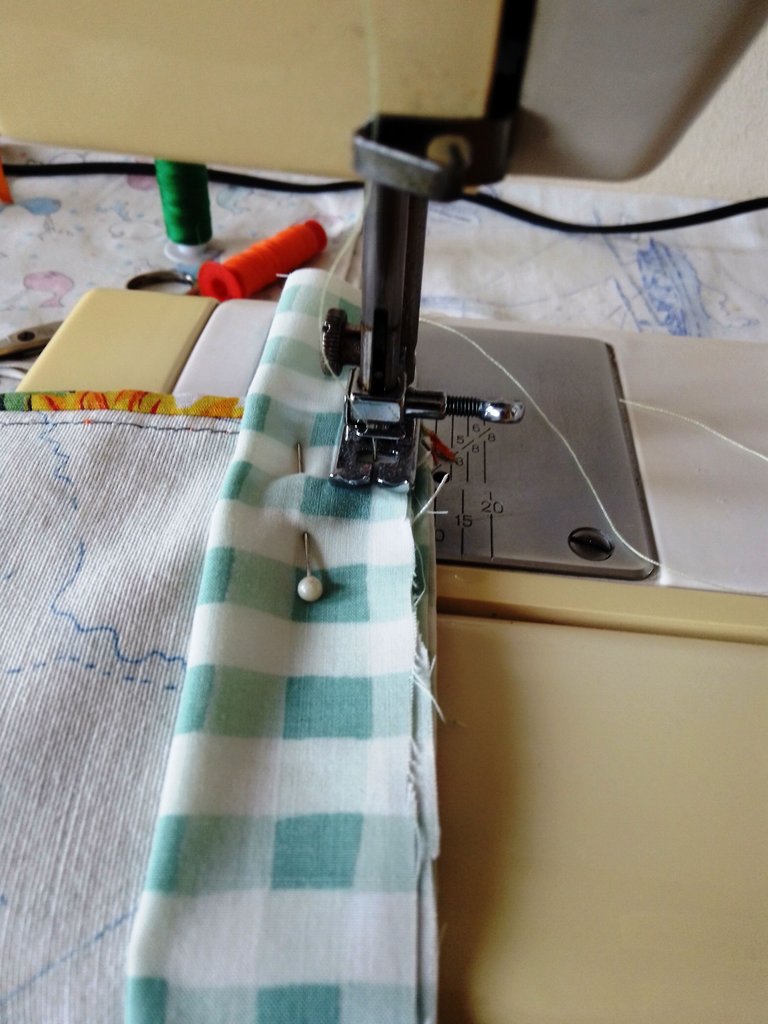
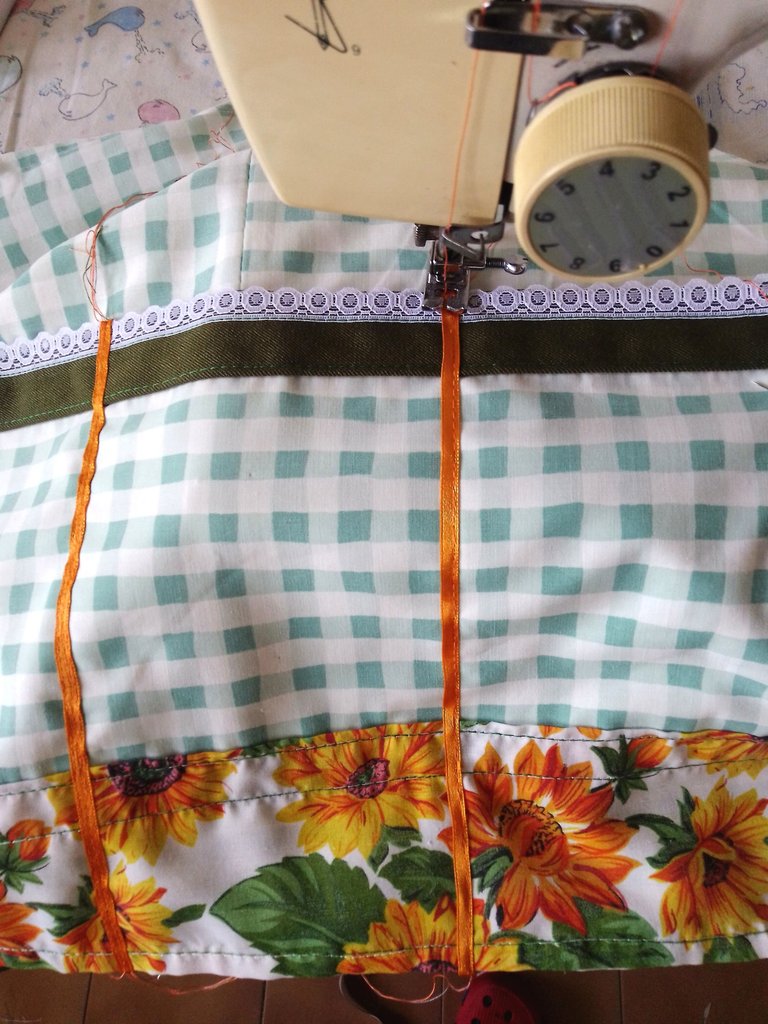
- Mark with a pencil the separation to form the pockets, 13 cm from each other.
- Marcar con un lápiz la separación para formar los bolsillos, 13 cm uno del otro.
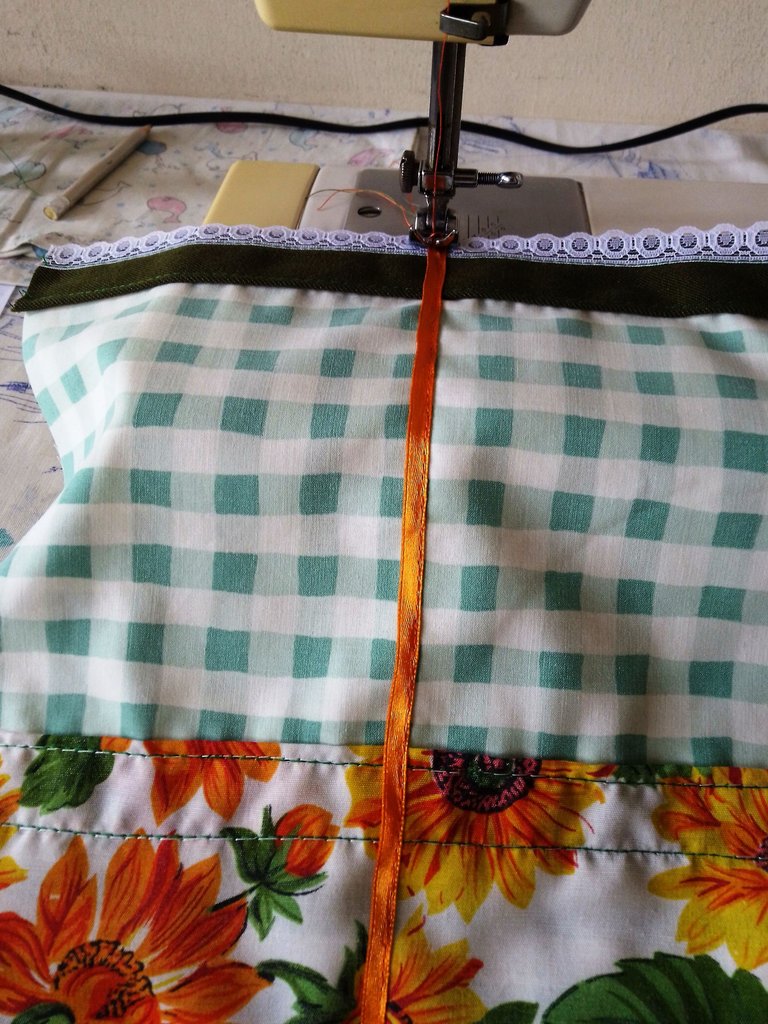
- Now on the two pieces that are sewn together, put the piece N°2, hold with pins and sew the tape just where we marked the separation of 13 cm. The stitching on the ribbons should include the first two pieces that are the support, and in this way the pockets will be formed. It's easy, just look closely at the photos.
- Ahora sobre las dos piezas que se cosen juntas, poner la pieza N°2, sostener con alfileres y coser la cinta justo donde marcamos la separación de 13 cm. La costura sobre las cintas debe incluir las dos primeras piezas que son el soporte, y de esta manera se formarán los bolsillos. Es fácil, sólo hay que fijarse bien en las fotos.
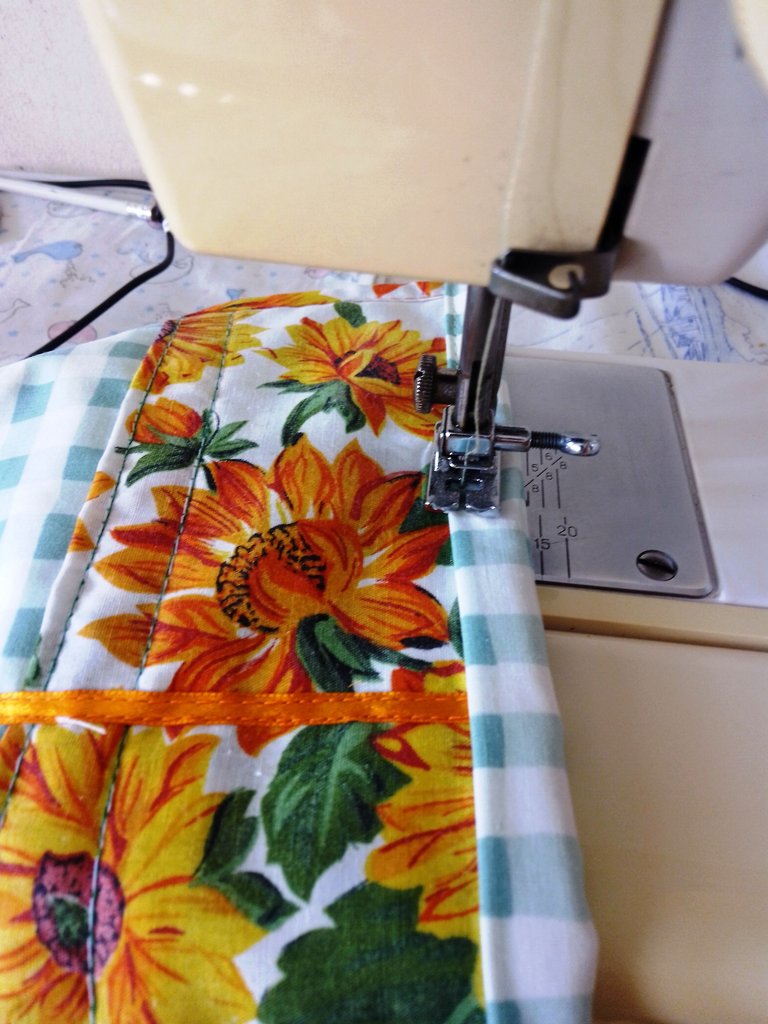
- What remains friends now is to bias binding the sides and bottom. I made it out of the same fabric, cutting strips of 4 cm wide and the necessary length.
- Lo que falta amigos ahora es sesgar los costados y la parte de abajo. Yo lo hice de la misma tela, cortando unas tiras de 4 cm de ancho y el largo necesario.
- Next step, at the top of the piece fold 2 cm, this is a channel to pass a wooden stick or bamboo, so it will be firm and will not bend the fabric. Pass a seam.
- Paso siguiente, en la parte de arriba de la pieza doblar 2 cm, esto es un canal para pasar un palito de madera o bambú, así quedará firme y no se doblará la tela. Pasar una costura.
- Sew the two triangles right sides together, flip them over and sew straight across the waves (tongues). Now sew the triangle at the top, sew up and down until the end, making sure that the hole remains intact.
- Coser los dos triángulos derecho con derecho sólo por los costados, voltear y pasar costura recta en las ondas (lenguas). Coser ahora el triángulo en la parte superior, coser arriba y abajo hasta el final tratando de que el orificio quede intacto.
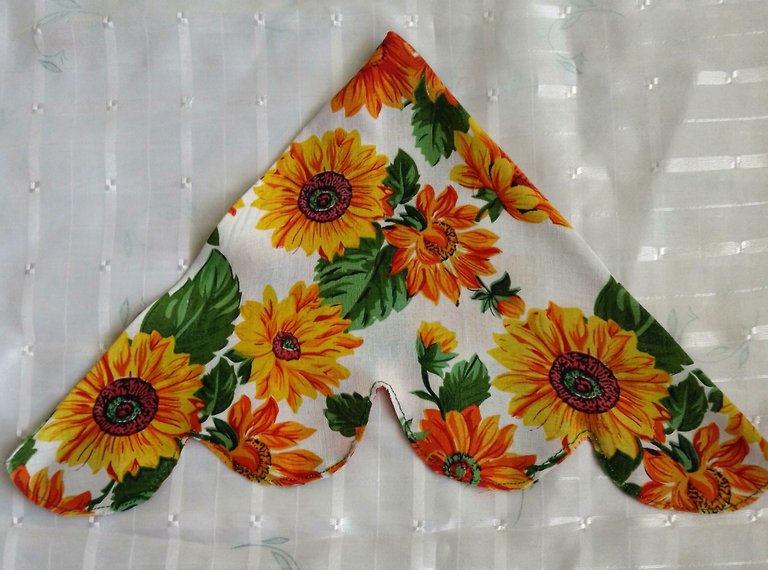

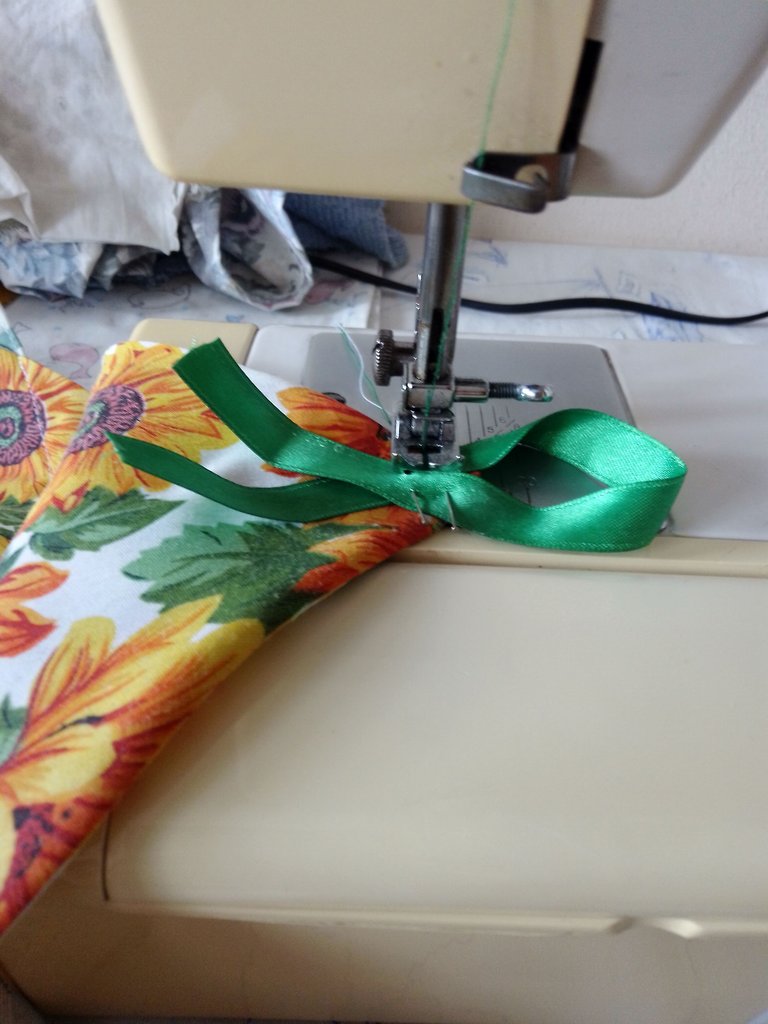
- At the tip of the triangle place a strong ribbon to hang it and that's it.
- En la punta del triángulo colocar una cinta resistente para colgarlo y listo.
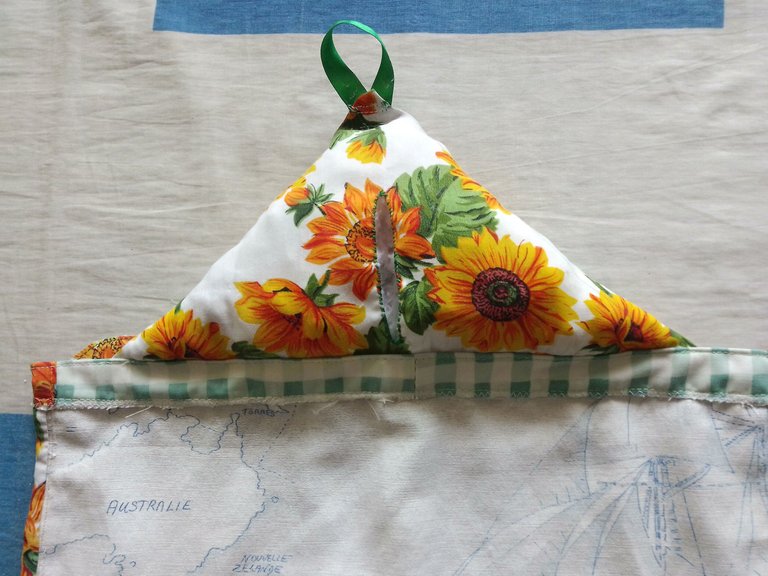
I made a small vertical opening in the back of the triangle to put some stuffing because the fabric I used was not very thick. If you can, it is better to make it with thick upholstery fabric, so you don't need to stuff it, it is firmer this way.
Yo en la parte de atrás del triángulo hice una pequeña abertura vertical para colocar un poco de relleno porque la tela que usé no era muy gruesa. Si ustedes pueden, es mejor hacerla con tela gruesa tipo tapicería, y así no hace falta rellenar, queda más firme de esta manera.
Well friends, I hope you liked my work and found it useful. Greetings and until a next creation 😉.
Bueno amigos, espero que mi trabajo les haya gustado y les parezca útil. Saludos y hasta una próxima creación 😉.
All photos are my property / Todas las fotos son de mi propiedad
Has sido votado por
PROYECTO ENLACE
'Conectando Ideas y Comunidades'
PROYECTO ENLACE es un proyecto de curación de habla hispana enfocado en recompensar contenido de calidad y apoyar autores en su proceso de crecimiento en HIVE.
Creemos y apostamos por el futuro de esta gran plataforma, y estamos muy emocionados de poder hacerla crecer junto a esta comunidad. Así que te invitamos a publicar en nuestra COMUNIDAD y estar atento a todas las actividades que tenemos preparadas y que estaremos publicando en breve.
¿QUIERES AUTOMATIZAR TUS GANANCIAS DE CURACIÓN? SE PARTE DEL PROYECTO ENLACE APOYANDO A NUESTRO TRAIL EN HIVE.VOTE INGRESA AQUÍ PARA CONOCER LOS DETALLES.
¿QUIERES INVERTIR ENLACE? DESCUBRE COMO HACERLO Y GENERAR INGRESOS DE FORMA SEMANAL MEDIANTE TU DELEGACIÓN DE HP AQUÍ TE EXPLICAMOS COMO.
Te invitamos a participar en nuestro servidor de Discord: https://discord.gg/3S9y7BbWfS
Atentamente
EQUIPO ENLACE 2024
¡Muchísimas gracias por su apoyo!
Muy bello te felicito, me encanto el diseño y la tela.
¡Muchísimas gracias! 🙂
This is beautiful
The design you used is really beautiful. I love the fabric
All in all, you did a really great job with this
It makes me happy to read this, thank you very much! 😊
You’re welcome
Ha quedado precioso, útil y decorativo, ideal para esas cucharas sin agujero que necesitan un lugar especial para cuidarlas, el diseño del portacucharas queda genial y original. Éxito en el concurso.
¡Qué bueno que te gustó! Tenía mis dudas al principio jeje, ¡gracias por tu apoyo! ❤️
¡Te quedó hermoso! 😍 Las flores amarillas siempre quedan bien para la cocina. Me gusta la forma ondulada que le hiciste a la tela. Simula muy bien los pétalos de una flor. Me gustan los acabados de tu trabajo. Te felicito. Éxitos en el concurso 💟
¡Muchísimas gracias por tus bellas palabras y deseos! Tuve suerte de tener ese retazo de tela con girasoles 😊, ¡saludos!
¡Que hermoso!. Los cucharones de madera hacen juego con los girasoles. La tela se ve resistente y le dá firmeza a la pieza. ¡Gran trabajo!.
¡Me alegra que te haya gustado! Al principio no estaba segura de que la combinación quedara bien, ¡gracias! 😊
Beautiful kitchen Apron you have made a sweet dress. Weldone dear
Well, a dress for spoons hehe, thank you! 😊
Me encantó la combinación de la tela de flores y la de cuadritos para este portacucharas. Quedó muy lindo. Saludos y mucha suerte en el concurso.
¡Graaacias! Afortunadamente los retazos que tenía combinaron bien jeje, ¡saludos! 😊
Te deseo mucho éxito.Hola @ioanna-m gracias por unirte al concurso con este útil y bonito proyecto.
¡Muchísimas gracias por tus palabras @kattycrochet! 😊
Thanks so much for this opportunity! ❤️😊
Nice work and well explained process... 🙂
Thank you! 😊