

Introduction
With this ability, your 0 mana cost monster doesn't only act as a temporary defense for your team but also a tiny helper to increase Elanor Bravefoot's damage.
However, since I would be trying this fresh, I would be taking it a step further. Let me show you a strong lineup featuring this wonderful Promo card that not only is for show but one that can actually win you games.


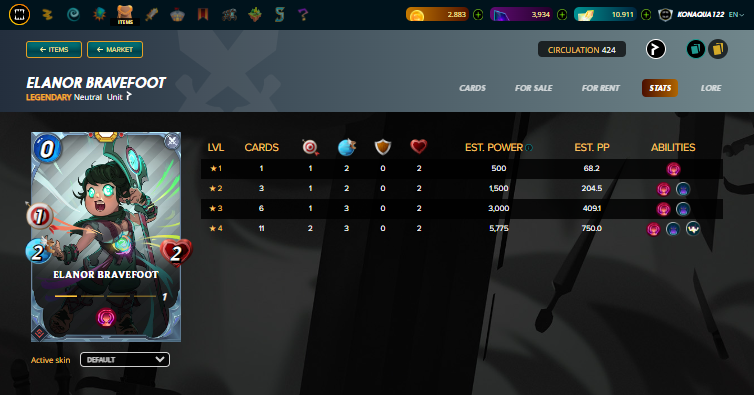
As expected for a 0 mana cost monster, the stats are really low. However, what Elanor Bravefoot differs with other 0 mana cost monster is that she is not a simple filler or a fodder. She can actually deal a decent damage with an appropriate team.
The best ability for Elanor Bravefoot is, of course, Blasphemy of Uul. This gives you an extra 2 damage alone giving you a potential 4 range damage monster at max level for 0 mana. This means that you can use all those extra mana that you would've used in these 3 monsters for others giving you a strong front line.
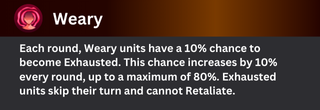
Weary: [Debilitation] Each round, Weary units have a 10% chance to become Exhausted. This chance increases by 10% every round, up to a maximum of 80%. Exhausted units skip their turn and cannot Retaliate.
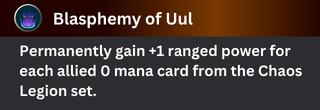
Blasphemy of Uul: [Stat Modifier] [Positive Status] Permanently gains +1 ranged power for each allied card named Fiend.

Strengthen: [Stat modifier] [Positive Status] As long as this monster is alive, all friendly monsters has their max health increased by 1.

Pros
- Can be used anytime, anywhere. Elanor Bravefoot is a 0 mana cost Neutral monster. You can use her as a damage dealer along with other 0 mana cost fiend monsters or as a free monster. Whatever your decision is, one thing is true. You can use her anytime, anywhere at no cost.
- Has the ability to gain multiple damage for free. By using multiple 0 mana cost fiend monsters like Fungus Fiend or Scorch Fiend, you can gain a significant amount of damage which is really good especially since Elanor Bravefoot doesn't cost any mana to use.
- Gives your team more durability through Strengthen ability for no cost. Not only this card gives you damage but she actually boost your team's survivability by increasing their max health. This ability complements so much with other 0 mana cost monsters especially since they themselves have low stats and an extra health may be the difference for them absorbing 2 attacks before dying instead of 1.
Cons
- Not good for long battlesWeary is not a bad defibilations to be honest. The problem is that if the game goes for too long, the chance of this card skipping their turn increases. Therefore, you need to quickly eliminate your opponent's monsters fast.
- Low defensive capabilitiesElanor Bravefoot has low health, speed, and no armor. While this doesn't really mean anything because she is a range monster, after all, it would still be bad because of Opportunity ability. Make sure you have Taunt monsters to protect your Elanor Bravefoot against such strategies.
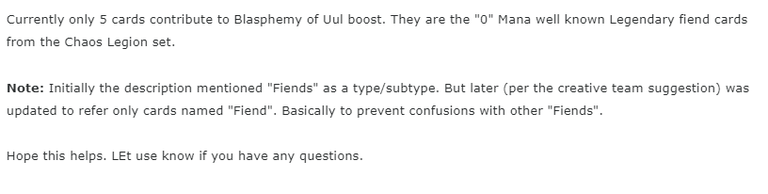
- Limited options if you are focusing on Blasphemy of Uul ability.So far, there are only 5 monsters that can be used by Blasphemy of Uul, these are the 0 mana cost monsters from each Splinter that has "Fiend" in the name. To fully abuse this ability, you also need to use summoners with Dual Elements to be able to use multiple fiend monsters at the same time.

 |
 Equalizer |
The Max Health of all monsters on the board will be equal to the Max Health of the monster with the highest max health: Since your field will be filled with 0 mana cost monsters, Equalizer will be the best rule of combat for you. This increases the health of those monsters giving you multiple tanks at no mana cost. |
 |
 Fog of War |
Removes the Snipe, Sneak and Opportuniy abilities for this battle.: Elanor Bravefoot's main problem are the tricky target modifying abilities that make her vulnerable even if she's not your front line. With Fog of War rule of combat, Sneak, Snipe and Opportunity abilities will be disabled putting Elanor Bravefoot on the safer side. Scattershot still works in this rule of combat. |
 |
 Aim True |
All monsters cannot miss their attacks: Elanor Bravefoot only has 3 speed even at max level making her miss a lot of her attacks. Aim True is a good rule of combat to fix this weakness. This makes all of her attacks pass through allowing you to focus on increasing your team's damage instead. |

|
 Fire & Regret |
All monsters on the board gains the Return Fire ability that inflicts half the damage to monster with range damage attacking this monster: Since Elanor Bravefoot has range damage, Return Fire ability will be bad for her. With the increased damage from Blasphemy of Uul, the returned damage to her will be increased as well. |
|
 Ferocity |
All monsters do double damage to opponent's monster that has Taunt ability: Elanor Bravefoot needs to be supported by another monster with Taunt due to her low health and no armor. Ferocity is a problem, not for Elanor Bravefoot, but the one needed to make her survive longer. |
|
 Fab Four |
Up to four monsters can be used by each player in this battle. : Since your field will be filled with 0 mana cost monsters, Equalizer will be the best rule of combat for you. This increases the health of those monsters giving you multiple tanks at no mana cost. |

|
 Coeurl Lurker |
Coeurl Lurker is a good Taunt monster that can be used with any element. Both Elanor Bravefoot and Coeurl Lurker are Neutral monsters giving you flexibility on which Fiends to use to increase Elanor Bravefoot's damage. |
|
 Fungus Fiend |
The 0 mana cost monster that complements all with Risqruel Drath, Coeurl Lurker and Elanor Bravefoot. He has Slow ability that works well with Coeurl Lurker. |
|
 Scorch Fiend |
Scorch Fiend is another 0 mana cost monster you can use if you use Risqruel Drath to increase Elanor Bravefoot's damage through Blasphemy of Uul. The Demoralize ability is a good bonus but since he is a melee monster much like other fiend 0 mana cost monsters, do not expect him to deal extra damage unless you have rules of combat that modifies the attack target. |

The team I designed for this battle fully utilizes Elanor Bravefoot and its ability, Blasphemy of Uul. I used a dual element summoner, Risqruel Drath, to be able to use two fiend monsters, Fungus Fiend and Scorch Fiend. With these two and Risqruel Drath's extra range damage, my Elanor Bravefoot's damage increased from 1 to 4. I also used two Taunt monster for this game to ensure Elanor Bravefoot's safety. Coeurl Lurker worked with Risqruel Drath's Flying ability focusing on speed and evading attacks while Tusk the Wide became a second Taunt monster through Risqruel Drath's Summoner Tactics. These strategies are further tied with Countess Sinash's high range damage and Blast ability along with her Swiftness ability.
Lineup

Risqruel Drath
Risqruel Drath is my dual element of choice for Elanor Bravefoot because of his Summoner Tactics ability allowing me to give Taunt to another monster. I believe that due to the 0 mana cost monster's fragility, a Taunt monster is very important and do you know what is better than 1 monster with Taunt ability? It's 2 monsters with Taunt ability.
Coeurl Lurker
Coeurl Lurker is a balanced tank capable of protecting the team from all forms of damage. His high speed and Phase ability makes him capable of evading melee, range and magic damage. He also gets benefit from Risqruel Drath's Flying ability as it reduces the non-flying attacker's max hit chance by 25%. Combined with his Dodge ability, any attacks towards him are already only at 50% hit chance, and this is even before computing the speed difference.

Tusk the Wide
Even if there's no Super Sneak rule of combat, I would still add Tusk the Wide as the second monster. With lineup prioritizing Elanor Bravefoot, I feel like a double tank is necessary. This slot can also be Grum Flameblade or Immolation depending on your preference. The most important part is it should have Shield or Void ability, which Coeurl Lurker lacks. Another idea is adding a monster with Shield Ward to give Coeurl Lurker Shield ability. However, the only monster that can grant this ability right now does not have a great stat or other abilities making him a bad option as a secondary tank.
Scorch Fiend
Scorch Fiend is another 0 mana cost monster. He's the 0 mana cost monster from Fire Splinter. The Demoralize ability is a good plus but his main job is to increase Elanor Bravefoot's damage through Blasphemy of Uul ability by being a fiend monster.
Fungus Fiend
Not only he works with Elano Bravefoot's Blasphemy of Uul ability, his Slow ability also works great with Coeurl Lurker's strategy based on speed.

Elanor Bravefoot
The main star of the show. With this lineup, you gain a 4 range damage monster for 0 mana. She needs to be protected though because her low health and speed makes her vulnerable from any forms of damage.

Countess Sinash
Not only she has Swiftness complementing Coeurl Lurker and increasing Elanor Bravefoot's hit chance, his other abilities are also really strong. The increased range damage from Risqruel Drath also increases her Blast damage by 1, since it's rounded up.

A quick Opportunity attack from Countess Sinash to Iza the Fanged quickly put the tides in faor of mine. The huge damage from everyone on my team helped a lot especially the combination of my 0 mana cost monsters and Tusk the Wide. 0 mana cost monsters with damage 4, 2 and 3, respectively, are a huge help especially when everyone can attack due to Super Sneak rule of combat. I didn't even need to result to my second backup tactics of using Tusk the Wide as a second Taunt monster through the use of Risqruel Drath.

Elanor Bravefoot is a really good idea. I also think that she would have more usage in the future. I expect Splinterlands to release summoners that can use more than 2 elements in the future or even a rule set that allows you to use multiple monsters from different elements regardless of your summoner. When these things happen, we can see Elanor Bravefoot spike in both price and usage making her one of the best cards in the game.

There was a section on the Blasphemy of Uul page from Splinterlands support regarding fiends. I thought that you can use other fiends (dmons, imps, and more!) to increase Elanor Bravefoot's damage. I checked with Splinterlands support when I tried it with Muspelheim Demon and it didn't work. Apparently, the only ones that works are the 5 "fiend" with 0 mana cost that can be found spread among each element.

- This post is an entry for Splinterlands Social Media Contest.
- Animated Banners and Dividers are edited in Canva Pro.
- Other sources that I do not own are cited under their respective photos.
- Some of the fonts used are from instafonts.io
If you're interested in playing the game, support me by registering using my referral link here

Ⱨ₳VɆ ₳ ₲ØØĐ Đ₳Ɏ!
View or trade
LOHtokens.Thanks for sharing! - @alokkumar121
