It's finally time for a followup to my previous post on monochrome photo editing! This time, I'll show you how to resize and crop a photo to get exactly the size you want. Again, I'll be using the first photo from an earlier post called Late Afternoon at the Lake, so feel free to download it and follow along.
Cropping an image refers to cutting away parts of a picture you don't want to share. This isn't fancy editing to remove an ex from the middle of a family photo, though. It's more like removing stuff at the edges of an image which detract from the main focus, or changing the aspect ratio from what the camera captures to the needs of a screen or post. For example, I cropped the menu screenshots from GIMP to 800x600 without changing the resolution, because you don't need the distraction of all the other stuff in the program.
First, though, a note about image aspect ratio and resolution. Pictures you want to post online can be taller than they are wide, square, or wider than they are tall. Tall images are often called "portraits," whether they show someone's face or not, and wide images are often called "landscapes" even if there is no scenic vista. In either case, the ratio of width to height often falls into a few specific sizes based on various factors from aesthetics to how stuff is made. If you know your Fibonacci sequence and the theory of the golden ratio, you might know why 3:2 and 5:3 might be common choices.
On the other hand, if you want an image to be a wallpaper for a computer monitor or smartphone, it makes sense to size the image to match the display. At the time I am posting, 1080p is still a common computer monitor resolution, although smaller and larger options certainly exist. Computer monitors used to be 4:3 or 5:4 aspect ratio, and I remember when VGA monitors at 640x480 (4:3) resolution were commonplace. I stubbornly stuck with a 1280x1024 (5:4) system I liked for a long time after "1080p HD" was common. Now, widescreen standards are usually a 16:9 aspect ratio with the vertical pixel count used as shorthand, and interlace is almost entirely gone in favor of progressive scanning, but the 'p' remains. 720p (HD) is 720x1280. 1080p (full HD) is 1920x1080. Now even higher resolutions like 3840×2160 (4K ultra high definition) are common in televisions and can be found in some computer monitors.
All this is to say if you want to resize and crop for a phone or monitor display, know what resolution it needs and aim for that target. If you were good at ratios and quick calculations in school, this makes sense immediately. If not, remember there is an undo button, or ctrl+z on your keyboard.The best way to understand how all of this works is to just play around and see what happens. Unless you overwrite the original photo when you export the image, nothing you do in a GIMP project can break anything.

Before uploading the picture to the Hauser Lake post, I had already edited it to a 16:9 aspect ratio with a resolution of 3200x1800. Suppose I want to scale it to make a 1920x1080 wallpaper for my laptop, though? In GIMP, I want to click Image in the menu bar and choose Scale Image... from the drop-down menu, like so.
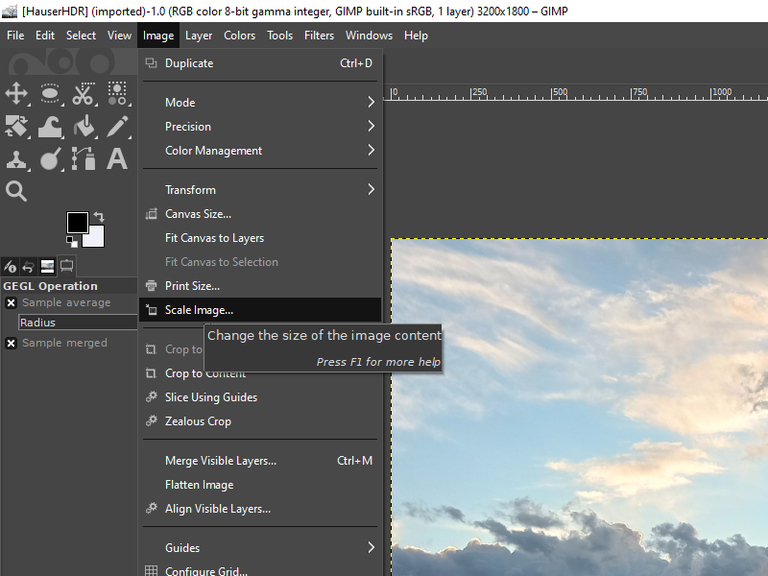
This opens a dialog box in the middle of the screen. Resizing an image usually keeps the aspect ratio of the original, although some software can scale width and height independently to stretch and skew the picture if you aren't careful when setting your changes.
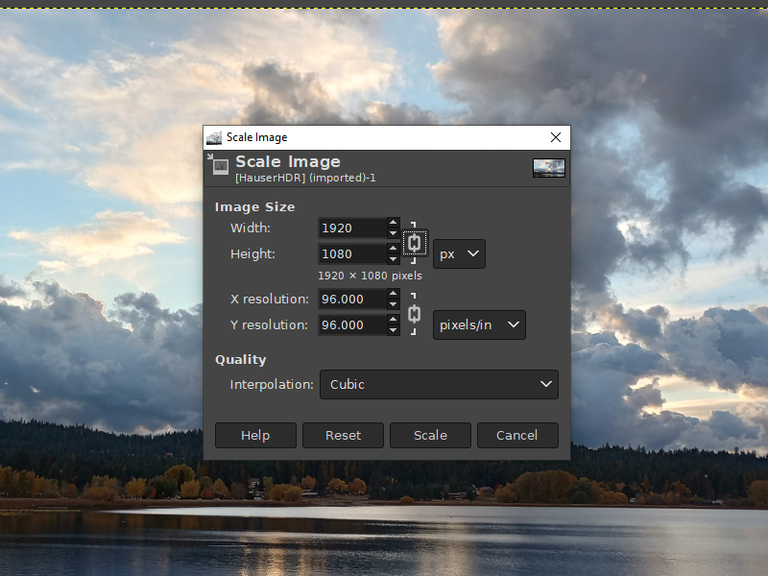
When I typed '1080' in the Height box and clicked in the Width box, it auto-calculated the ratio and immediately adjusted to '1920.' Note the chain link icon connecting the two text boxes. This is on by default, but you can click the chain to break this auto-calculation process if you want to adjust these factors independently for some reason. It's highlighted here only because I was clicking on it to verify it did what I thought while preparing these screenshots.
Remember, if you don't know what a tool does, you can look up tutorials, or just click it and see what happens. Don't be afraid to learn by trying stuff out!
At this point, I'm ready to use the same export process I covered in the last post to save it as a ,jpg or .png or whatever other image format I want.

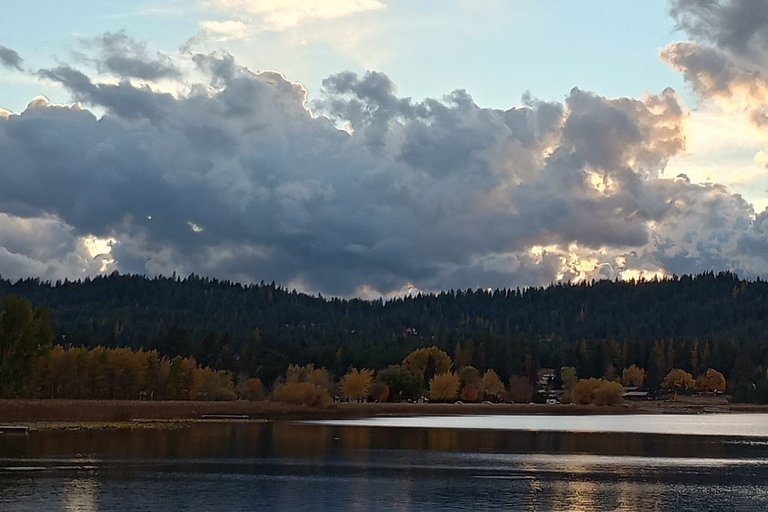
But what if I don't want a landscape? Or what if I want to crop the picture for a different display? Suppose I were writing a blog post, and decided I needed two different images from this photo, one a 3:2 cropped photo of the left side zoomed in on the shoreline, and one a 2:3 portrait focusing on the cloud formation in the middle? Just playing with the scale won't do what I want, will it?
We'll again open the Image drop-down menu, but this time choose Canvas Size...
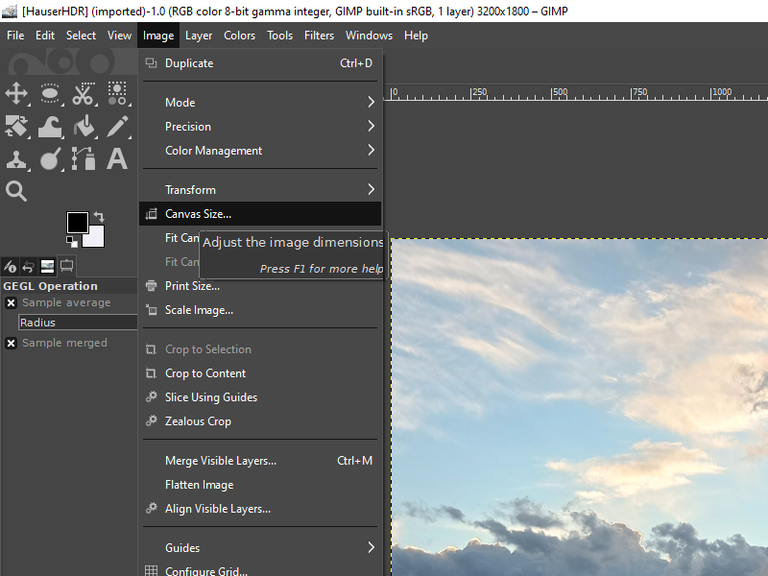
This opens a new menu with a small preview thumbnail where I can enter the pixel count and even the precise pixel offset for the new smaller canvas. Note the broken link on this canvas size selection. I can click that if I want to maintain the aspect ratio as I crop the photo, but in both examples today I will be deliberately changing that.
The thumbnail preview has a rectangle in the middle where I can see the portion of the original which will be cropped out, and I can click and drag to change which part of the photo I want.
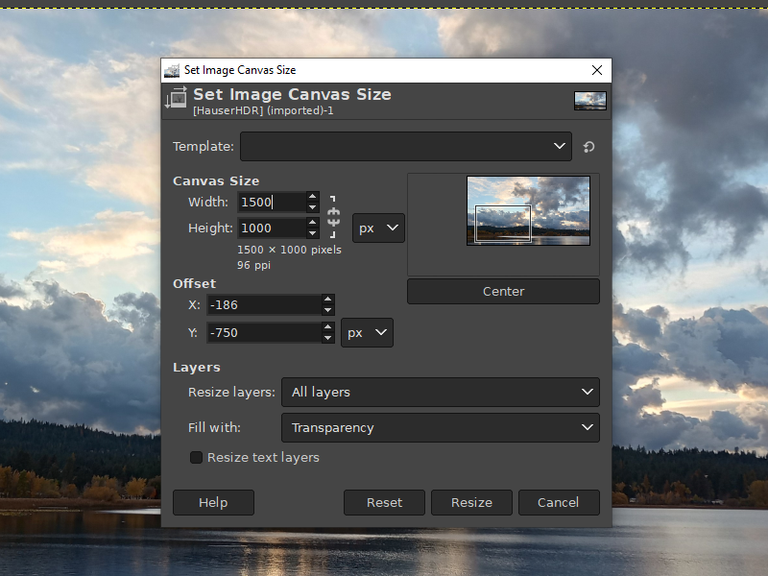
Once I click "Resize," I can export this new smaller image more suited to faster uploading to a blog, social media, etc.
Whatever screen you are using, this much smaller picture is still probably being scaled down to fit within the HIVE blog display on the website and device you are using, so it's still a higher resolution than is strictly necessary here. However, once I have the cropped portion of the original, I can then scale the canvas to whatever specific smaller resolution I may want to target if need be.
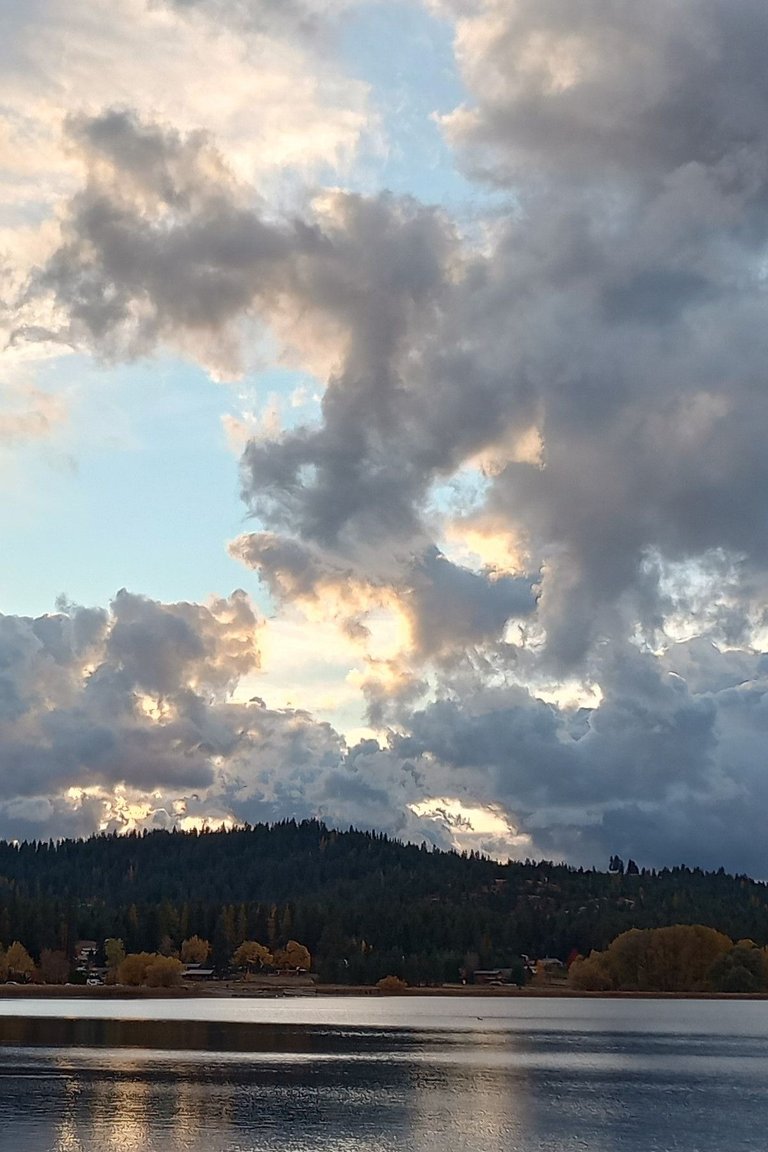
Again, the same process lets me focus on the clouds and emphasize the verticality with a portrait crop. Here, because I decided on a 2:3 ratio, I just changed the width to 1200 and left the original 1800 alone. I then made sure the image was roughly centered on the hot spot from the sun while keeping the dark blob of cloud intact on the top left.
None of this should imply you have any obligation to keep a precise pixel count and aspect ratio for any cropping or resizing. It's a good rule of thumb in my opinion, but such rules should be broken when aesthetics or practicality require. Mainly it helps me keep consistency when I have a lot of images and screenshots I want to keep orderly on a post.

Did any of this help you learn something new? Was anything left unclear after all this verbosity and jargon? Let me know what you thought of this tutorial in the comments, and if something really needs to be clarified, I'm more than happy to edit this post once shortcomings are pointed out. And what else would you like me to cover in GIMP? I could explain layers and transparency while showing how to make a meme or add watermarks, perhaps, but I am open to other suggestions, too.
One last thought I couldn't figure out how to include earlier: cell phone camera "digital zoom" is usually not a real lens adjustment, but rather just a digital crop from a hi-res photo. Just snap your pictures and crop in GIMP later and you'll probably get the same result. But feel free to test my theory, and phones with multiple lenses can capture images more than one way.

I find it amusing that I see this after messing around with gimp last night/this morning xD
was trying to figure out which of the three photo editing things I should use for this quickie job that landed on me last night, ended up being darktable mostly because I finally figured out the stupid masking tool and I wanted the masking quicker than I know how to do them in gimp
I definitely need to try this out! Just gotta find the time in my busy gramma life. Sometimes I think I should have chosen busygramma instead of scribblingramma for my handle.
Noice! You are a Gimp Wizard... which sounds really wrong... but eh.