Hello, dear friends Hivers.
I'm Zulay Pulido, Painter Apprentice, with Philosophical Thought.
“ Art is the expression of the deepest thoughts by the simplest way.” - Albert Einstein (1879 - 1955)
All the drawings in this publication are my own.
Today is Saturday, January 22, 2022.

Curso de Arte Conceptual: Lección 51 (Español – Inglés)
Hola, queridos amigos Hivers.
Soy Zulay Pulido, Aprendiz de Pintura, con Pensamiento Filosófico.
” El arte es la expresión de los más profundos pensamientos por el camino más sencillo.” - Albert Einstein (1879 - 1955)
Todos los dibujos de esta publicación son de mi autoría.
Hoy es sábado 22 de enero de 2022.
On this beautiful day, I bring you the Lesson N° 52, of my works of the Conceptual Art Course that I am doing virtually.
I continue with the Lighting works.
Every day, we are adding complexity to the assignments. The new things we do involve including everything we have seen so far and adding new fundamentals that, when we have learned, thanks to study and permanent practice, will take us to a higher level of drawing and painting.
For the time being, I must continue to reproduce more difficult scenarios, as this will give me a clear understanding of the concepts studied.
This time, we are adding a bit of realism to the objects. This is achieved by understanding that the illumination of an object is really the reflection of the light information that all the objects around it have and that bounce off it.
It is a little complicated at the beginning of the drawing; first, because I had never heard these concepts, and then, applying them requires a very orderly procedure learned with a lot of pain and effort.
Many students in the course want to throw in the towel because it requires a lot of dedication and tenacity not to give up. However, we know that the end result will bring us great enjoyment.
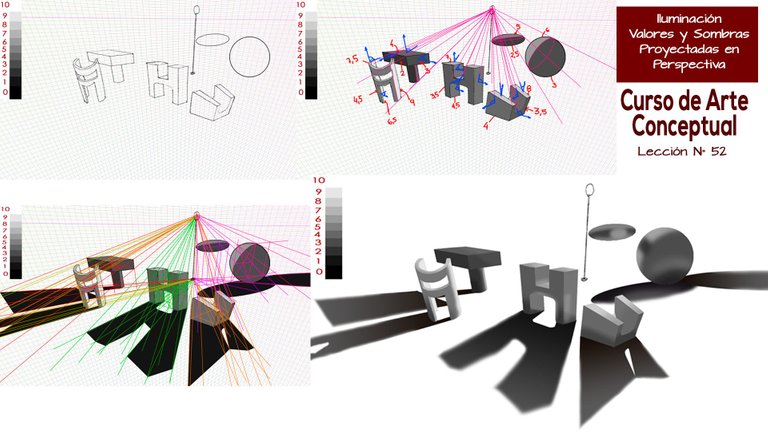
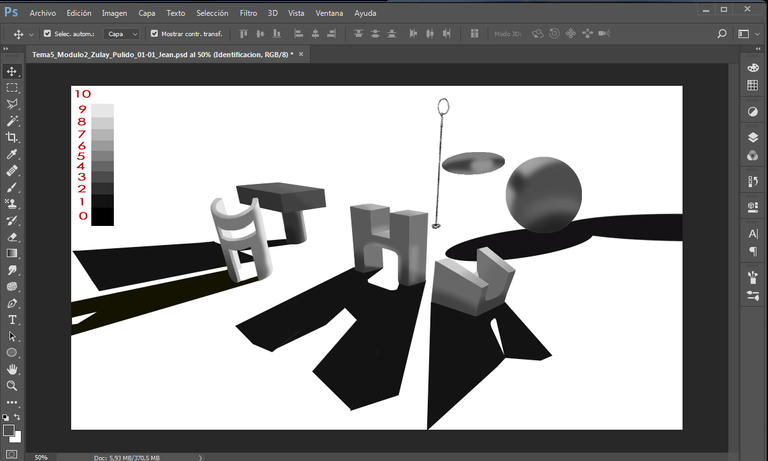
Task: Build the Lighting of a Simple Scene with Geometric Figures in Perspective and bring it to Basic Realism.
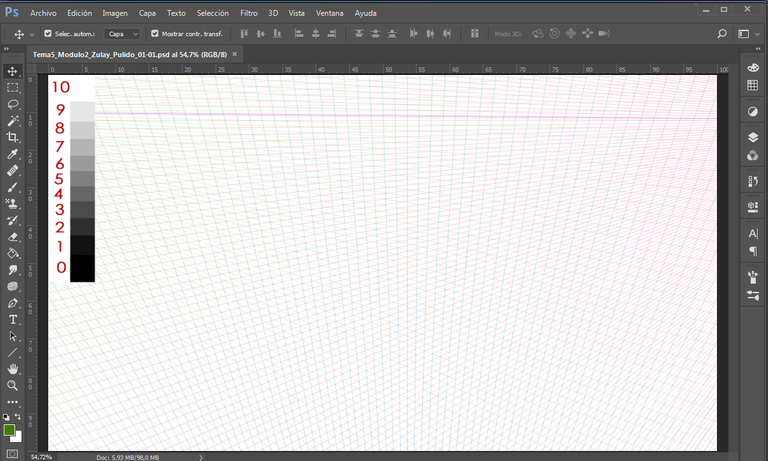
Step N° 1: Prepare a Perspective Mesh in Carapace and upload it to Photoshop and add the Grayscale.
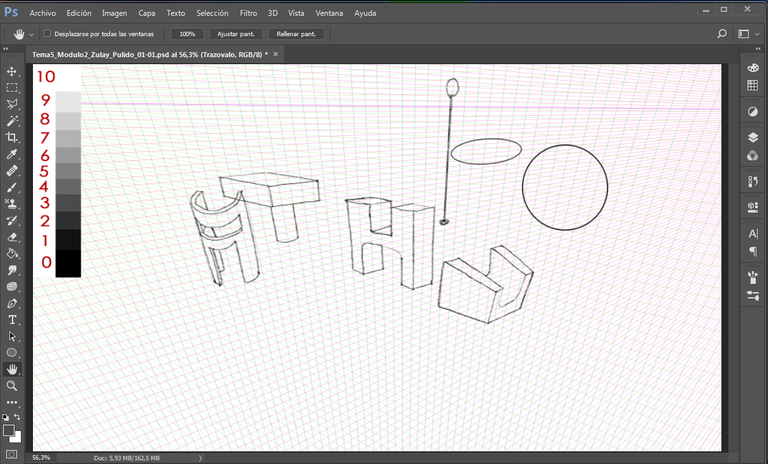
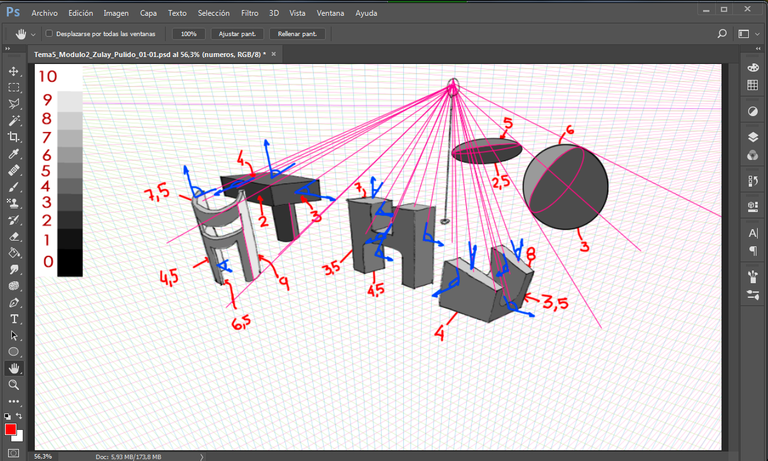
Step N° 2: Draw the outline of some geometrical figures in perfect Perspective, plus the Spotlight.
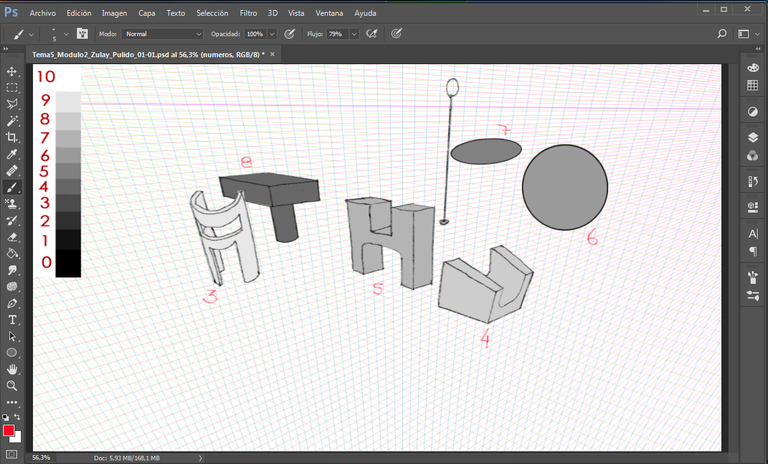
Step N° 3: Paint each element with a different Value between 0 and 10, as shown in the Scale of Values.
Step N° 4 Draw the Normals: Blue lines perpendicular to the faces of the objects. Then, draw the Light Beams, starting from the Focus to the faces of the elements. If the Angle between the Normal and the Light Ray is less than or equal to 90°, then that side will be illuminated. If the Angle between the Normal and the Light Beam is greater than 90°, that side will not receive Light. Paint the grayscale values that the pieces will carry on their light, intermediate and dark sides.
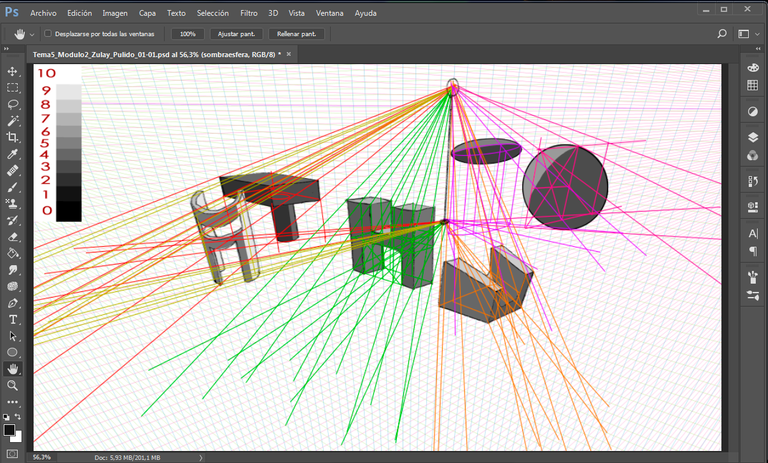
Step N° 5: Construct Triangular Planes between the Focus, the Base of the Focus and each element, to determine the location of the Shadows Cast by the objects on the side opposite to the one receiving the Light.
Step N° 6: Paint the Shadow Casting of each element.
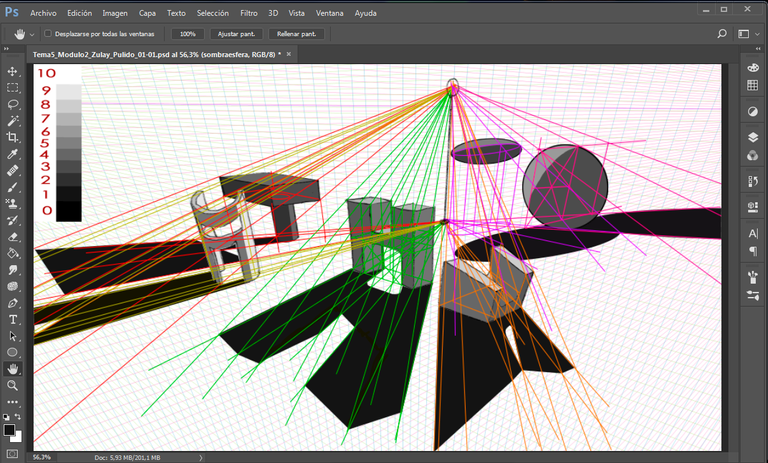
Step N° 7: Correct the Shadow Shadows Cast where necessary. Eliminate the stroke of the objects and the perspective mesh.
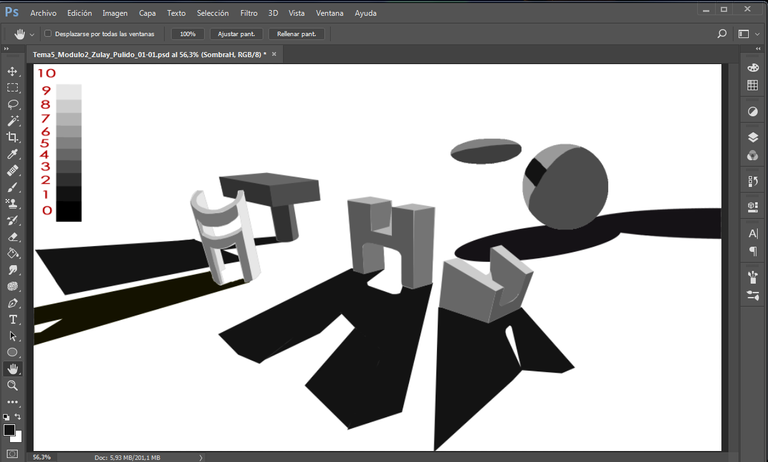
Step N° 8: Add to each object the Lighting coming from the floor and the surrounding objects.
Step N° 9: Blur the Projected Shadows.
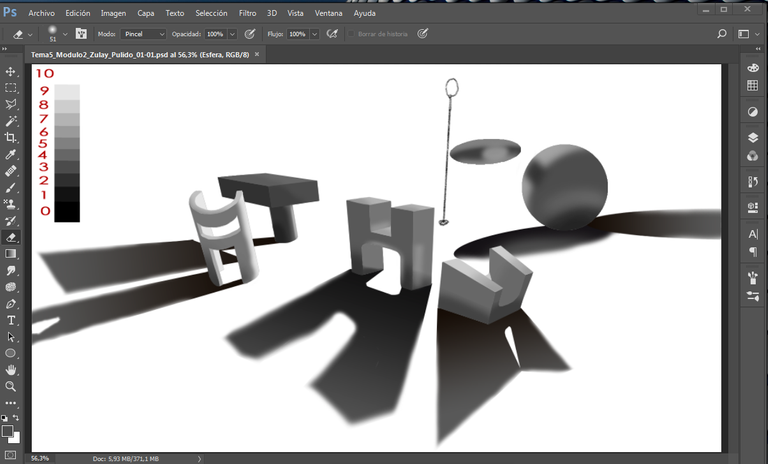
Final Presentation:
It took me eight (8) hours to do this job.
This task was done in Photoshop 2017 with my Star 03 V2 XP-PEN Graphics Tablet.
I hope it is of interest and benefit.
If you would like to visit the above lesson, you can use the following link: Go to Lesson N° 51.
En este bello día, les brindo la Lección N° 52, de mis trabajos del Curso de Arte Conceptual que estoy realizando de forma virtual.
Continúo con los trabajos de Iluminación.
Cada día, vamos agregando complejidad a las tareas. Lo nuevo que hacemos implica incluir todo lo visto hasta ahora, y sumarle nuevos fundamentos que, cuando hayamos aprendido, gracias al estudio y la práctica permanente, nos llevarán a un nivel superior de dibujo y pintura.
Por los momentos, debo seguir reproduciendo escenarios más difíciles, ya que eso me dará el entendimiento claro de los conceptos estudiados.
En esta oportunidad, le estamos agregando un poco de realismo a los objetos. Eso se consigue al comprender que la iluminación de un objeto es, realmente, el reflejo de la información de luz que tienen todos los objetos a su alrededor y que rebotan él.
Es un poco complicado al inicio del dibujo; primero, porque nunca había escuchado esos conceptos, y luego, aplicarlos requiere de un procedimiento muy ordenado y aprendido con mucho dolor y esfuerzo.
Muchos estudiantes en el curso quieren tirar la toalla, pues se requiere de muchísima dedicación y tenacidad para no desistir. Sin embargo, sabemos que el resultado final nos traerá gran disfrute.
Tarea: Construir la Iluminación de una Escena Simple con Figuras Geométricas en Perspectiva y llevarlo a Realismo Básico.
Paso N° 1: Preparar una Malla de Perspectiva en Carapace y subirla a Photoshop y agregarle la Escala de Grises.
Paso N° 2: Dibujar el trazo de algunas figuras geométricas en perfecta Perspectiva , además del Foco de Luz.
Paso N° 3: Pintar cada elemento con un Valor diferente entre 0 y 10, tal cual se muestra en la Escala de Valores.
Paso N° 4 Trazar las Normales: Líneas azules perpendiculares a las caras de los objetos. Luego, dibujar los Rayos de Luz, partiendo del Foco a las caras de los elementos. Si el Ángulo entre la Normal y el Rayo de Luz es menor o igual a 90°, entonces ese lado se iluminará. Si el Ángulo entre la Normal y el Rayo de Luz es mayor a 90°, ese lado no recibirá Luz. Pintar los valores de la escala de grises que llevarán las piezas en sus lados iluminados, intermedios y oscuros.
Paso N° 5: Construir Planos Triangulares entre el Foco, la Base del Foco y cada elemento, para determinar la ubicación de las Sombras Proyectadas por los objetos en el lado contrario al que reciben la Luz.
Paso N° 6: Pintar las Sombras Proyectadas de cada elemento.
Paso N° 7: Corregir las Sombras Proyectadas donde sea necesario. Eliminar el trazo de los objetos y la malla de perspectiva.
Paso N° 8: Agregar a cada objeto la Iluminación proveniente del piso y de los objetos aledaños.
Paso N° 9: Difuminar las Sombras Proyectadas.
Presentación Final:
Hacer este trabajo me tomó ocho (8) horas.
Esta tarea fue realizada en Photoshop 2017 con mi Tableta Gráfica Star 03 V2 XP-PEN.
Espero que sea de tu interés y beneficio.
Si deseas visitar la lección anterior, puedes utilizar el siguiente enlace: Ir a la Lección N° 51
Mis Redes Sociales personales son:
Facebook: https://www.facebook.com/zupulido,
y Twitter: https://twitter.com/zupulido, pero no las uso con frecuencia.
Sin embargo, las de la FAVTachira,
Facebook: https://www.facebook.com/FAVTachira/,
Twiiter: https://twitter.com/favtachira
e Instagram: https://www.instagram.com/favtachira/,
sí se actualizan constantemente.
If you liked this post, I thank you for leaving your kind comment and some recommendations to improve my work.
Remember, you can find me at https://hive.blog/@librepensadora
Greetings from Venezuela, a country with Great Drawers.
Si te gustó esta publicación, te agradezco dejar tu gentil comentario y algunas recomendaciones para mejorar mi trabajo.
Recuerda, puedes encontrarme en https://hive.blog/@librepensadora
Un saludo desde Venezuela, un país con Grandes Dibujantes.
Welcome dear friend.
I recommend you join the @theterminal Community, the best option that exists in Hive, specialized in teaching the most advanced techniques and methods of creating quality articles. That will undoubtedly serve you throughout your journey through this important Blockchain.
If you want to be part of this great initiative, you just have to contact via Discord to @brittandjosie or @justclickindiva
Bienvenido, querido amigo.
Te recomiendo unirte a la Comunidad @theterminal , la mejor opción que existe en Hive, especializada en la enseñanza de las más aventajadas técnicas y métodos de creación de artículos de calidad. Eso te servirá, indiscutiblemente, en todo tu trayecto por esta importante Blockchain.
Si deseas formar parte de esa grandiosa iniciativa, solo tienes que contactar, a través de Discord, a @brittandjosie o @justclickindiva


The rewards earned on this comment will go directly to the person sharing the post on Twitter as long as they are registered with @poshtoken. Sign up at https://hiveposh.com.
Thank you very much, friends of @poshtoken
I also like drawing very much. I learned a lot from your post. Thanks for sharing 😊
Hi, friend @be-alysha
It gives me great pleasure to have you on my blog and that you leave your nice message.
I hope to be useful to you.
Best regards
Hola @librepensadora, visitando tu publicación. Yo soy una aficionada del arte digital y aunque no tengo la experticia técnica; está muy bien trabajada y desarrollada tu publicación. Maravillosos que tus saberes los compartas y aportando calidad y originalidad a nuestra plataforma. Trataré de seguir tus publicaciones, serán fortalezas en mi aprendizaje.
Que tengas una feliz semana
Hola, amiga @marilour
Es bueno saber que también trabajas el Arte Digital.
Espero poder servirte con mis tareas.
Deseo que tengas muchísimo éxito en Hive.
Un gran abrazo
Your content has been voted as a part of Encouragement program. Keep up the good work!
Use Ecency daily to boost your growth on platform!
Support Ecency
Vote for new Proposal
Delegate HP and earn more
Hi, friends of @ecency
I am very grateful for your great curation work.
Have a Big Hug