
In this post i'll show you a step by step drawing of Rembrandt's eye, using the flow of form to produce a painterly effect with charcoal. This is great study to practise form & structure to improve your drawing skills. I sometimes come back to this when i feel like i've 'lost it' and need to get back into the motion of drawing well.
Have a read and try it yourself or skip all my words and just enjoy the pictures! If you like it and it helps you, please let me know in the comments and votes etc and i'll try to put some more guides together in the future.
Thanks for reading and enjoy!
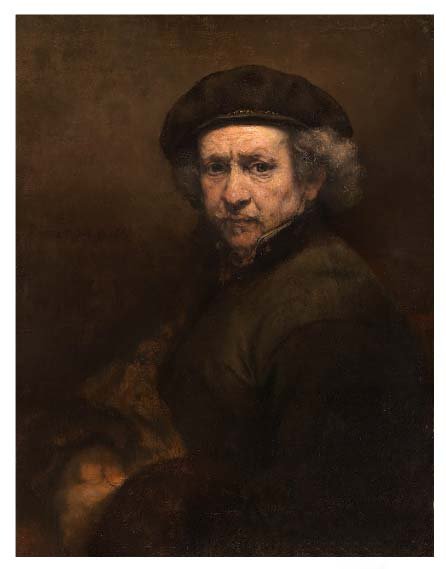
The Master Painting
Painted in 1659 and currently on display at National Gallery of Art, Washington, DC. This self-portrait painted in his later life just 7 years before his death shows Rembrandt at his finest. His skill at loading the brush with paint and placing it just right has come from decades of practise and work. From a distance the portraits have texture and life but it's what he's doing up close that we want to focus on today...
https://www.google.com/culturalinstitute/beta/asset/self-portrait/-gHQe8vbiHn2xw?hl=de
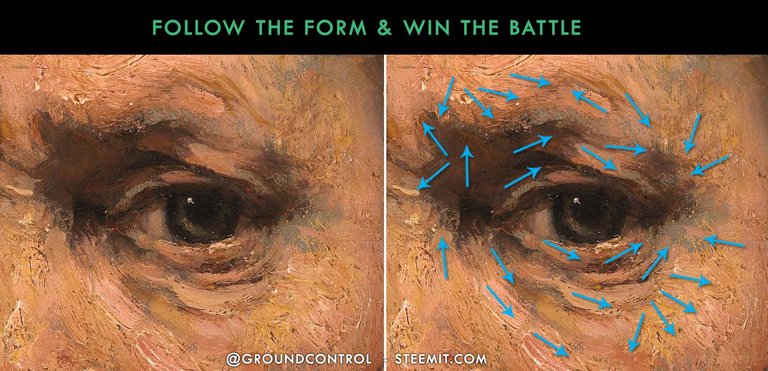
A Closer Look At The Eye
What we want to focus on is the way Rembrandt would move the paint in the direction of the form he was painting.
By following the forms of the eye socket, the weight of ageing skin and the darker recesses, he's able to achieve amazing detail with very little brush work. You can see the grey under painting of which he's laid his flesh tones so precisely he's able to achieve likeness, form, texture and light in a single stroke. By following the form and direction of what your trying to reproduce is how you win the battle in achieving likeness.
Lets Begin The Study
You don't have to use the exact same items but they aren't expensive to pick up at the art store or online.
1. Charcoal - I used a General's Charcoal Pencil in 2B Medium
2. White - Stabilo CarbOthello Titanium White (100) and/or General's White charcoal
3. Stabilo Mars Rasor - a rubber pencil that gives great control over removing charcoal
4. Paper Stump & kitchen towel paper to help move the charcoal around. Fingers tend to get oily and messy, using paper is much better.
5. Surface - Strathmore's Bristol Vellum 400 or 500. This paper has a great tooth that really supports charcoal while also allowing it to move freely. It's fairly cheap paper for the quality. There's two kinds of Bristol, smooth and Vellum - for charcoal you want the Vellum kind.

Charcoal has a very similar feel to oil paint. It's easy to move around and build up so it's a great medium to practise with. The skills you develop with charcoal will translate to painting and help you improve greatly. (Plus it's cheap!).
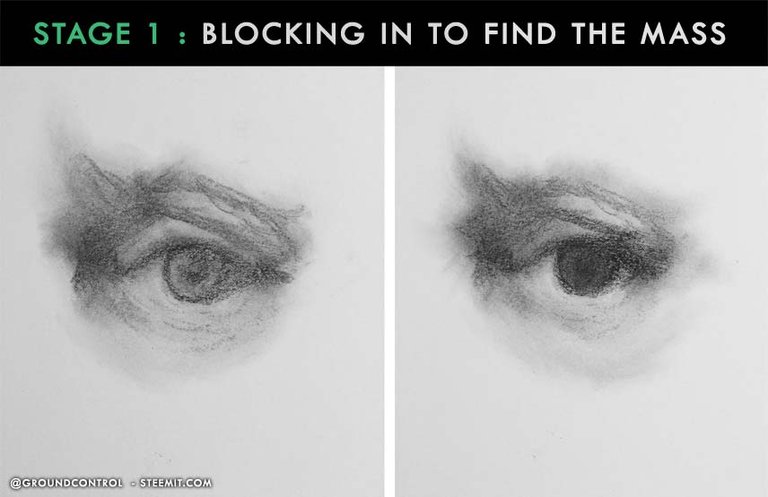
Stage 1 - Blocking in the mass
The first step is to take a look at what your drawing, squint your eyes and just focus on where the dark masses sit. This will help you ignore all the little details that can get in the way - we don't need to focus on them yet. If you ever get lost when trying to draw a likeness remember to SQUINT! Your mother may have told you to stop squinting because you'll get wrinkles but that's just the price we'll have to pay!
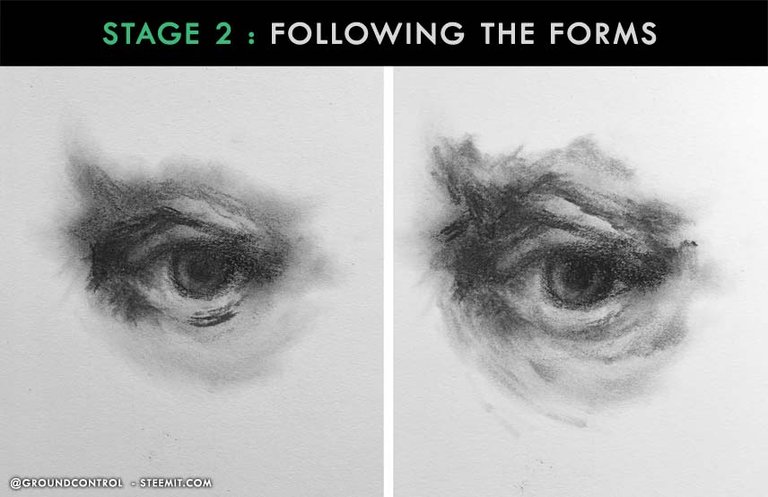
Stage 2 - Following the Forms
Using the charcoal pencil, look for the direction of the form and add a mark. If need be, push and spread it with the paper stump. We're still finding form and laying in mass so don't go too dark. Dark strokes are harder to remove if you make a mistake. Build up to them slowly. Remember to start light and blurry and finish dark and sharp.
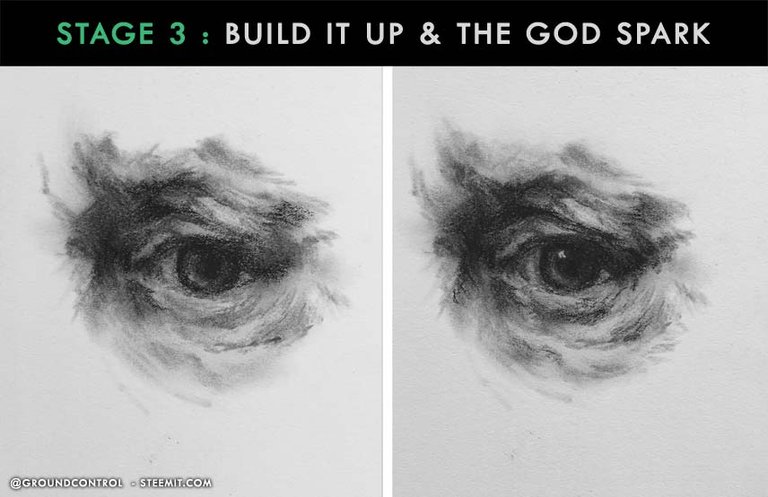
Stage 3 - Build it Up & The God Spark
Continue following the forms, building up mass and tone. Work light to dark, only adding sharp strokes when your happy with the underlying form you made.
The God Spark is a term used for adding that little white dot in an eye. It's a very important element to a portrait, it's called the God Spark because once you add it - the eye comes to life, without it we're looking at a zombie! Be careful where you place it, it's position relates to the shape of the eye ball and represents a curvature thats reflecting light back at the viewer. Where you place the "God Spark" will determine which direction the eye is looking.
Final Touches
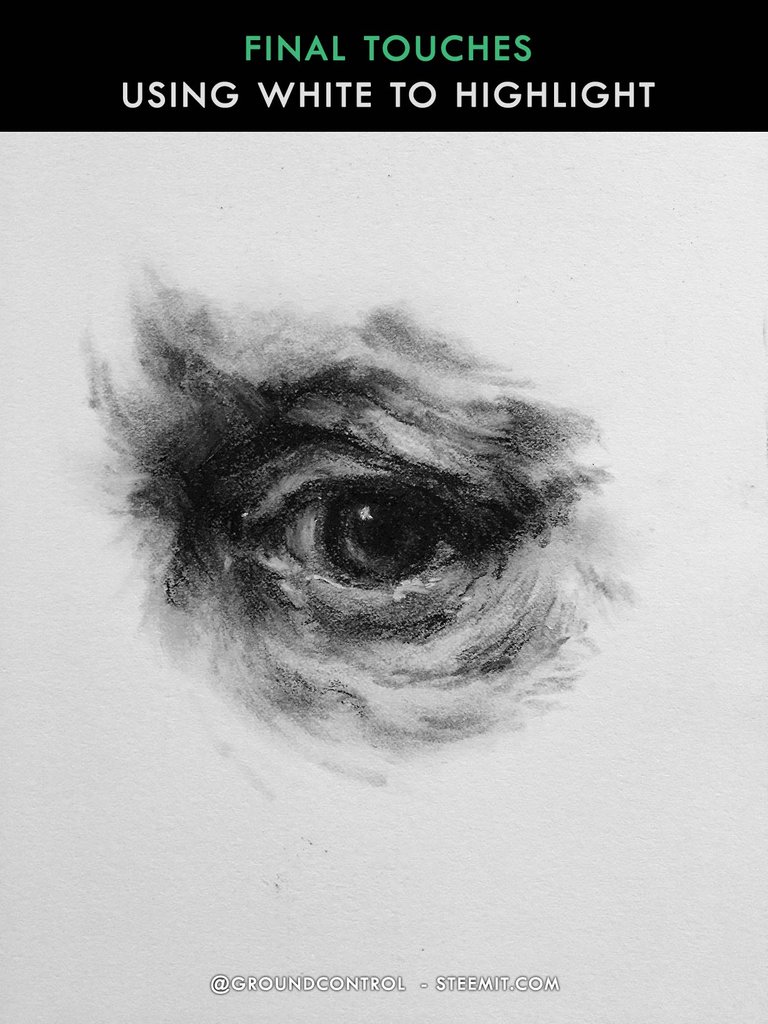
Now we're happy with the charcoal work, we have a nice representation of an eye and we've learnt a lot about the form and structure by following Rembrandt's brush strokes. The final touches are to use the white to add a few highlights that are bit to hard to achieve with the eraser. It's not easy to add white on charcoal, it tends to go grey so use it sparingly.
And here it is, a study of Rembrandt's eye in charcoal in which we used the skills of a grand master to learn about form and flow to achieve shape and body to create a likeness.

Excellent tutorial
Thanks mate, checked and following your work. Impressive airbursh art - that stuff is hard to do!
Cheers. Yeah it can get really frustrating at times but it's worth the effort
click here!This post received a 2.8% upvote from @randowhale thanks to @groundcontrol! For more information,
Thank you @randowhale
You are AMAZING!!!
I am in love with your works! I will try to learn from your lessons! Thank you!